


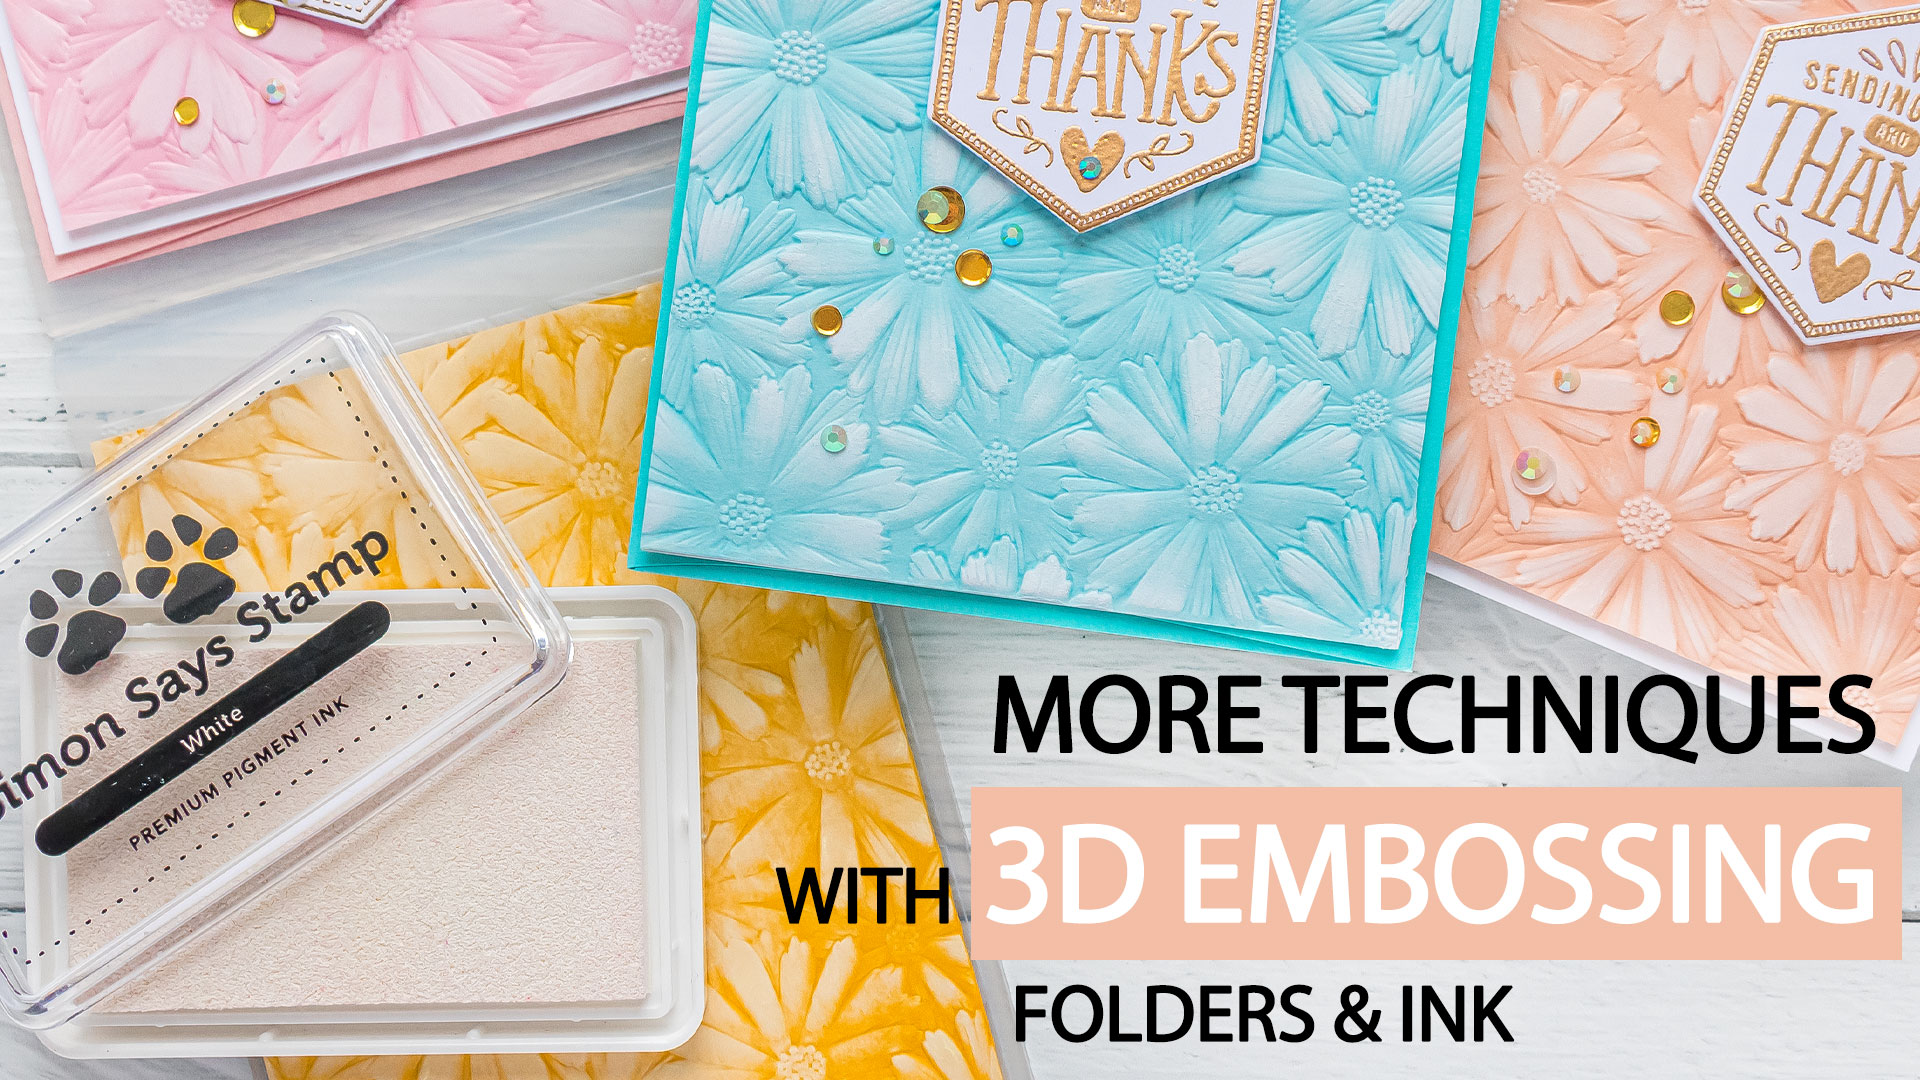
Hello, friends! Yesterday I shared a video featuring Simon Says Stamp new embossing folders and I showed you one of the techniques to use with these folders to add ink to your embossed designs – a pigment ink technique where you ink up the embossing folder itself and use it to print the ink onto the paper. Do watch that video if you missed it, it is a fun one.
Today I have another embossing folder technique to share that gives us beautiful colorful results. Unlike the previous video, for this technique, we will need colored cardstock and white pigment ink.

Like this project? Pin it and save for later | Curious about my project photography? Click for details.
VIDEO TUTORIAL
Watch the video below or on my Youtube channel.
Like this video? Please give it a big thumbs up (you can do this on Youtube video page right under the video) and share it with a crafty friend! Leave me a comment too, I love hearing from you!
CARD DETAILS

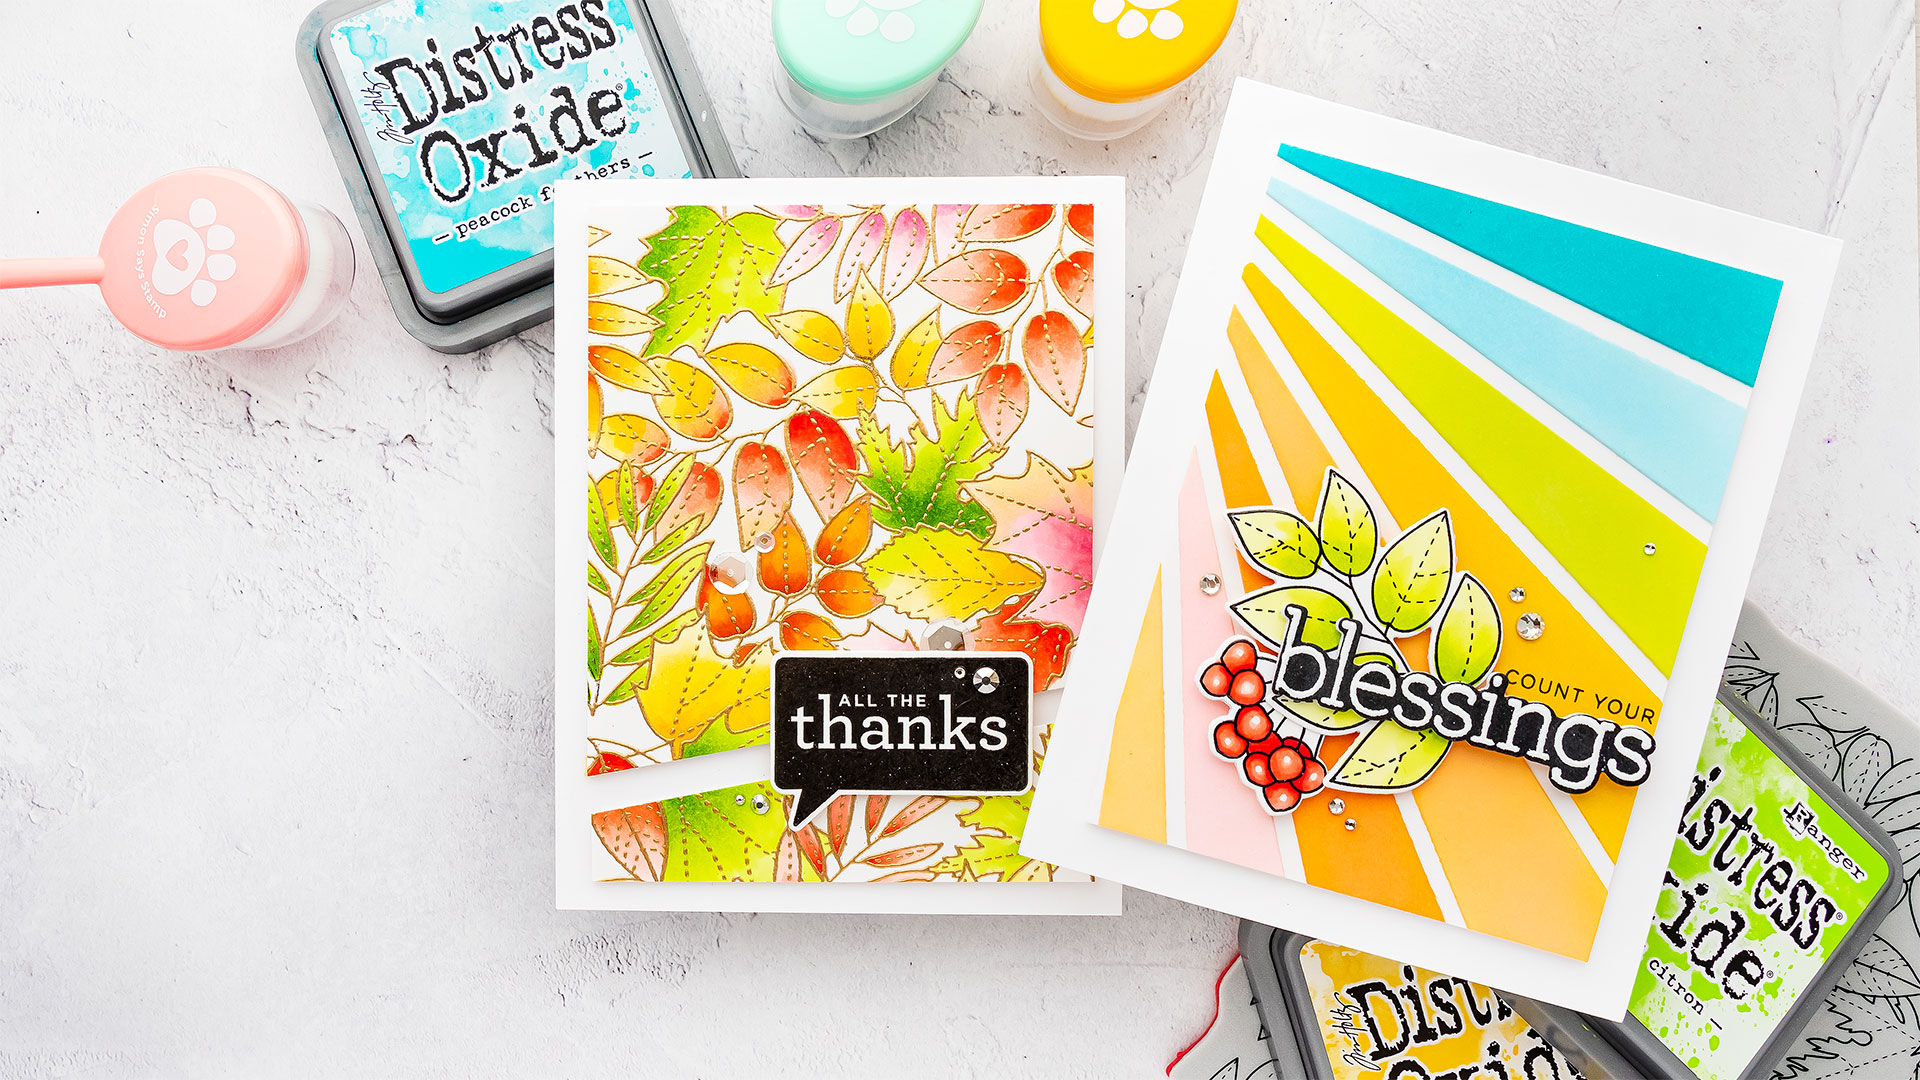
The embossing folder I used is Floral Field from Simon Says Stamp and it is a stunning all-over design. Here are a few tips to keep in mind when working with embossing folders:
-
- Use smooth cardstock (do not use textured cardstock).
- Thicker cardstock works best as it can hold the design better and it shows more detail once embossed.
I like Simon Says Stamp and Hero Arts colored cardstock for dry embossing, it is nice and thick and works splendidly for this technique.
- Mist the paper with water before embossing. This will allow the paper fibers to stretch and will give you deeper embossed results with more detail.
I like to mist my paper on both sides and I can even use my fingers to spread the water droplets across the panel to equally saturate it with moisture. You don’t need to add too much water, just a bit to let those fibers move.
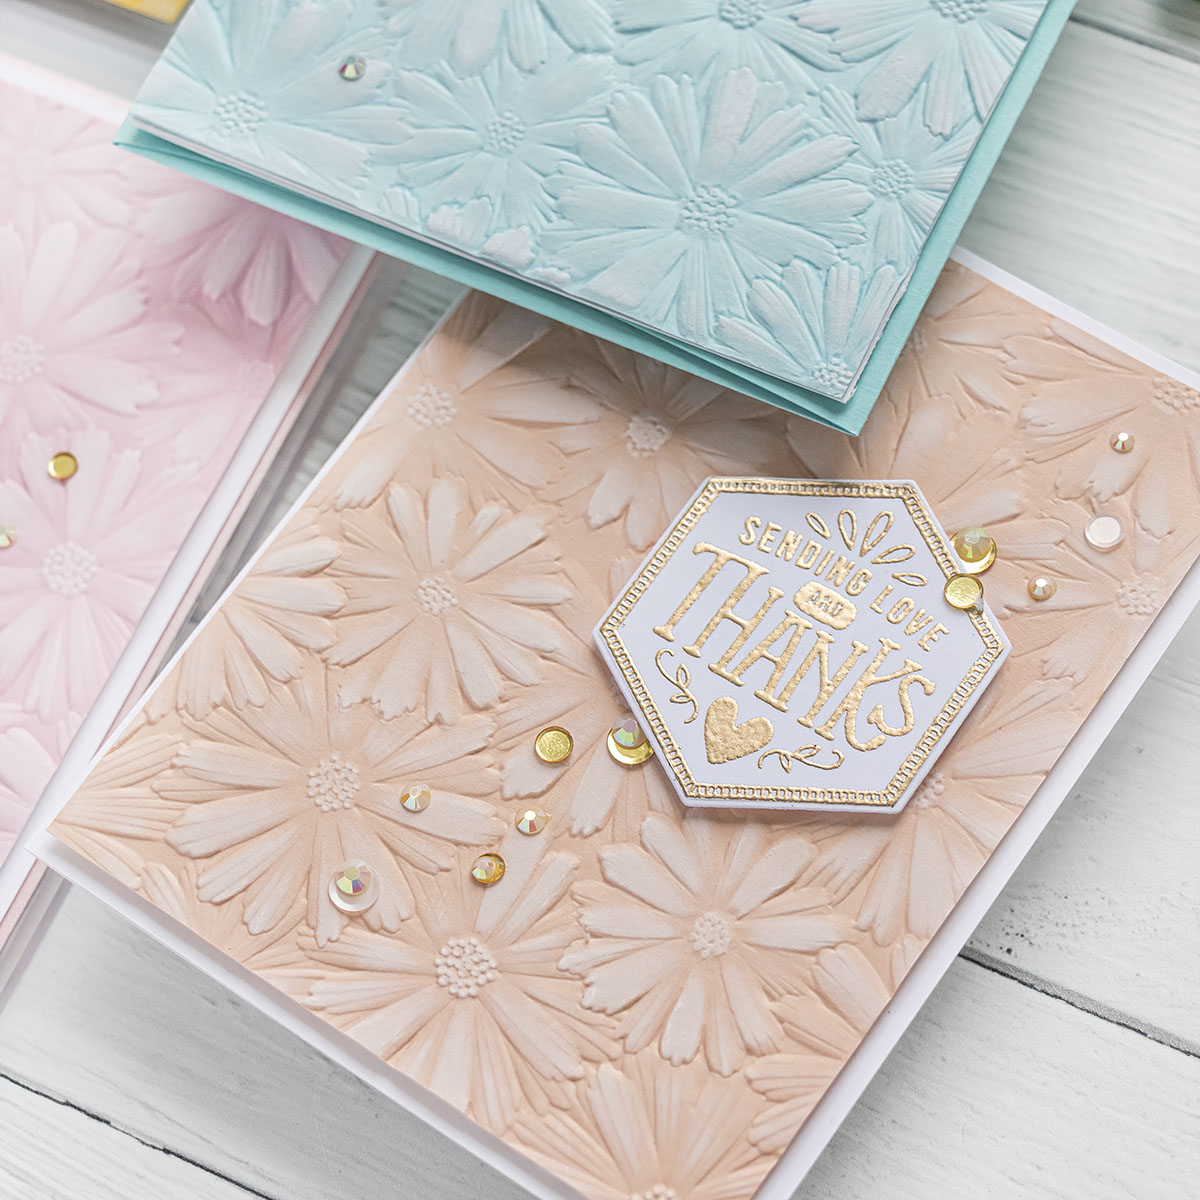
I used various colors of colored cardstock to emboss this design. I was in the mood to play and wanted to create pretty backgrounds for my cards.
WHITE PIGMENT INK TECHNIQUE
When you emboss your designs on colored cardstock, you can use white pigment ink to add details to the embossing.
I used white pigment ink from Simon Says Stamp, you can also use other white pigment ink pads, one from Hero Arts is just as good.
Hold your ink pad parallel to the paper and gently rub this ink pad over the surface of the paper to add white pigment ink onto the raised embossed areas. Do not press hard, simply gently rub the paper. You can press harder if you like, but you might cover up the embossed details too much, so I suggest you go light handed first and if you feel you want more ink – add more ink later. You can always add more, but you can’t remove the ink once you’ve added it and you feel you’ve added too much.

I’ve found I prefer the light color cardstock best, I like the softness of the light color cardstock and white pigment ink, but it is a matter of personal preference, and you might like the dark backgrounds more.
ADD A SPIN TO THIS TECHNIQUE
You can also add a spin to this technique and instead of using white pigment ink, use colored pigment ink. For example, dark pink pigment ink on a light pink cardstock panel. This is just something extra for you to try.
I picked using white pigment ink as it is the most universal and I feel like everyone has a white pigment ink in their stash now, plus it can be used for so many different techniques. It is a true staple to have.
I kept on playing with my embossing folder and various types of cardstock. I also explored new 130lb cardstock from Simon and it worked perfectly for this technique, provided you sprayed it with water beforehand. I also tried something different – I experimented using colored ink pads to color the background. I used pigment ink and also later dye ink. I used the same application method as I did with the white ink pad, but this time I was applying color. I didn’t quite like the finished result, maybe I needed to try other colors of ink, but I still wanted to show you the process (watch the video) and this idea in case it inspired you to give it a try in your craft room.
FINISHED CARDS
I used several backgrounds to make quick and easy greeting cards – I trimmed some backgrounds to 4 x 5 1/4” and foam mounted to A2 white card bases. The blue background was adhered as it. I also heat embossed beautiful hexagon sentiments using Simon’s Antique Gold embossing powder and Hexagon Greetings stamp set. Finally, I embellished my cards with gold sequins and white jewels!
BLOG HOP

Use code SPGKN7 for a free Speckled Egg Mini Distress Ink Pad! This promotion will expire 11/8 at 11:59 pm EST.
If you arrived from Amanda Korotkova, the next stop on this hop is Lisa Addesa. Start over at the Simon Says Stamp Blog.
GIVEAWAY
We’re giving away a $25 coupon to every stop on the hop from your blog comment section. We’ll choose your winners over the weekend and post on our Simon Says Stamp blog on Wednesday, the 11th of November.
SUPPLIES
I’m listing the products I used below. Click on the link to go directly to the product. Where available I use compensated affiliate links which means if you make a purchase I receive a small commission at no extra cost to you. Thank you so much for your support!
 Simon Says Stamp Embossing Folder Floral Field Shop at: SSS |
 Simon Says Clear Stamps Hexagon Greetings Shop at: SSS |
 Simon Says Stamps and Dies Hexagon Greetings Shop at: SSS |
 Simon Says Stamp Hexagon Greetings Wafer Die Shop at: SSS |
 Simon Says Stamp Mega Thick White Cardstock 130# Shop at: SSS |
 Simon Says Stamp Cardstock Shop at: SSS |
 Hero Arts Hero Hues Cardstock Shop at: SSS |
 Neenah 110 Lb Solar White Cardstock Shop at: SSS |
 Spellbinders Platinum 6 Die Cutting Machine Shop at: SSS |
 Spellbinders Deep Sea Die Cutting Machine Shop at: SSS |
 Mini Misti Stamping Tool Shop at: SSS |
 Hero Arts Water Mist Spray Bottle Mister Shop at: SSS |
 Simon Says Stamp White Pigment Ink Pad Shop at: SSS |
 Hero Arts Clear Embossing & Watermark Ink Shop at: SSS |
 EK Success Powder Tool Applicator Shop at: SSS |
 Simon Says Stamp Antique Gold Embossing Powder Shop at: SSS |
 Hero Arts Heat Embossing Gun Shop at: SSS |
 Tonic Studios 8.5 Inch Paper Trimmer Shop at: SSS |
 White Fun Foam 12 Pack 9 x 12 Shop at: SSS |
 Crystal Ninja Crystal Katana Pick Up Tool Shop at: SSS |
 Simon Says Stamp Big Momma Foam Tape Roll Shop at: SSS |
 Simon Says Stamp Craft Tacky Glue Shop at: SSS |
What a stunning card!
These colors are so pretty and I love the white ink technique!! Thank-you for sharing – so inspiring!
The embossing folders and the gorgeous colors are terrific.
These cards are sooooooo pretty! I can’t wait to get this embossing folder. I ordered it yesterday and your cards have made me impatient to receive my order LOL! Thanks so much for the wonderful inspiration and the great technique idea for the white pigment ink.
What beautiful cards. Love the technique and some great tips.
when i first saw that folder i didn’t care for it, but after seeing you use it like like it looks so lovely
I love what you did with the embossing folders!
Beautiful cards! Thanks for sharing.
What a lovely, delicate effect you have achieved.
I love the Forest Border and Fall Foliage embossing folders. Great idea for using white pigment ink.
I went to look at your video in youtube and I get in the youtube rabbit hole! LOL!!! Lovely technique!
— Dalis
Fantastic cards, great tips for getting a good impression on the cardstock.
Very elegant!
Beautiful soft cards. So many ways to use these new embossing folders. Can’t wait!
The embossing folders are wonderful!!!
Such fun inspiration along this hope.
Spectacular cards!
These new embossing folders look like so much fun!
Thanks for the inspiration.
I love how soft and subtle these cards are. Beautiful!
These turned out so beautiful!! I love that you tried (and shared) so many colors. They are so, so pretty, who knew how the white ink could add SO much!!! TY
Gorgeous cards and colors!
These are gorgeous!
Gorgeous! Love all the texture!
Oh these are beautiful cards! Love that amazing Floral Field embossing folder!
White on colored paper – so simply, but so stunning! Nice.
These are so beautiful. I love this technique and quite often use it for sympathy cards. I enjoy your creations so much.
Beautiful cards! Love the colors you used along with this gorgeous embossing folder!
Yana, these cards are so pretty! The simplicity and elegance you achieved with these limited products is stunning. Thank you for sharing.
Wow, this is beautiful Yana. I do love the light colored cardstock a lot.
Wow what a fabulous technique, I will definitely give this a go. Thank you.
Beautiful cards. Love that 3D embossing folder and the technique.
Gorgeous cards! That embossing folder in my favorite must have!!!!
Thanks so much for sharing this beautiful technique. I ordered that embossing folder yesterday when I first saw it. I can’t wait to get it and give this a try.
Lovely cards, Yana…thank you for the great tips and techniques!
This is a wonderful technique using a 3D embossing folder. Thanks for the tip to spray the cardstock first. Using the white pigment ink pad gently over top gives it such lovely soft detail.
Another great technique. Gorgeous cards.
Your cards are so pretty. I didn’t think I needed that embossing folder but after seeing your cards…
Stunning cards! The new 3D embossing folders are a great addition, the daisies are gorgeous!
Oh, the daisies are so sweet and happy. I love the different colors you chose.
Definitely watching the video! Beautiful job! Thanks for sharing your creativity!
So pretty and not too complicated! Love them.
They look so fancy with the embossing! I love it.
These are really Beautiful!!! I love these folders!!
So pretty!
Thanks for sharing these gorgeous embossed cards with us and the great tips to make our own!
Great to get such a lovely idea for white pigment ink as I hardly use mine.
What a great video packed with helpful and useful information! A wonderful technique that I will have to try! Your cards are lovely! I love the look of the embossed card with the white pigment ink. Thank you very much. Happy holidays!
I love the look of these cards, so pretty. The addition of the white ink over the card makes them so soft looking. The would be great thank you cards any time of the year depending on the color of cardstock you pick. Great job!
Gorgeous cards. I love these folders.
Stunning! Love these cards 🙂 thank you for the inspiration
Such pretty cards. This is a great techeque to try and you gave some good tips to help.