




Hello, crafty friends! If you still need a few Christmas cards, I hope this elegant but approachable wreath design inspires you to create.
Video Tutorial
Watch the video tutorial below to see how the Happiest Holidays sentiment was hot foiled, how the layered wreath and small decorations were assembled, and how white splatter and sparkling grit paste transformed the clean wreath into a snowy outdoor design.
Complete Project Snapshot
| Project type | Handmade Christmas card |
|---|---|
| Occasion | Christmas and winter holidays |
| Skill level | Beginner to intermediate |
| Approximate time | 30 Minutes |
| Finished size | 5 x 7″ |
| Card panel | 4 3/4 x 6 3/4″ |
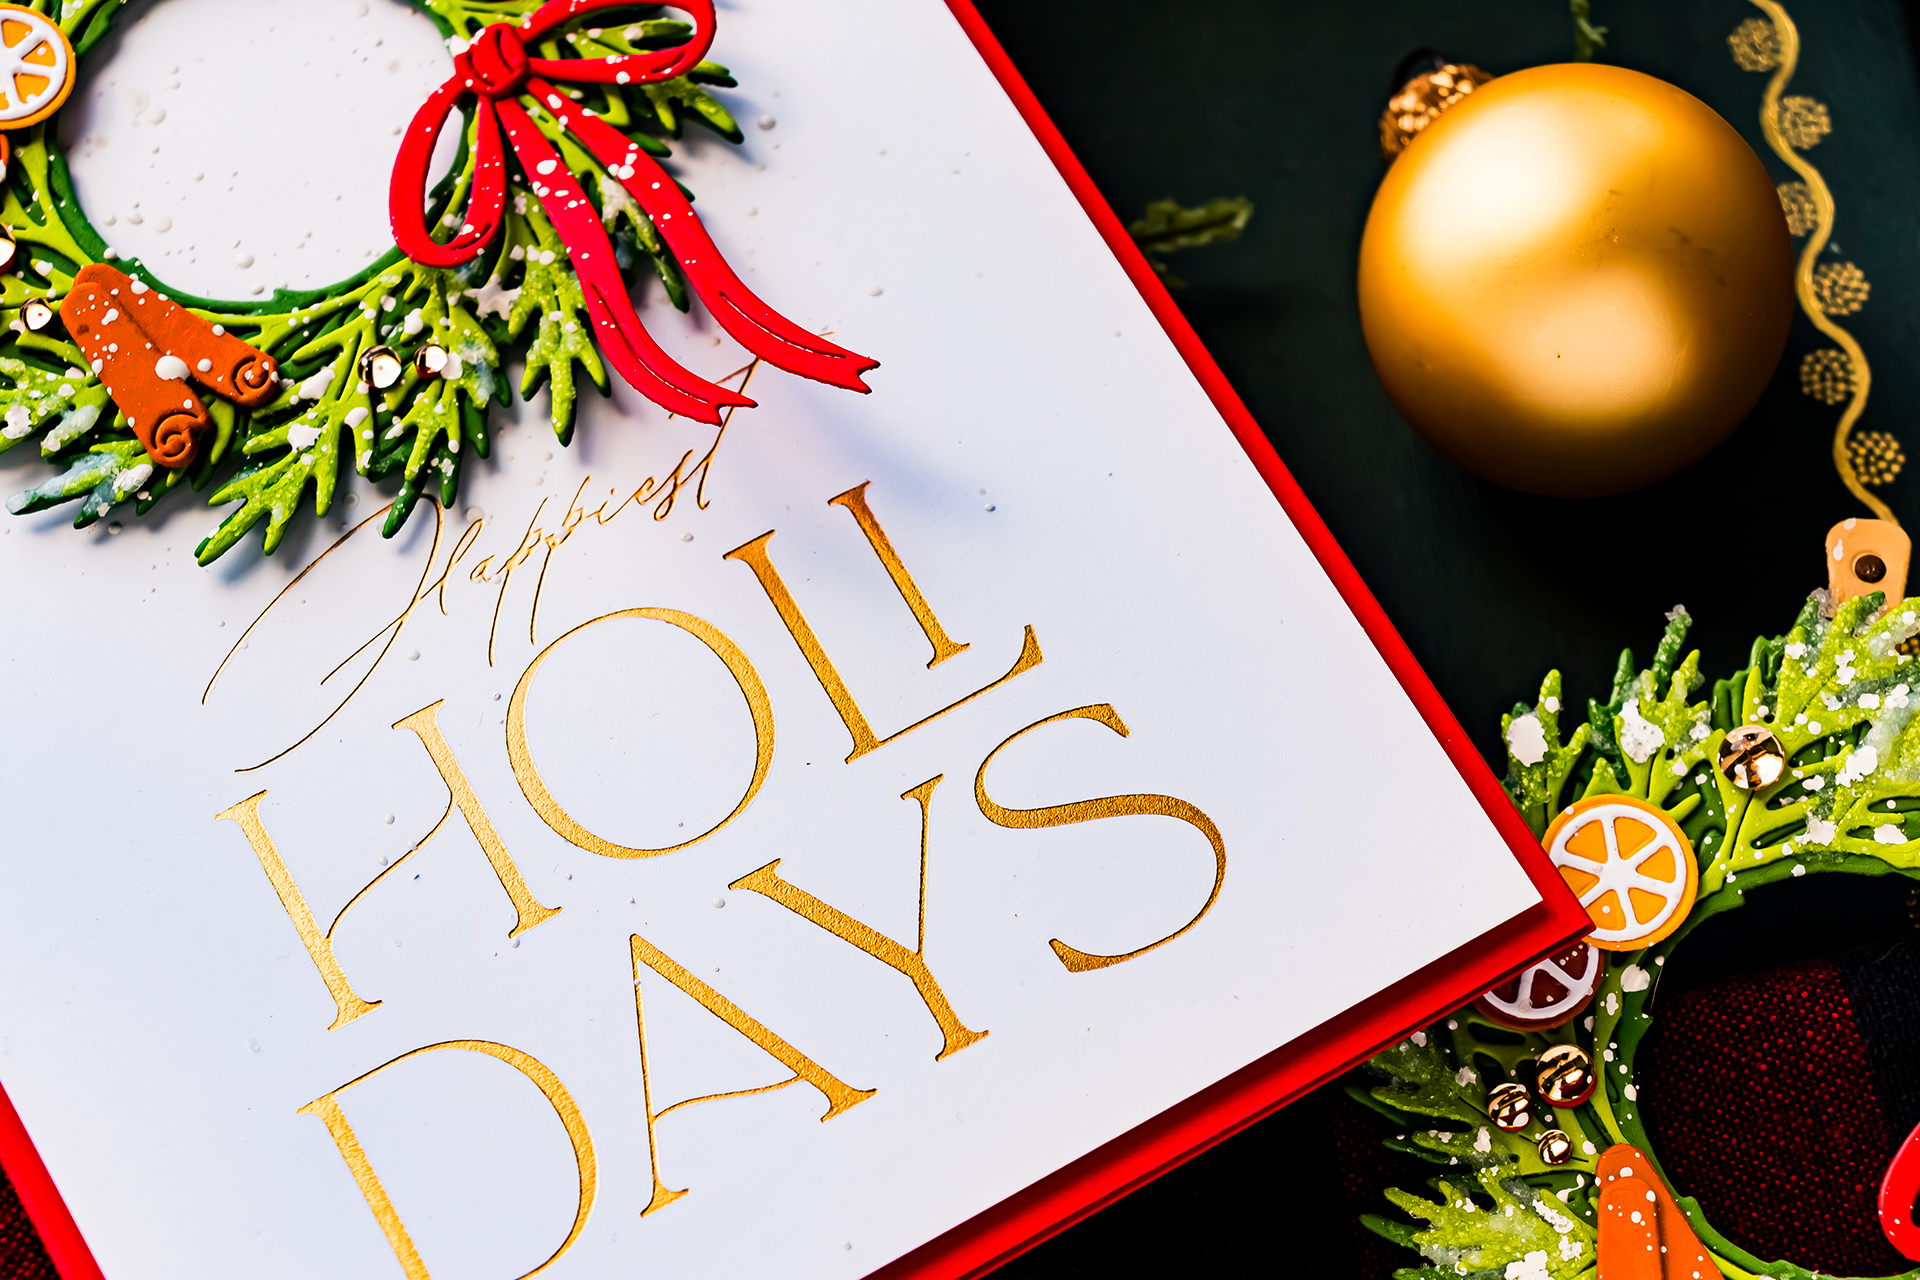
| Design and background | Layered holiday wreath on a clean white background with a large foiled sentiment |
| Techniques | Hot foiling, layered die cutting, dimensional assembly, white splatter, and dimensional snow texture |
| Featured products | Happiest Holidays Registration Press Plate Set and Hero Arts Winter Wreath Die Set |
| Machines and systems | Glimmer Hot Foil System and a compatible die-cutting machine |
| Color palette | White, dark green, light green, red, warm brown, orange, yellow, and satin metallic gold |
| Dimension and finish | Layered cardstock, thin foam adhesive, gems, opaque white splatter, sparkling grit paste, and metallic foil |
| Optional technique | Press the sentiment with ink using the BetterPress Letterpress System instead of hot foiling it |
What You’ll Need
Featured Press Plate and Dies
- Happiest Holidays Registration Press Plate Set from the City Holiday Collection by Yana Smakula
- Hero Arts Winter Wreath Bundle or the individual Winter Wreath Die Set used in the video
Cardstock
- Spellbinders Fern ColorWheel Cardstock
- Spellbinders Rainforest ColorWheel Cardstock
- Spellbinders Poppy ColorWheel Cardstock
- Spellbinders Fawn ColorWheel Cardstock
- Spellbinders Truffle ColorWheel Cardstock
- Spellbinders Terra Cotta ColorWheel Cardstock
- Spellbinders Saffron ColorWheel Cardstock
Foil and Hot Foiling Supplies
- Satin Metallic Hot Foil
- Glimmer Hot Foil System
- Compatible die-cutting machine
Embellishments and Snow Supplies
- Pinkfresh Studio Clear Drops: Champagne
- Spellbinders Splatter White Opaque Watercolor
- Tim Holtz Distress Grit Paste – Snowfall
- Water brush or regular paintbrush
- Small detail brush – size 2 was used in the video
- Spellbinders Tool ’N One or another pickup tool
How to Make a Snowy Christmas Wreath Card
Step 1 – Hot Foil the Happiest Holidays Sentiment
Start by hot foiling the large “Happiest Holidays” sentiment onto white cardstock with Satin Metallic Hot Foil. This warm metallic finish adds elegance while remaining soft enough to coordinate with the natural colors of the wreath.
The Happiest Holidays Registration Press Plate Set contains separate elements that can be combined to create a multicolor design. The main sentiment plate also works beautifully by itself, which is how we are using it for this project.
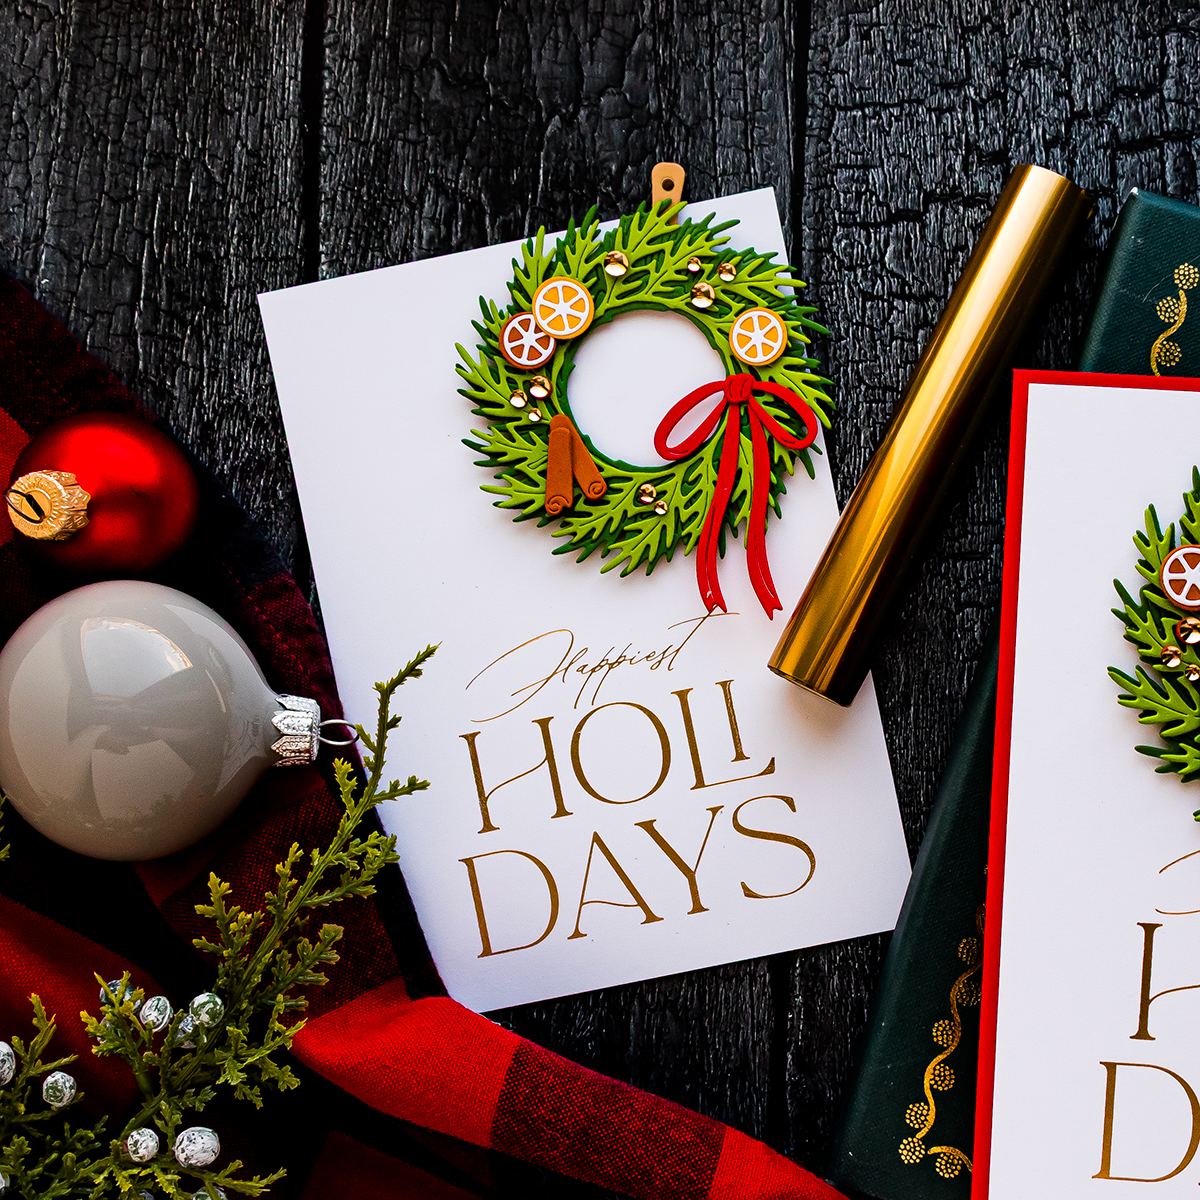
The finished sentiment fits nicely on an A2 card, but it can also anchor a larger 5 x 7-inch design. For this card, position it closer to the bottom of the panel. This leaves enough room for the wreath while helping the two large elements feel connected.
You can also use the plate with the BetterPress Letterpress System and press the sentiment in ink. However, hot foil adds reflective detail that changes as the card moves in the light.
Step 2 – Die Cut the Wreath Greenery
Next, die cut the larger wreath layers from two shades of green cardstock. Use Fern for the darker greenery and Rainforest for the lighter layer.
Using two greens helps the individual leaves remain visible and gives the wreath more depth than a single-color die cut. Glue the two greenery layers together, slightly offsetting them so both colors can be seen.
You can add thin foam adhesive between the greenery layers if you want extra volume. I adhered these layers directly together because the citrus slices and other decorations will provide plenty of dimension later.
Step 3 – Create the Wreath Hanger and Bow
Die cut the bow from Poppy cardstock. The bright red creates a strong focal point and coordinates with the berries and card base.
Cut the wreath hanger from Fawn and Truffle cardstock. The two shades of brown help the small hanger details remain visible. This is an unexpected element that helps the wreath look as though it is hanging on a door.

The clean white background suggests a white door without requiring a separate door stencil or additional background elements. This keeps the design simple and gives the detailed wreath plenty of space.
Step 4 – Build Dimensional Cinnamon Sticks
Die cut the cinnamon sticks three times from Terra Cotta cardstock. Glue the matching pieces together so each finished cinnamon stick is three layers of cardstock thick.
Stacking cardstock is a helpful alternative to placing foam adhesive behind very narrow die cuts. It creates sturdy dimension without allowing pieces of foam to show around the edges.
Set the layered cinnamon sticks aside until the adhesive has dried, then add them to the wreath as part of the decorative cluster.
Step 5 – Assemble the Dried Citrus Slices
Die cut the detailed top portions of the citrus slices from white cardstock. Cut the solid backing pieces from Saffron and Terra Cotta cardstock.
Combining the white details with warm yellow and orange backings creates the appearance of dried citrus. Assemble the layers with liquid adhesive.

Add 1 mm thin foam adhesive squares behind three citrus slices and arrange them around the wreath. Repeating the citrus three times creates balance while leaving enough open space for the greenery, bow, cinnamon, and berries.
Step 6 – Add Red Berries
Die cut the berries from Poppy cardstock. The berry die cuts several pieces in one pass, making it easy to build a generous cluster without repeatedly running a tiny die through the machine.
Use a pickup tool to position the berries on the wreath, then adhere them with Barely Art Precision Craft Glue. Grouping the berries into small clusters will look more natural than spacing every berry evenly around the entire wreath.

Next, add Pinkfresh Studio Clear Drops in Champagne over selected berries. The clear champagne finish adds subtle shine while allowing the red cardstock to remain visible underneath.
You can decorate the wreath with only the included die-cut pieces, but you are not limited to them. Gems, additional greenery, small flowers, or miniature houses from a coordinating accessory set could all be added to the same wreath base.
Step 7 – Assemble the 5 x 7-Inch Card
Trim the white foiled panel to 4 3/4 x 6 3/4 inches. This creates a narrow border when the panel is placed on the finished 5 x 7-inch card base.
Create a 5 x 7-inch side-folding card base from Poppy cardstock. The red border connects the card base to the bow and berries without distracting from the white center panel.

Add foam adhesive to the back of the wreath and position it above the foiled sentiment. Next, foam mount the complete white panel onto the red card base.
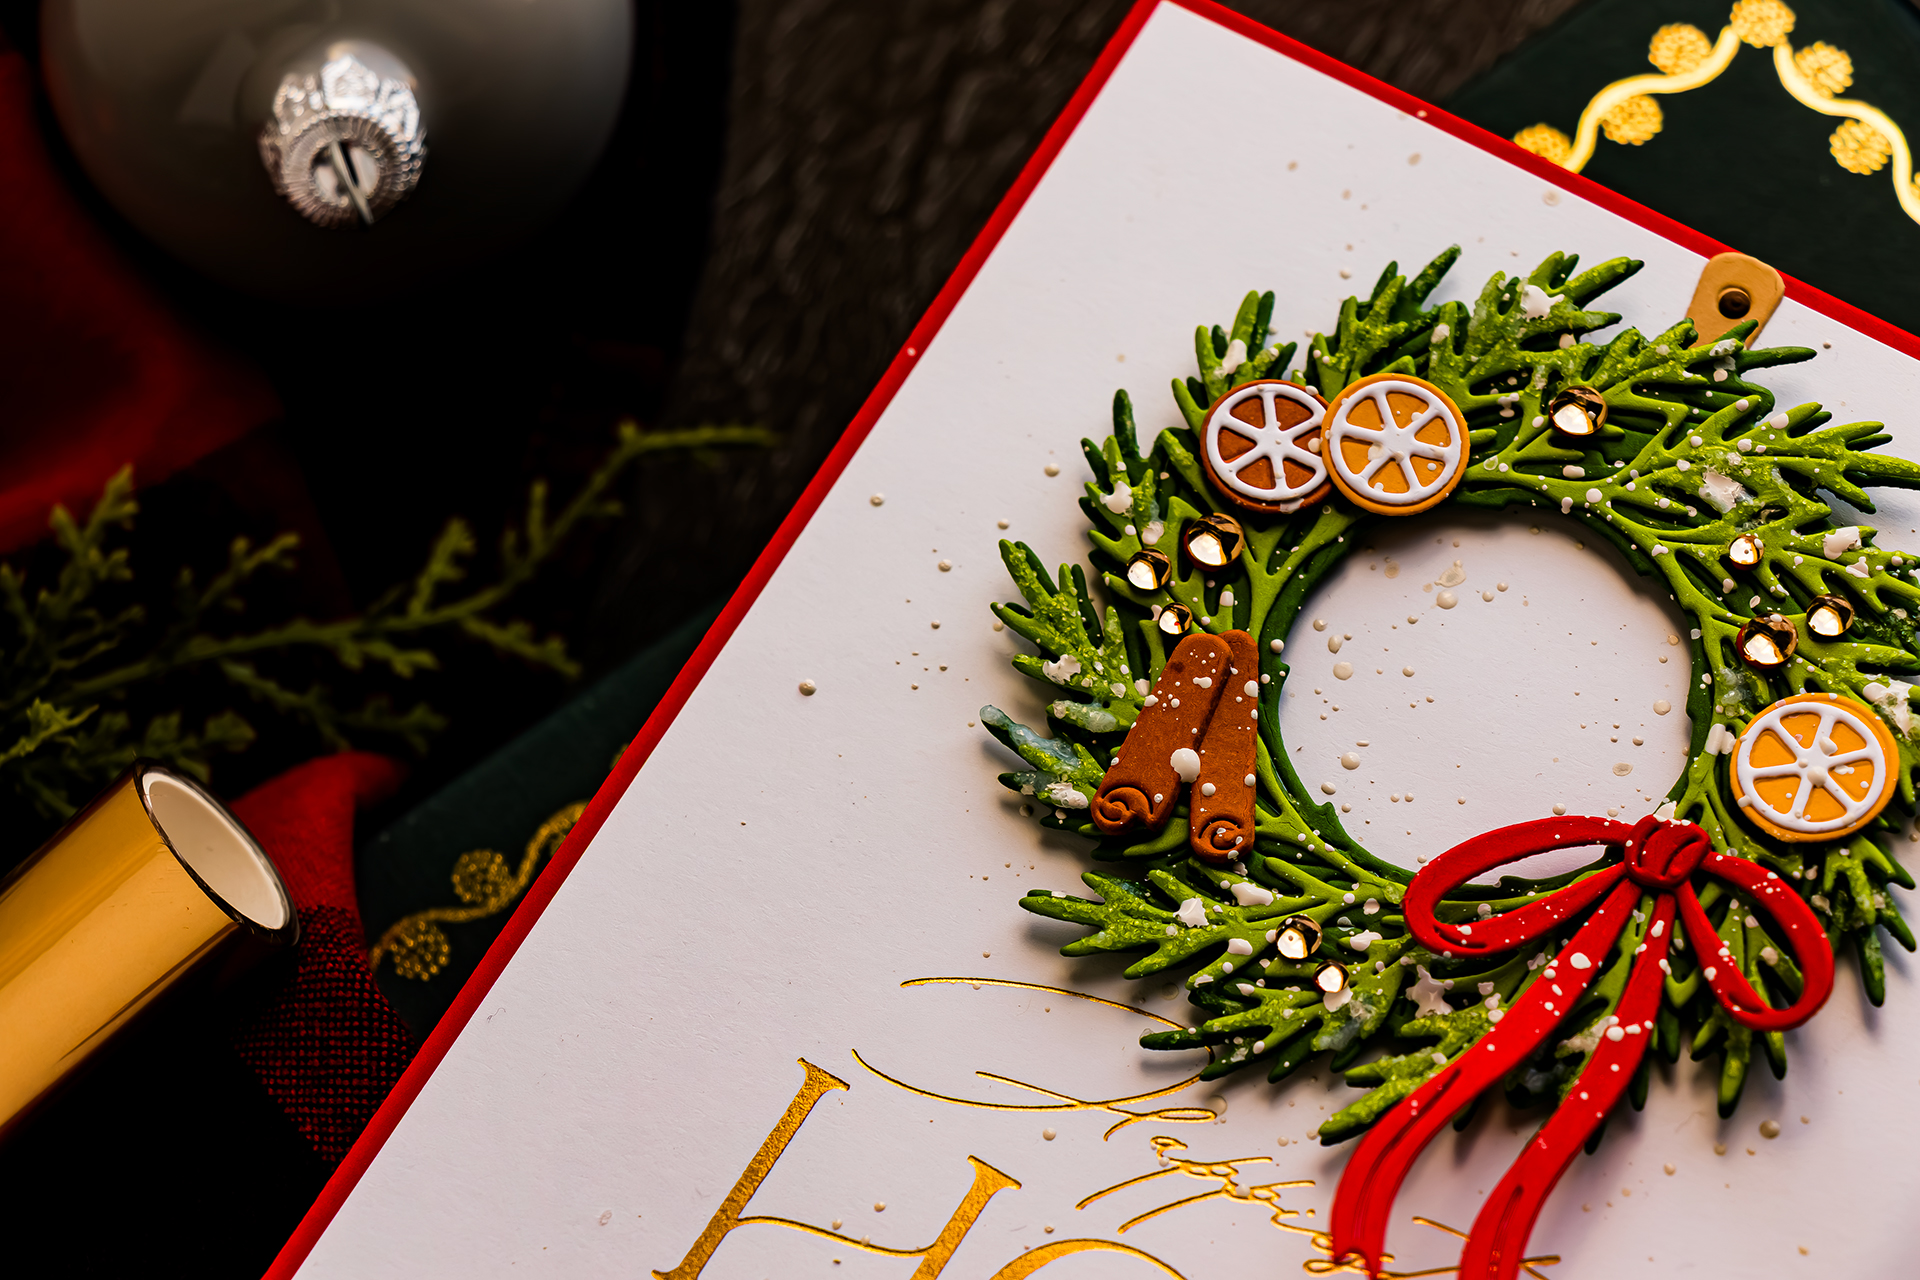
At this stage, you can leave the card clean and graphic. The gold foil, bright white background, and colorful wreath already create a finished holiday design. The following steps are optional, but they completely change the character of the card.
Step 8 – Add Fine Snow with White Splatter
To create the first layer of snow, add Splatter White Opaque Watercolor to the wreath. If the product appears dry, add one or two drops of water and stir it inside the jar with a water brush.
Pick up the mixture with a water brush or regular paintbrush and tap the brush over the wreath. Concentrate the splatter on the greenery and decorations rather than covering the entire card panel.
The opaque white droplets create the look of fine falling snow. Before the splatter, the card feels clean, crisp, and graphic. After the splatter, it begins to feel more atmospheric and slightly vintage.
Start with a small amount of splatter. You can always add another layer, but removing large white drops from a finished card is much more difficult.
Step 9 – Add Sparkling Snow Texture
For additional texture, apply Tim Holtz Distress Grit Paste – Snowfall with a small detail brush. The product goes on milky but dries more translucent, leaving clear glitter and dimensional texture behind.
Pick up a small amount of paste with the brush and place it selectively along the edges of the greenery, citrus slices, berries, and bow. Avoid covering every detail. The most convincing snow effect comes from irregular placement and a mixture of light and heavier areas.
The combination of fine white splatter and dimensional grit paste makes the wreath look as though it has been hanging outdoors during a snowfall. The splatter creates distant snow, while the paste creates accumulated snow and ice.
Why the Card Design Works
This card relies on two large focal elements: the wreath and the Happiest Holidays sentiment. Moving the sentiment toward the bottom creates room for the wreath while keeping the design visually balanced.
The palette also follows a clear hierarchy. White provides most of the visual space, green forms the main image, and red and gold function as festive accents. The warm citrus and cinnamon colors add variety without introducing a competing color family.
Finally, the dimensional details are concentrated on the wreath. Keeping the background simple prevents the card from becoming visually crowded and allows the foil, gems, splatter, and paste to remain noticeable.
Tips for the Best Results
- Foil the sentiment before trimming the panel so you have room to adjust its final position.
- Use two shades of green to keep the layered wreath from appearing flat.
- Stack narrow cardstock die cuts when foam adhesive would be too visible.
- Use thin foam adhesive behind small decorations so they remain dimensional without sitting too far above the wreath.
- Arrange the largest decorations first, then fill smaller gaps with berries and gems.
- Keep embellishments in small clusters instead of spacing them perfectly evenly.
- Test the placement of the wreath and sentiment before adhering either element.
- Add water to Splatter White gradually. Too much water can make the splatter less opaque.
- Protect your work surface and surrounding projects before adding splatter.
- Allow the white splatter to dry before applying grit paste.
- Apply the grit paste irregularly so the snow looks natural.
- Let the paste dry completely before placing the card in an envelope.
Ways to Customize the Christmas Wreath Card
- Press the sentiment in ink with the BetterPress Letterpress System instead of hot foiling it.
- Foil the sentiment in silver, champagne, red, or opaque white.
- Use the smaller wreath from the die set to create an A2 card.
- Use only the Splatter White for a lighter snowfall effect.
- Skip both snow products for a clean, graphic Christmas card.
- Replace the citrus and cinnamon with gems or ornaments.
- Add small die-cut houses to create a miniature village wreath.
- Change the red accents to pink, blue, or burgundy for a different holiday palette.
- Create a winter wreath with white, silver, and pale blue cardstock.
- Use the wreath on a gift tag, ornament, or holiday home décor project.
- Replace the Happiest Holidays sentiment with the die-cut word “Joy.”
- Add a stenciled front door behind the wreath for a more detailed scene.
Frequently Asked Questions
Can BetterPress plates be used for hot foiling?
The Happiest Holidays plate was hot foiled for this project with the Glimmer Hot Foil System. It can also be pressed with ink using the BetterPress Letterpress System.
Can this wreath fit on an A2 card?
Yes. The wreath can be adapted to an A2 card. Use a smaller sentiment or adjust the spacing so the wreath remains the main focal point.
How do you add dimension to very narrow die cuts?
Die cut the same shape several times and glue the layers together. This creates sturdy dimension without trying to hide foam adhesive behind a narrow piece.
What is the difference between white splatter and Snowfall Grit Paste?
Splatter White creates small opaque droplets that resemble falling snow. Snowfall Grit Paste adds thicker, sparkling texture that resembles accumulated snow or ice. Using both creates a more dimensional result.
What can I use if I do not have a water brush?
Use a regular paintbrush. Add a small amount of water to the Splatter White, load the brush, and tap it above the project to create the droplets.
Do I have to add the snow effects?
No. Before the snow was added, the card had a clean and graphic appearance. The splatter and paste simply provide an alternate, more textured finish.
More Christmas Cardmaking Ideas
- How To Use Happiest Holidays BetterPress Registration Set
- Foiling the Happiest Holidays BetterPress Registration Set – A Step-by-Step Tutorial
- More dimensional Christmas wreath card ideas
- Favorite hot foil colors for cardmaking
- Christmas card ideas with the City Holiday Collection
- Easy ways to add snow to handmade cards
Final Thoughts
This snowy Christmas wreath card combines several of my favorite techniques without becoming difficult or overly time-consuming. The large gold-foiled sentiment establishes the design, while the layered wreath adds color and dimension. White splatter and sparkling grit paste provide the final transformation, turning a clean paper wreath into one that looks freshly covered in snow. Try the full textured version or stop before the snow for a crisp, graphic finish. Have fun creating!
SUPPLIES
I’m listing the products I used below. Click on the link to go directly to the product. Where available I use compensated affiliate links which means if you make a purchase I receive a small commission at no extra cost to you. Thank you so much for your support!