
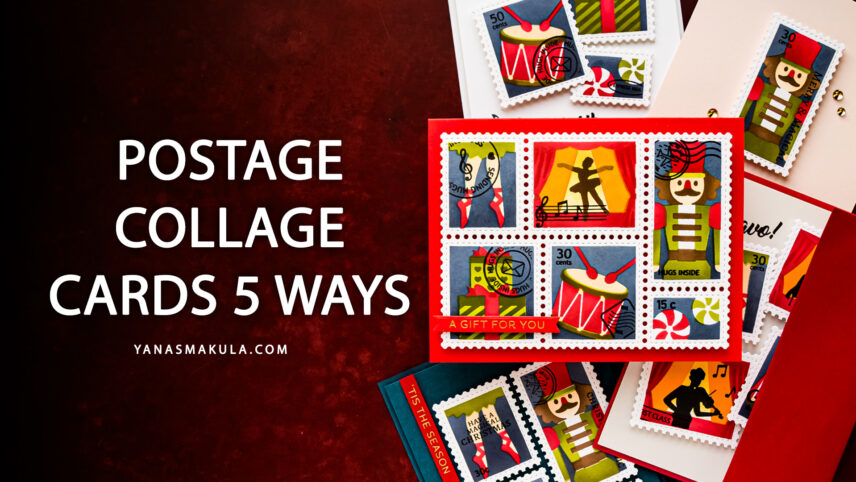

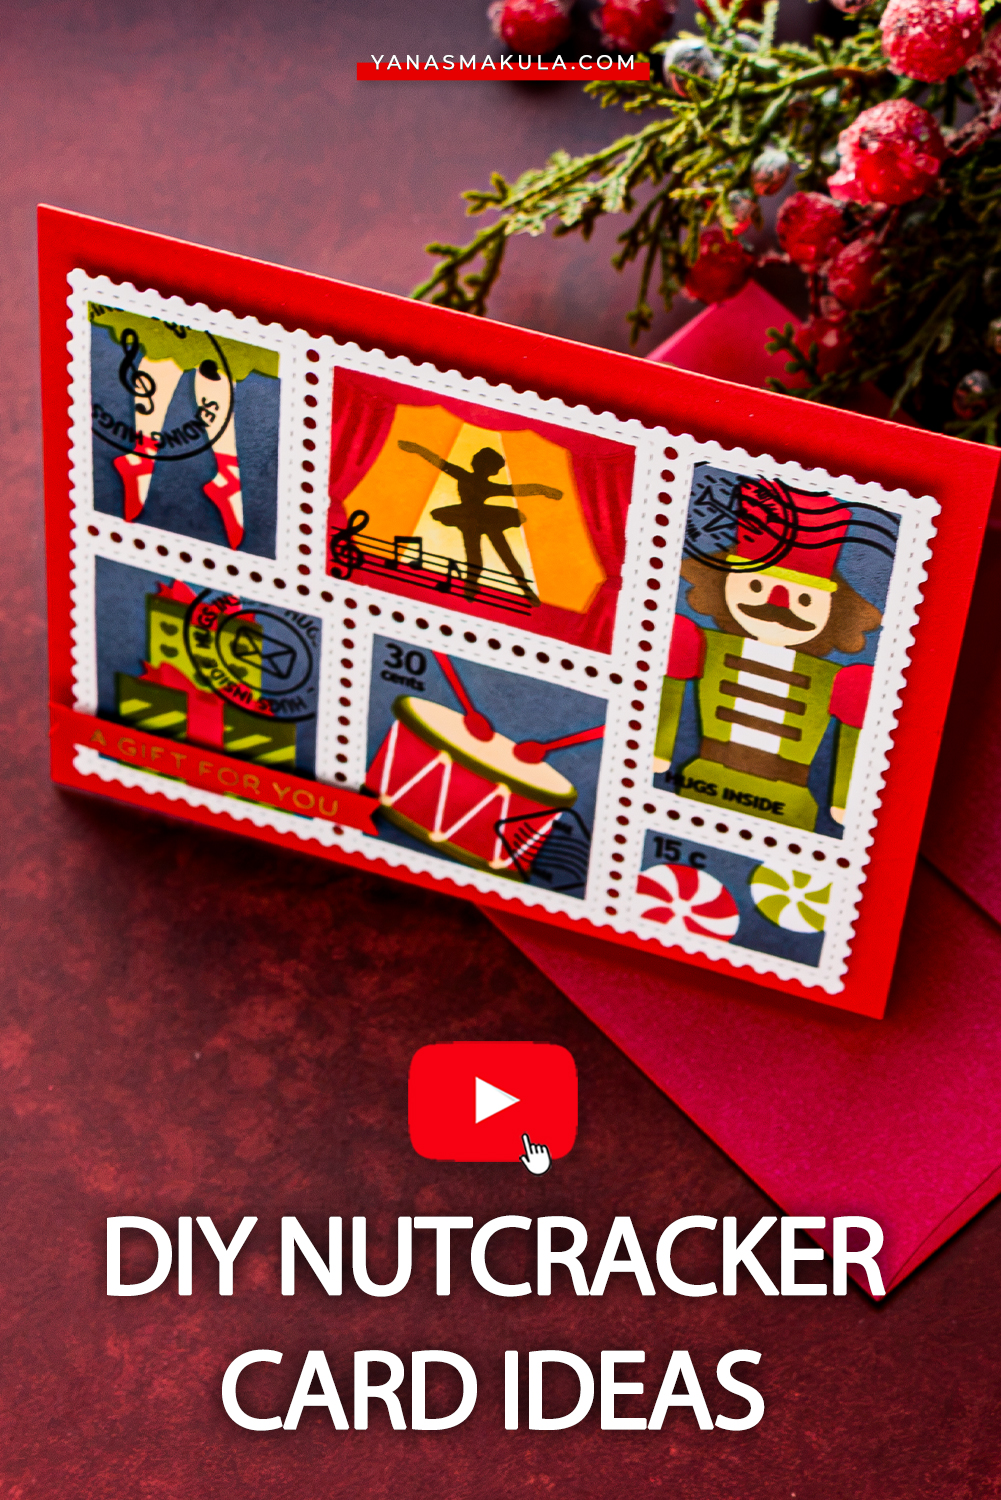
Hello, crafty friends! Today, we are stretching one stenciled design into five festive Christmas cards while exploring several easy ways to arrange Postage Collage images.
Video Tutorial
Watch the video tutorial below to see the complete stenciling process and how I turned three Postage Collage panels into five finished Christmas cards. I also share tips for aligning the stencil layers, adding musicians to the stage, cutting sentiments apart, and rearranging the individual postage stamps.
Complete Project Snapshot
| Project type | Set of five handmade Christmas cards |
|---|---|
| Occasion | Christmas and holiday greetings |
| Skill level | Intermediate |
| Approximate time | 30-45 minute per card |
| Finished size | A2 cards; one featured panel measures 4 x 5 1/4 inches |
| Design and background | Layered Nutcracker postage stamps arranged as a complete panel, single focal point, grid, and angled collages |
| Techniques | Die cutting, layered stenciling, gradient ink blending, stamping, hot foiling, sentiment alteration, and dimensional assembly |
| Featured products | Waffle Flower Postage Collage Nutcracker Stencil and Postage Collage Die |
| Machines and supplies | Die-cutting machine, MISTI Lite Stamping Tool, paper trimmer, scissors, blending brushes, and Glassboard Studio mat |
| Color palette | Dark blue, green, red, yellow, brown, cream, black, white, and gold |
| Materials | White, red, Chiffon, and Fog cardstock; Altenew inks; black ink; gold foil; foam adhesive; and clear drops |
| Dimension and finish | Foam-mounted postage stamps, gold-foiled sentiments, and Champagne Clear Drops |
| Optional technique | Replace the stenciled ballerina with one of the performers from the coordinating silhouette stamp set |
What You’ll Need
Featured Dies, Stencils, and Stamps
- Waffle Flower Postage Collage Nutcracker Stencil
- Waffle Flower Postage Collage Die
- Waffle Flower Postage Collage Ballerina Silhouettes Stamp Set
- Waffle Flower Nutcracker Sentiments
- Waffle Flower Postage Collage Stamp Set
- Waffle Flower Postage Collage Blocks Stencil
- Older Spellbinders BetterPress sentiment plate from my stash
Cardstock
- Neenah Classic Crest Solar White 80 lb Cardstock
- Spellbinders Poppy cardstock
- Spellbinders Chiffon Cardstock
- Spellbinders Fog Cardstock
- White cardstock for the card bases
Altenew Inks
- Snapdragon
- Nimbus
- Dark Night
- Olive
- Moss
- Maple Yellow
- Vanilla Cream
- Crimson
- Velvet
- Mocha
- Espresso
Stamping and Foiling Supplies
- VersaFine Clair Nocturne Ink
- Gold hot foil
- MISTI Lite Stamping Tool or a clear stamping block
- Pre-made gold-foiled sentiments from a sentiment stash
Adhesives and Finishing Supplies
- Best Ever Craft Tape
- Foam adhesive squares
- Liquid adhesive
- Pinkfresh Studio Clear Drops: Champagne
Additional Supplies
- Glassboard Studio mat
- Altenew 1/2-inch blending brushes
- Paper trimmer
- Scissors
- Die-cutting machine
How to Create the Nutcracker Postage Collage Panel
Step 1 – Die Cut the Postage Collage Panel
Start by die cutting the Postage Collage panel from Neenah Classic Crest Solar White 80 lb Cardstock. This die creates the base that coordinates with the themed stencils and stamps in the Waffle Flower Postage Collage collection.
You can stencil the cardstock first and die cut it afterward, but I find it easier to die cut before stenciling. Once the panel is cut, the openings and cut lines help you see exactly where the stencil images belong. This makes aligning the different stencil layers much easier.
Secure the die-cut panel to a Glassboard Studio mat with a small piece of Best Ever Craft Tape rolled back onto itself. This creates a temporary adhesive loop that holds the paper in place without covering any of the areas that need to be stenciled.
Step 2 – Blend the First Background Layer
Position stencil layer one over the die-cut panel using the etched alignment guides. This layer creates the main background areas for the Nutcracker, gifts, drum, candies, ballerina, and stage scenes. For the top center stage, blend Snapdragon ink. This section will eventually include curtains, a spotlight, and a performer.
Blend the remaining five postage backgrounds with Nimbus and Dark Night inks. Start with Dark Night at the bottom and gradually transition into the lighter Nimbus ink toward the top. This darker-to-lighter gradient gives each small postage scene more depth than a single flat color would provide.
If you prefer a white background, you can skip this first stencil layer. I wanted plenty of color on these Christmas cards, so I blended all six background sections.
Step 3 – Add Green Elements and the Spotlight
Align stencil layer two. The etched markings on the stencil identify the suggested color families, making it easier to see which areas belong together. Blend Olive ink over the green portions, then add Moss ink where you want darker shading. This layer colors the top of the ballerina’s dress, the Nutcracker’s coat, one candy, part of the drum, and the main areas of the gifts.
For the spotlight in the top center scene, use Maple Yellow. Apply more color at the top of the spotlight and fade it toward the bottom, leaving the lowest portion almost white. This directional gradient helps create the appearance of light shining onto the stage.
Step 4 – Introduce Red and Skin-Tone Details
Position stencil layer three. This layer combines warm skin-tone areas with several red Christmas details. Use Vanilla Cream for the ballerina’s legs, the Nutcracker’s face, and the selected drum section. The stencil suggests yellow for the drum, but using the same Vanilla Cream ink simplifies the palette while still providing enough contrast.
Next, blend the red areas with Crimson and deepen selected portions with Velvet. These sections include the stage curtains, gift ribbons, and candy details.
Using a light and dark ink from the same color family gives the small images more definition while keeping the overall palette coordinated.
Step 5 – Deepen the Red Details
Align stencil layer four and continue with Crimson and Velvet inks. This layer adds the ballerina’s shoes, additional curtain details, the edge of the stage, portions of the Nutcracker’s hat and coat, gift-bow details, and more color on the drum.
Add Velvet more heavily in selected areas to create contrast. Because the individual postage images are small, these deeper shadows help the details remain visible once the panel is placed on a card.
Step 6 – Complete the Final Dark Details
Position stencil layer five. This final layer adds the darkest details to the Nutcracker, drum, gifts, and stage scene. Blend Mocha first and add Espresso for deeper shading on the Nutcracker and drum. Use Moss to add the darker pattern to the gifts.
The stage opening can be completed by stenciling the ballerina in black or dark brown. However, you can also leave that opening unblended and stamp one of the performers from the Postage Collage Ballerina Silhouettes Stamp Set.
If you plan to stamp a performer, mask the stage opening while blending the remaining portions of stencil layer five. This keeps the stage clean and prevents stray ink from interfering with the stamped image.
Step 7 – Stamp a Performer and Musical Notes
For my stage, I selected the pianist from the Ballerina Silhouettes Stamp Set. Position the panel in a MISTI Lite Stamping Tool and stamp the image with VersaFine Clair Nocturne Ink. The MISTI Lite works particularly well for these small scenes because it has a compact footprint and makes it possible to stamp the image again if the first impression is not completely solid. You can also use a clear acrylic block.
Stamp several musical notes around the pianist to add movement and connect the image with the musical Nutcracker theme. The coordinating stamp set also includes ballerinas, a violinist, and an orchestra conductor, giving you several ways to customize the stage.
Step 8 – Add Small Sentiments
Select sentiments that will fit inside the individual postage-stamp areas. I stamped “Merry Christmas” over the drum by positioning the two words separately. I also altered the “Ready for Christmas magic” sentiment. Using scissors, carefully cut the clear stamp between “Ready for” and “Christmas magic.” This allowed me to stamp “Christmas magic” vertically beside the Nutcracker.
Cutting a clear sentiment stamp does not mean it can never be used in its original form again. Simply position the two pieces together on a stamping block or platform whenever you want to stamp the complete message.
Step 9 – Add Postal Details
Overlay the Postage Collage Blocks Stencil on the completed panel before stamping the postmarks. The stencil protects the white borders while exposing the colorful centers of the postage stamps.
Stamp postal marks, wavy cancellation lines, numbers, and small words from the Postage Collage Stamp Set. Position some images near the corners so they appear to extend beyond the colored scene while remaining inside the die-cut postage border.
This step makes the individual illustrations look more like authentic postage stamps and visually connects the six different scenes.
5 Christmas Card Layouts from the Stenciled Panels
I created three complete Postage Collage panels and used them to make five cards. Keeping one panel intact and cutting the others apart provided enough pieces for several different compositions.
Card 1 – Use the Complete Postage Collage Panel
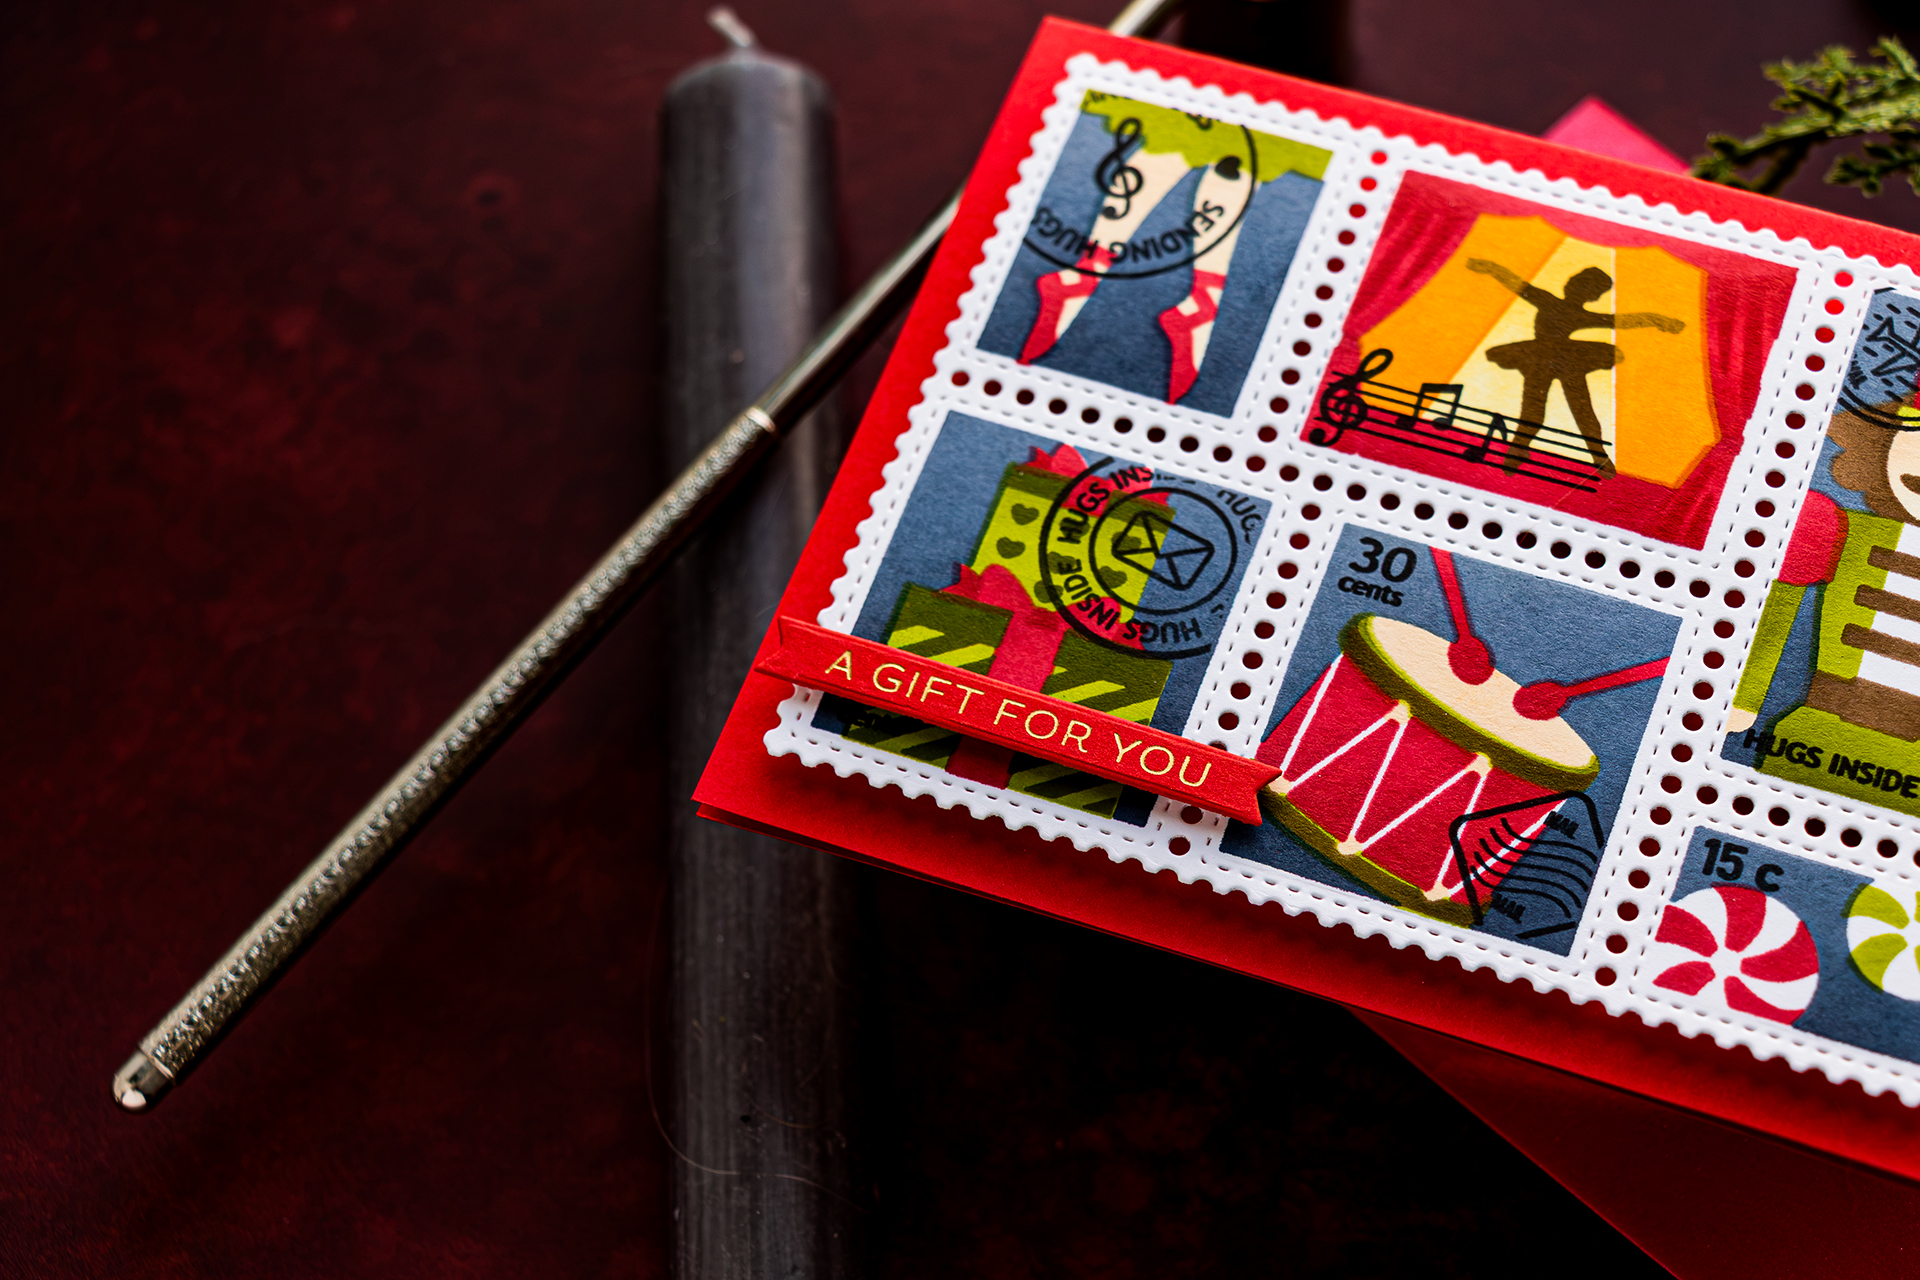
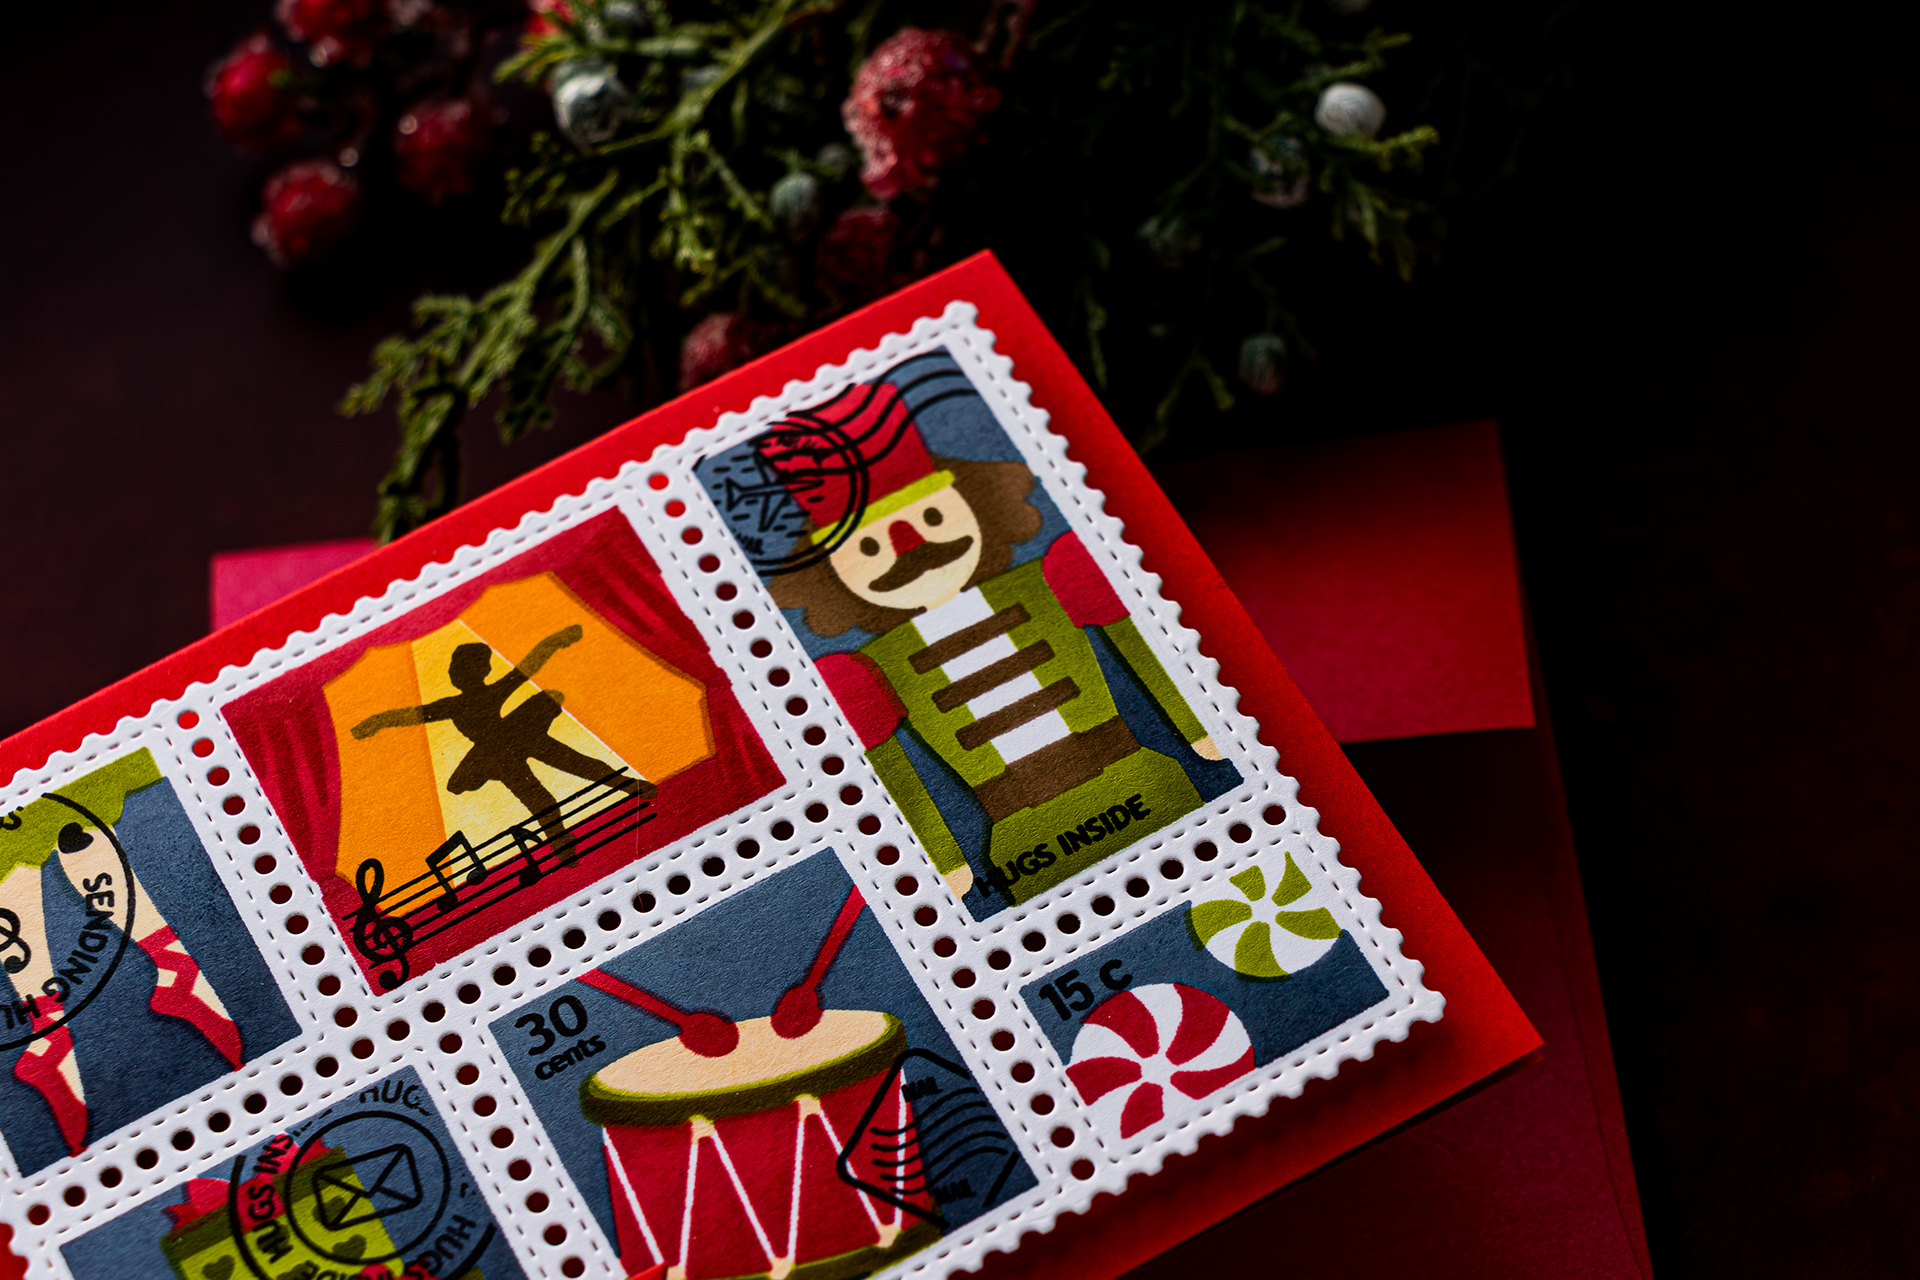
For the first layout, keep the complete Postage Collage panel intact and adhere it to an A2 top-folding card base made from red cardstock.
Add a simple “A Gift for You” sentiment near the bottom. My sentiment was previously foiled in gold on red cardstock and saved in my sentiment stash. Using a matching red sentiment strip helps it blend with the card base while the gold foil adds a festive finish.
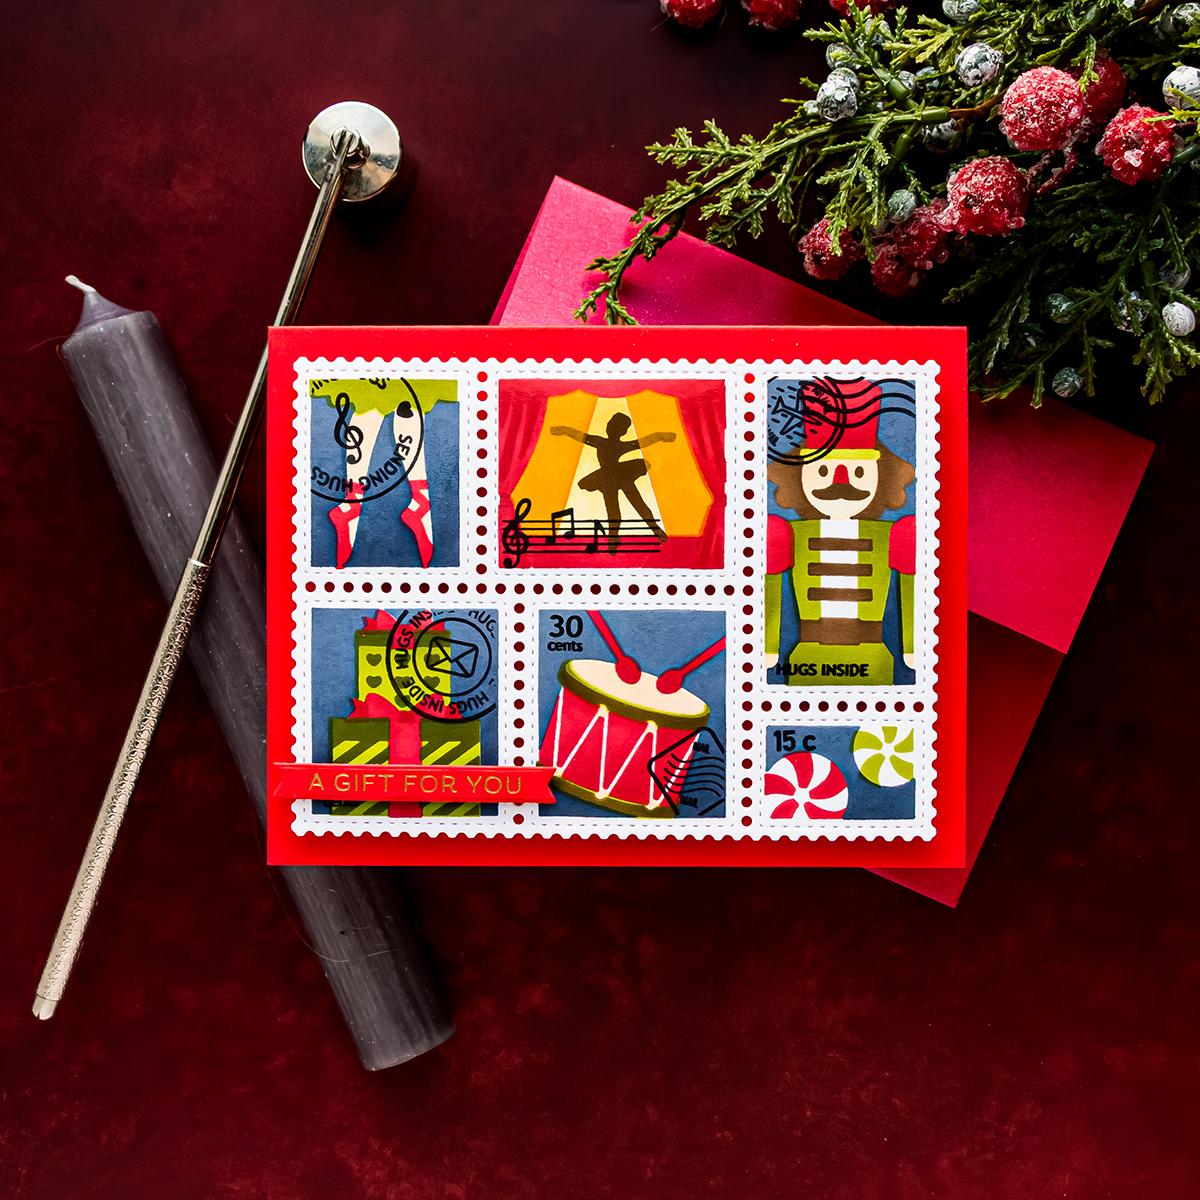
Inside the card, add the greeting “May your Christmas be grand and glorious.”
This is the easiest layout because the Postage Collage Die has already determined the spacing. It is a great option when you want all six scenes to remain together as one colorful focal point.
Card 2 – Feature One Postage Stamp
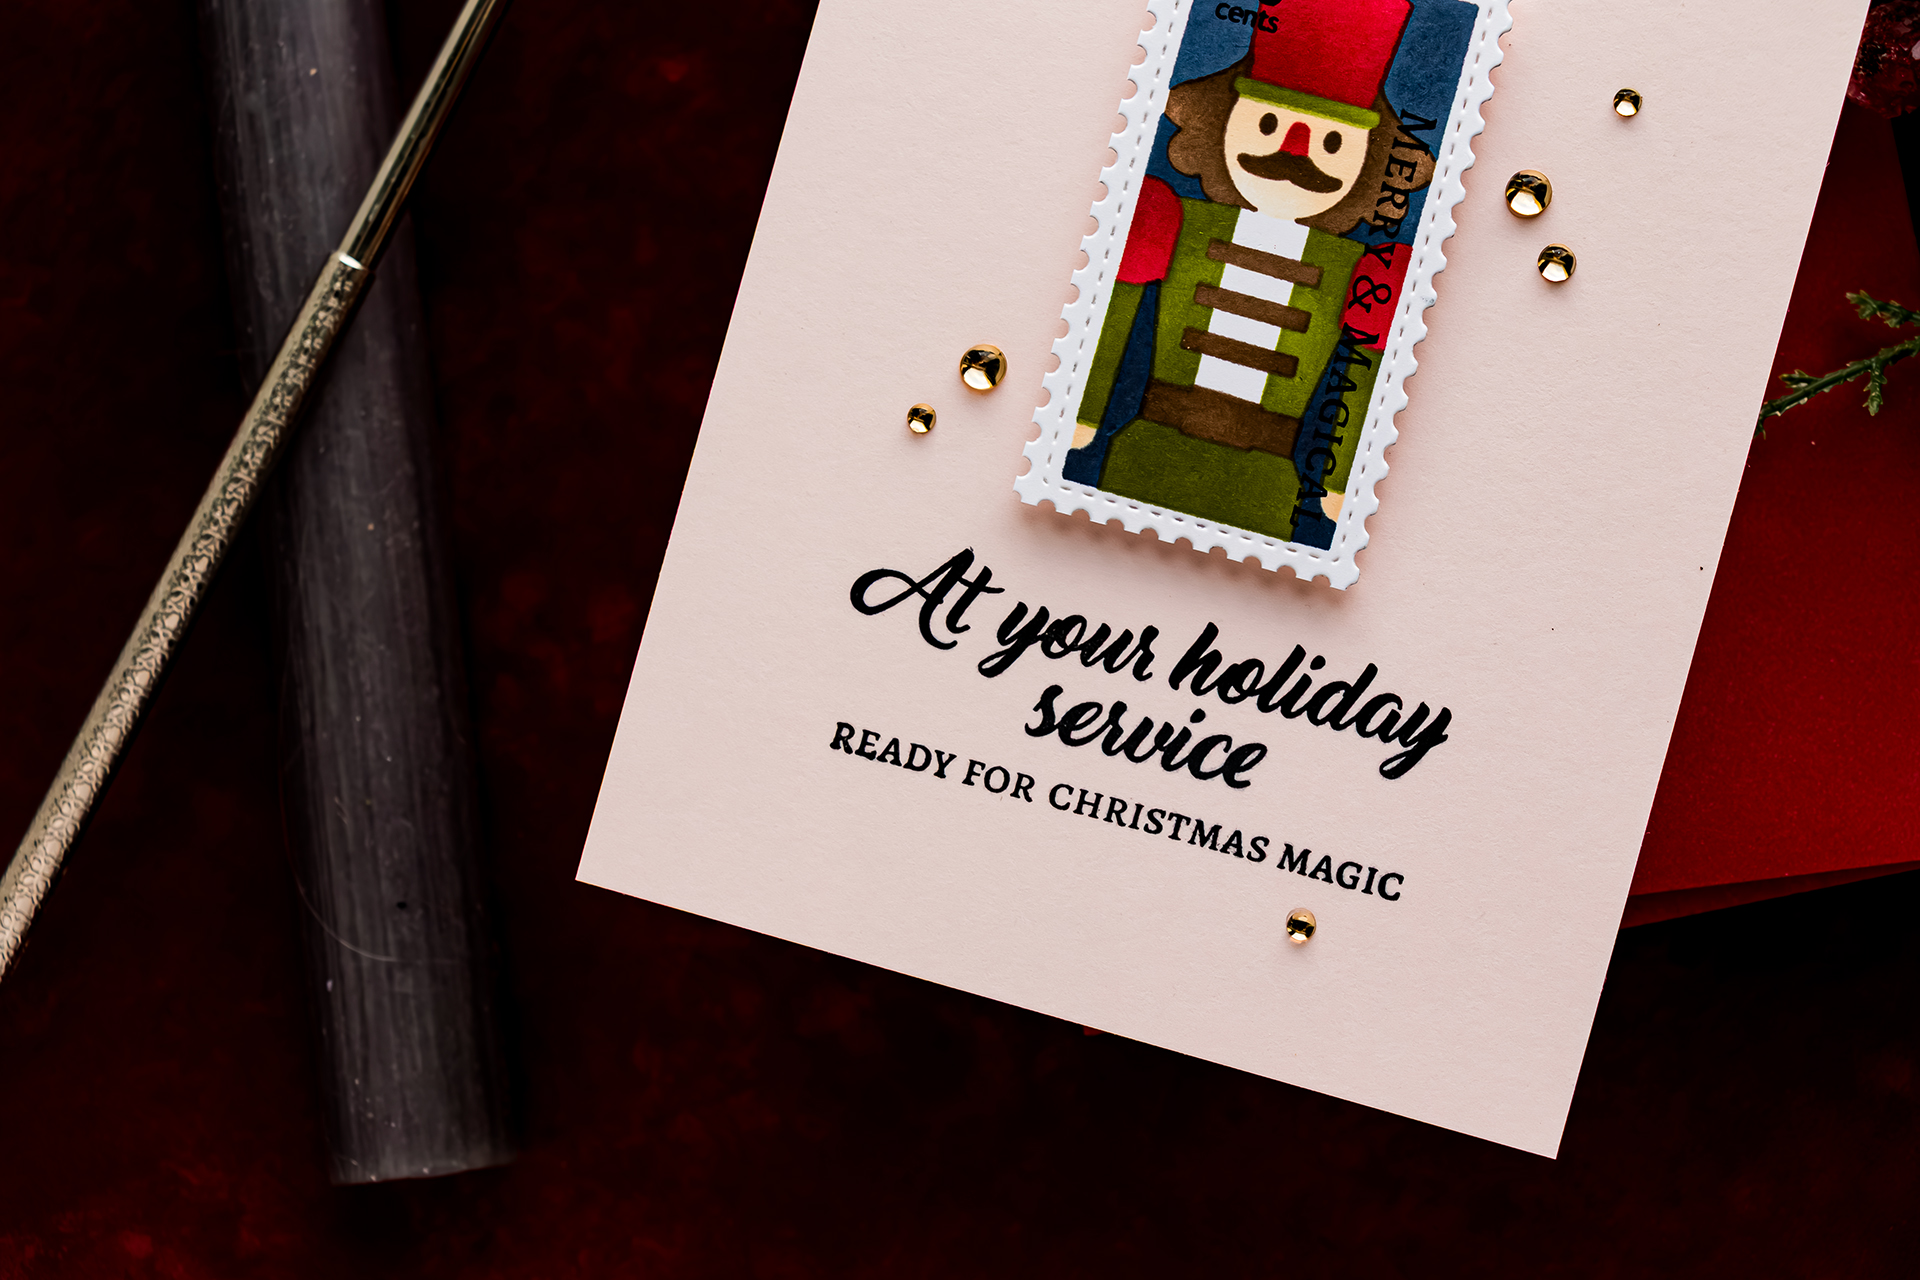
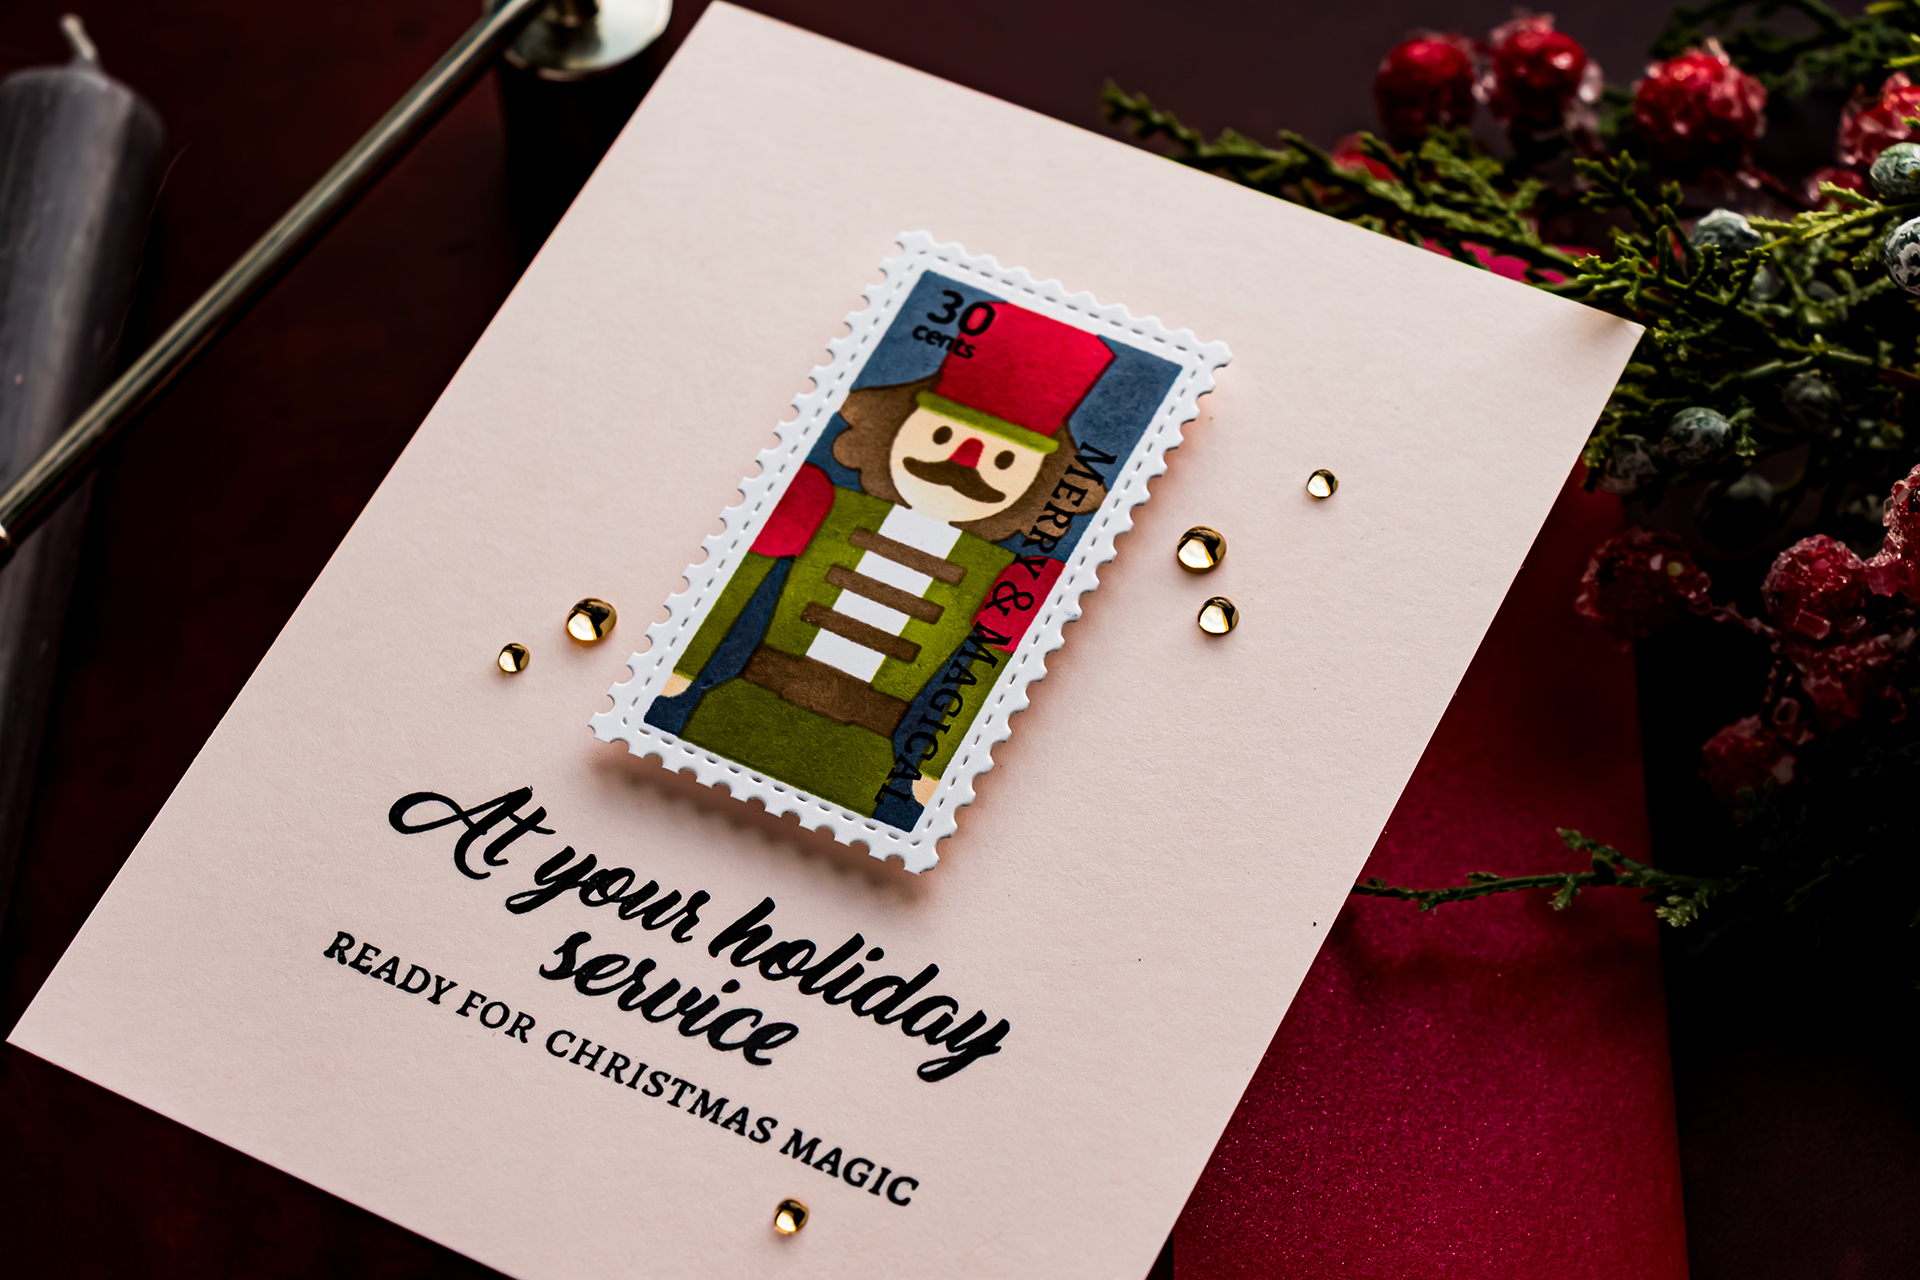
For a clean and simple design, cut the individual postage images apart and select one as the focal point. I used the Nutcracker image with the vertically stamped “Christmas magic” message. Adhere the image to an A2 Chiffon card base and stamp “At your service. Ready for Christmas magic” in black ink.
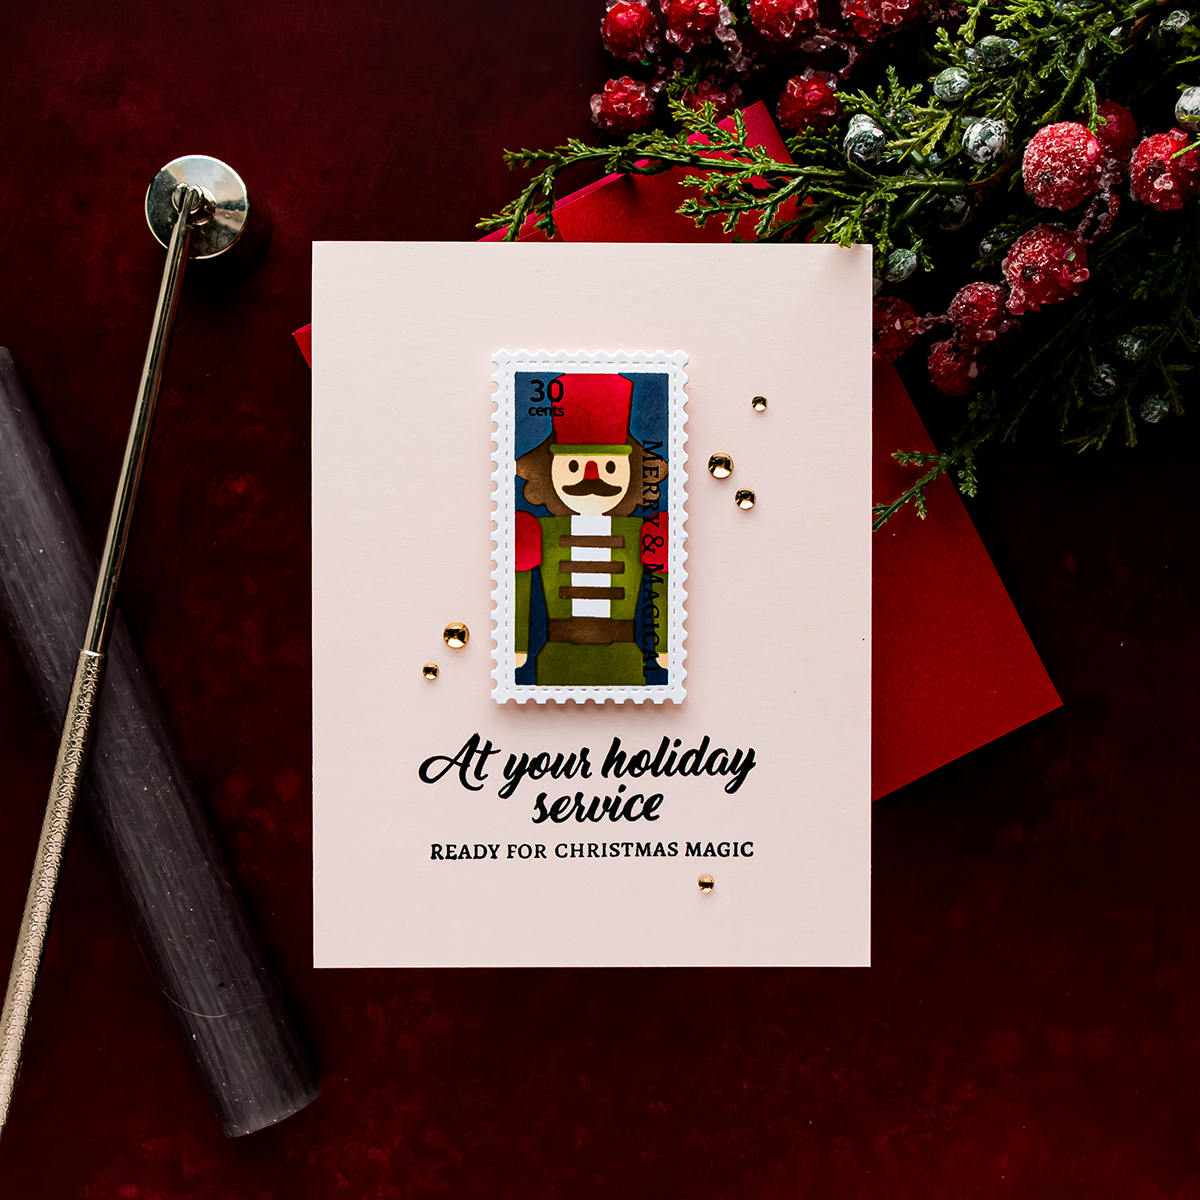
Finish the design with several Pinkfresh Studio Champagne Clear Drops. The embellishments add a little shine without competing with the detailed postage image.
This single-stamp layout is useful when you need a quick card or want to make several cards from one stenciled panel. Each completed panel contains six possible focal points, so this approach can stretch the design considerably.
Card 3 – Arrange Four Stamps at an Angle
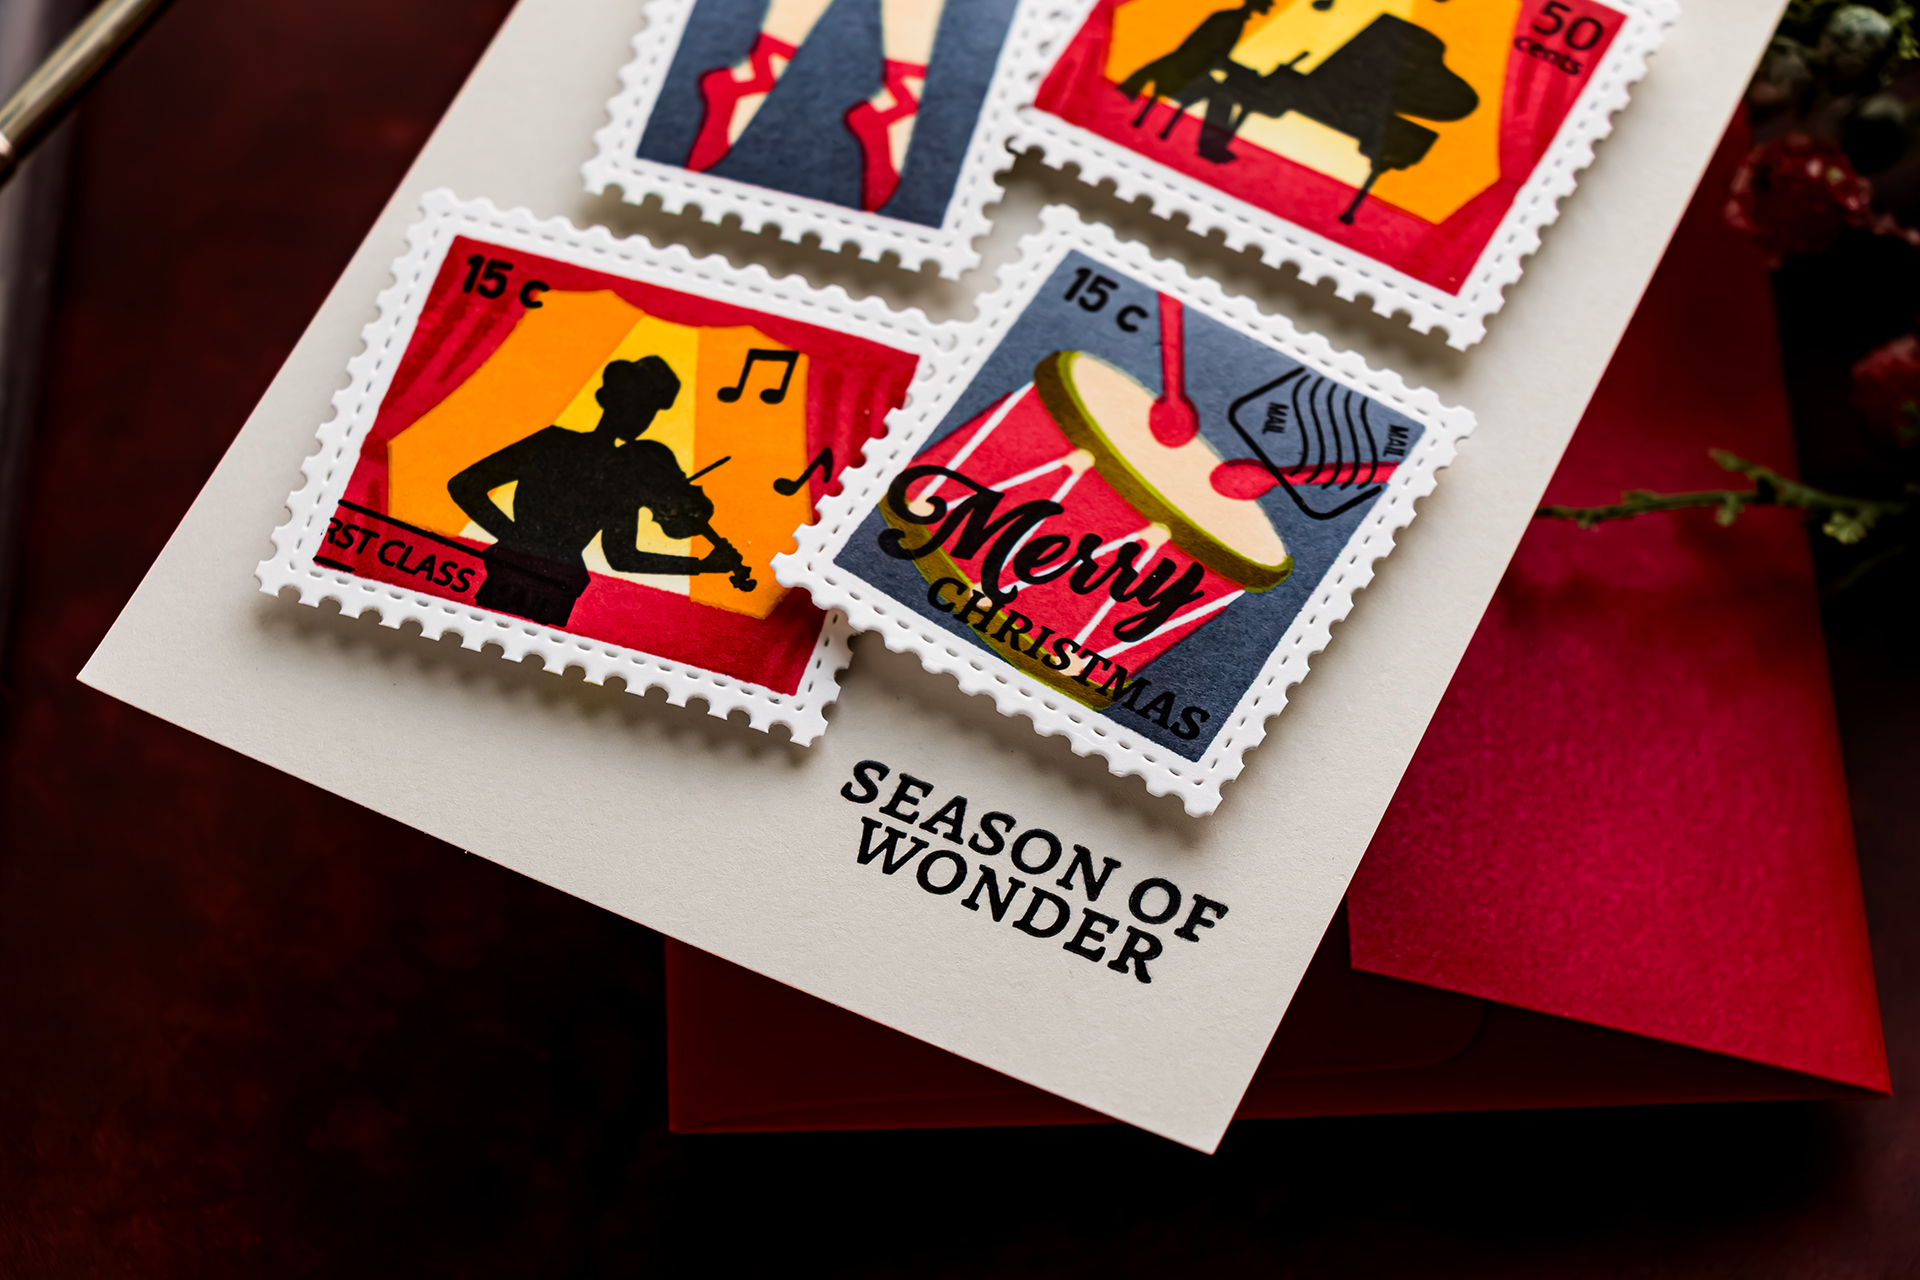
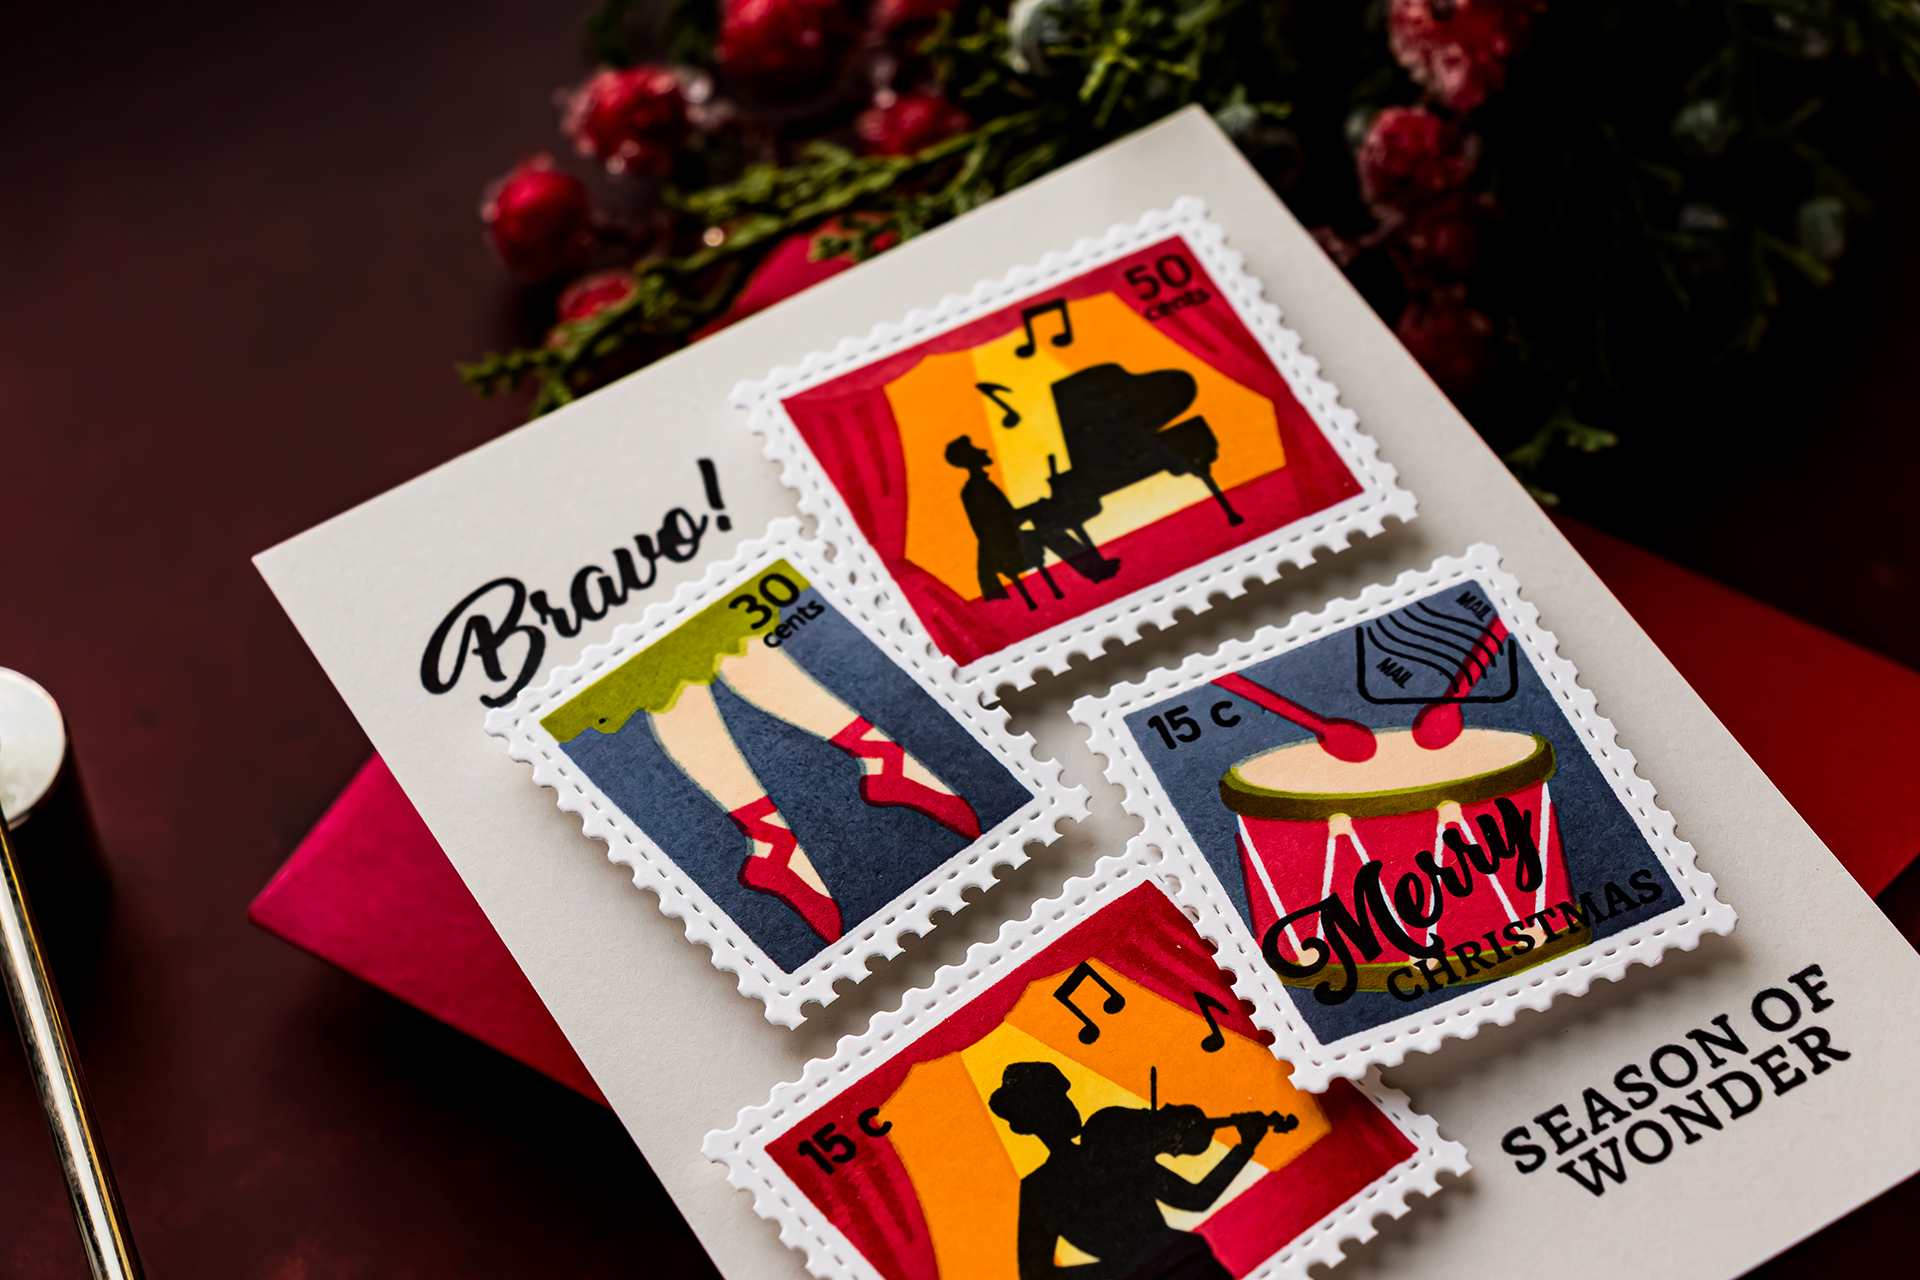
Select four postage images that share a visual theme. For this card, I used the pianist, ballerina legs, violinist, and drum images. Arrange the four stamps at slight angles on an A2 side-folding card base made from Fog cardstock. Mount the stamps with foam adhesive squares for dimension.
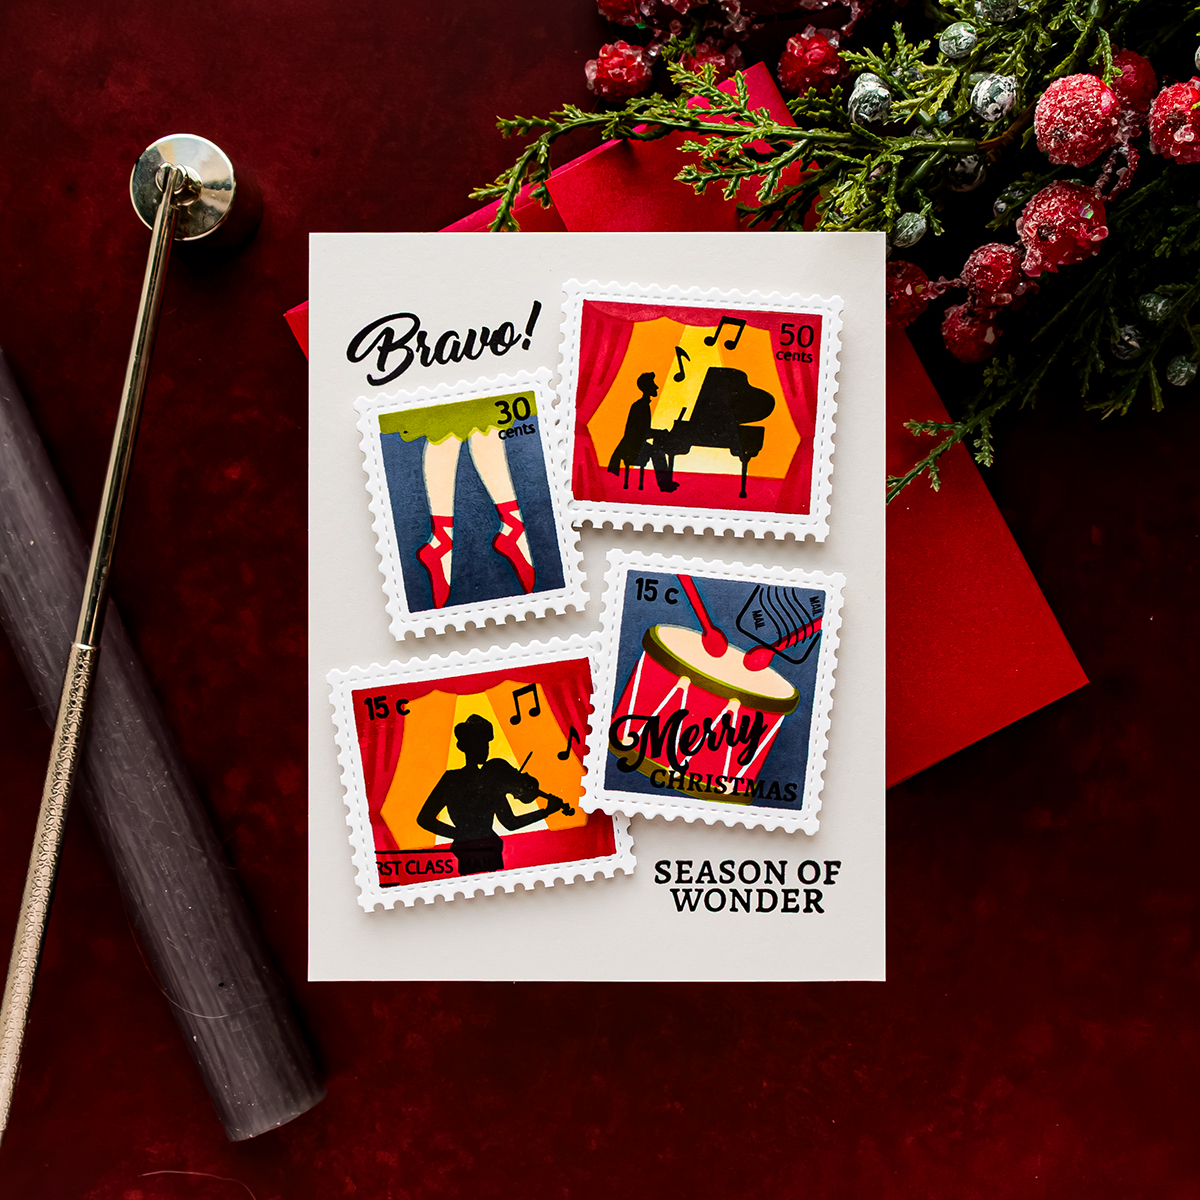
Stamp “Bravo” above the arrangement and “Season of Wonder” below it. The angled placement gives the card a playful, collected appearance while the neutral Fog background allows the red, green, and blue images to stand out.
Before adhering the stamps, move them around until the spacing feels balanced. The angles do not need to match, but leaving a similar amount of open space between the pieces will keep the layout intentional.
Card 4 – Create a Straight Four-Stamp Grid
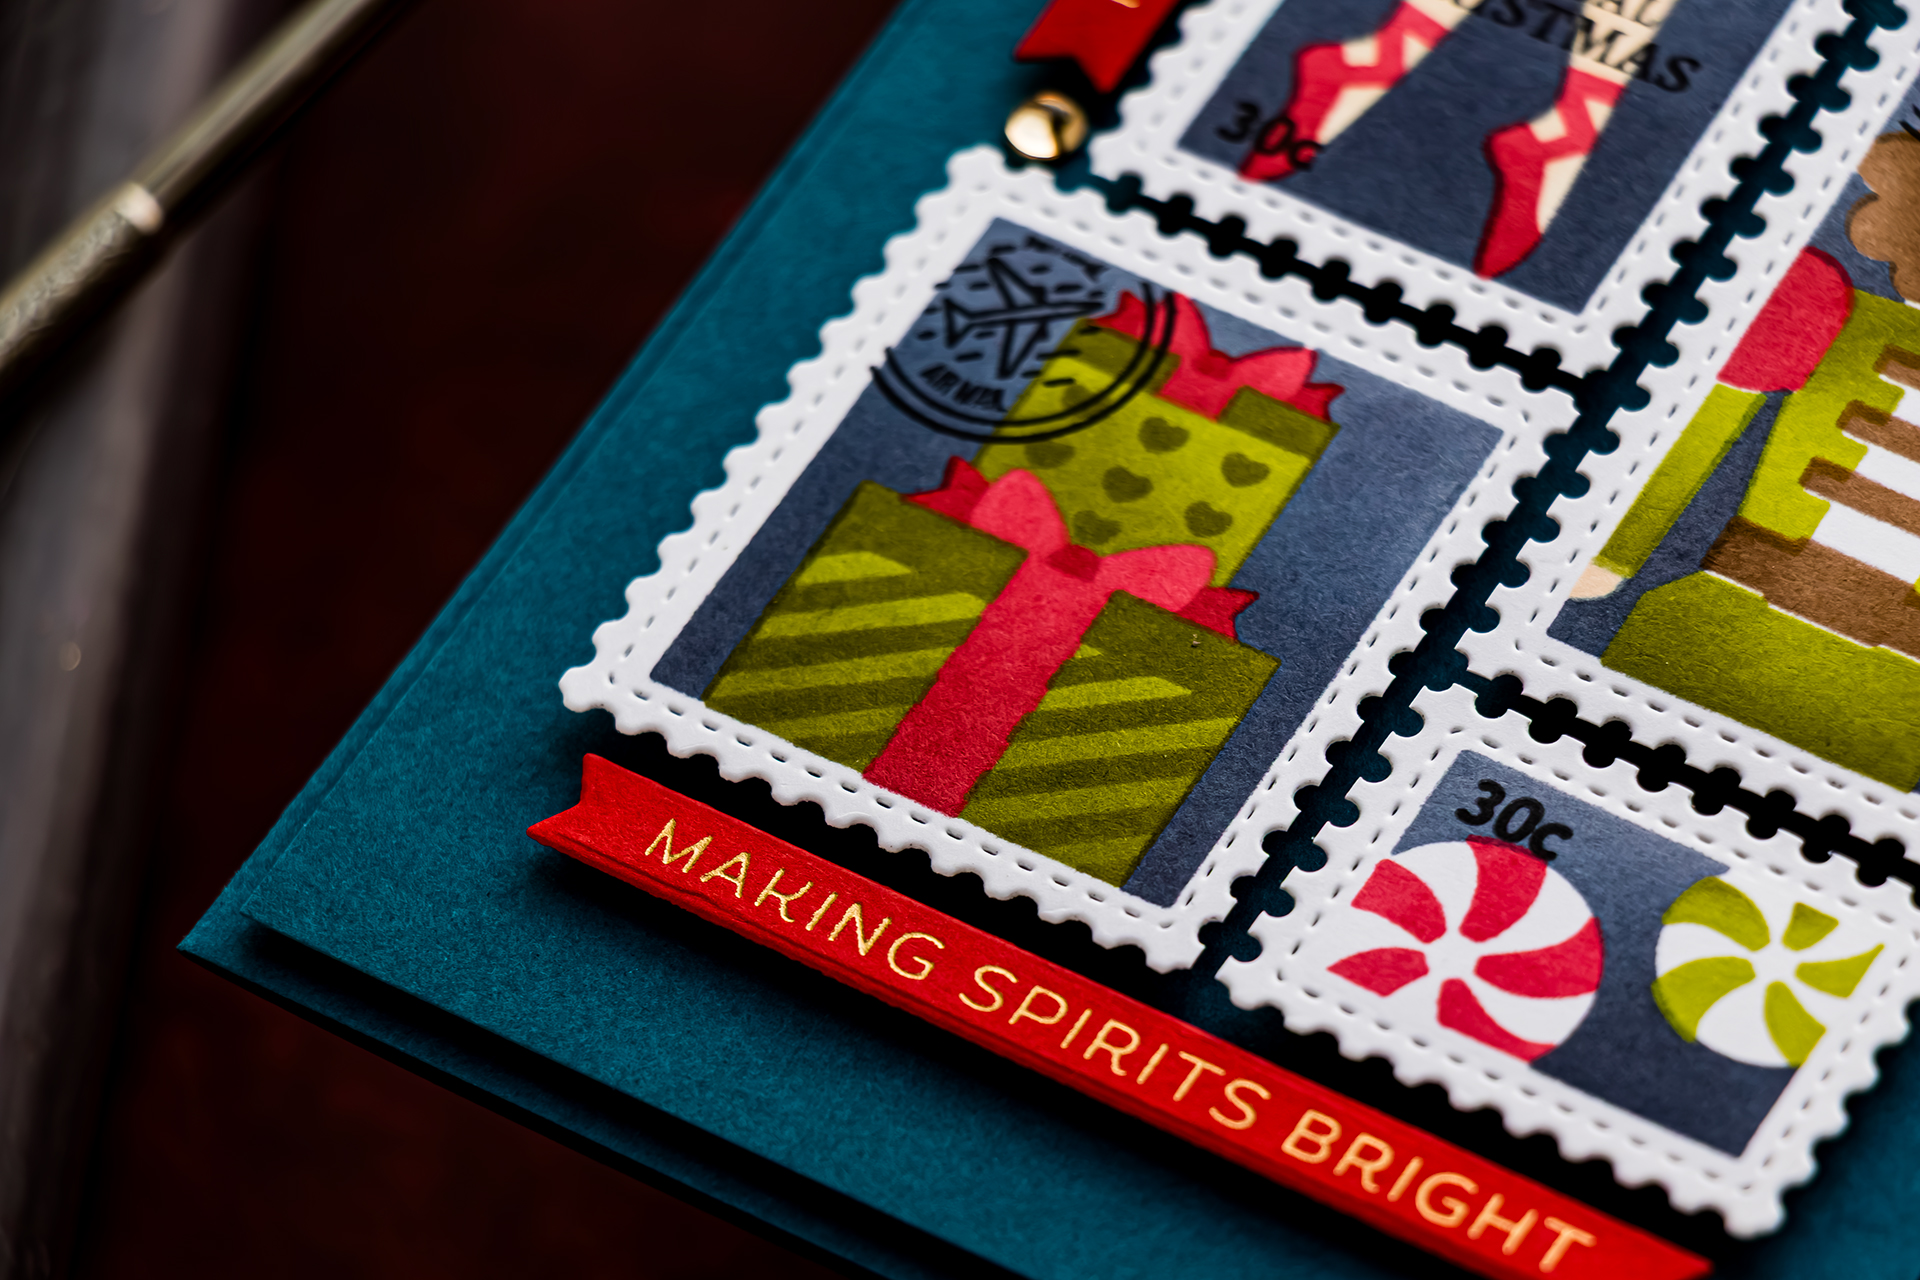
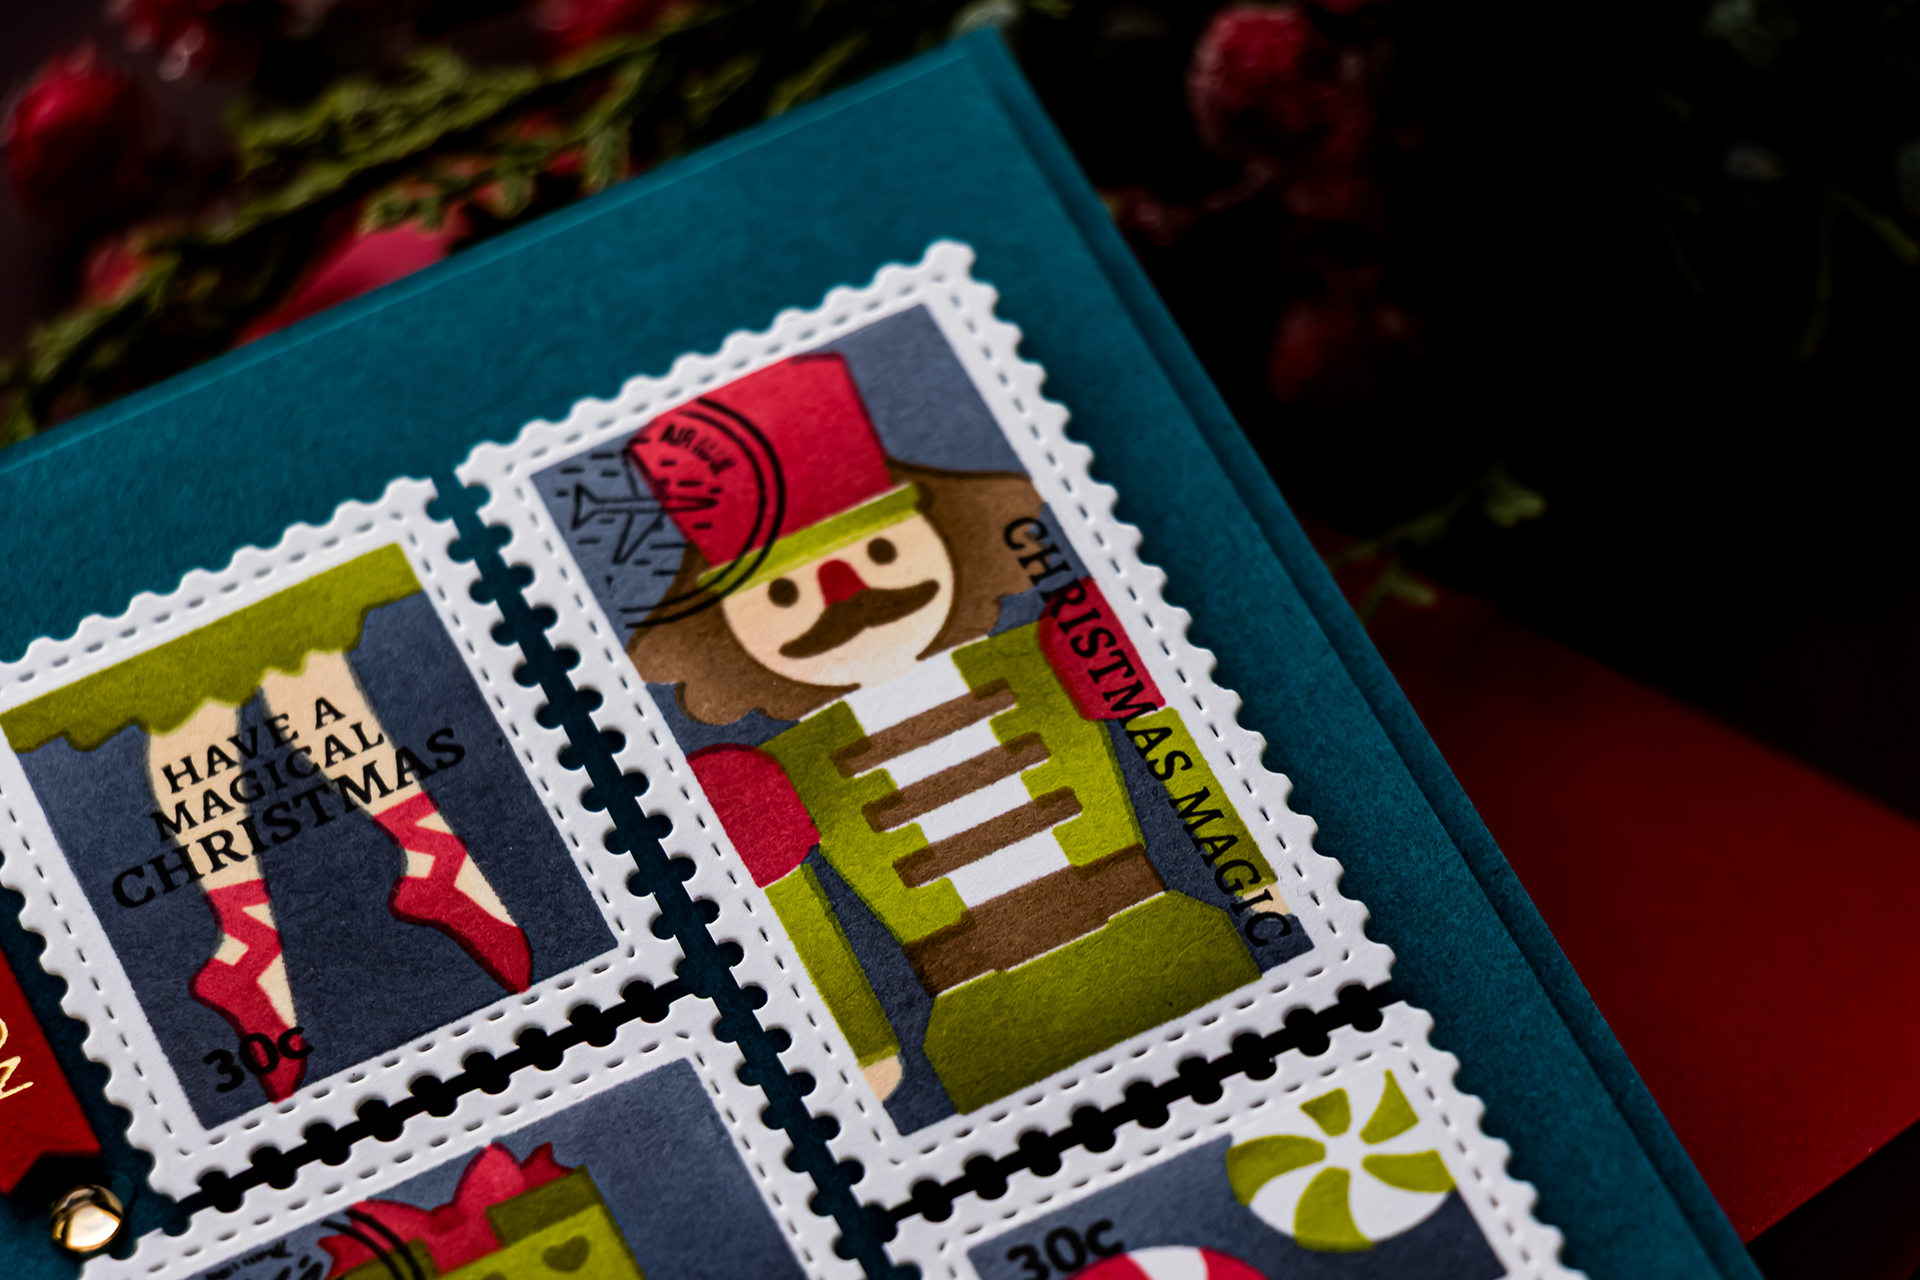
For a more structured composition, arrange four postage images in two straight rows. I combined the ballerina legs, Nutcracker, gifts, and candy scenes. Add a gold-foiled “Making Spirits Bright” sentiment along the bottom of the card. Because the postage stamps are different sizes, the upper row leaves a small gap.
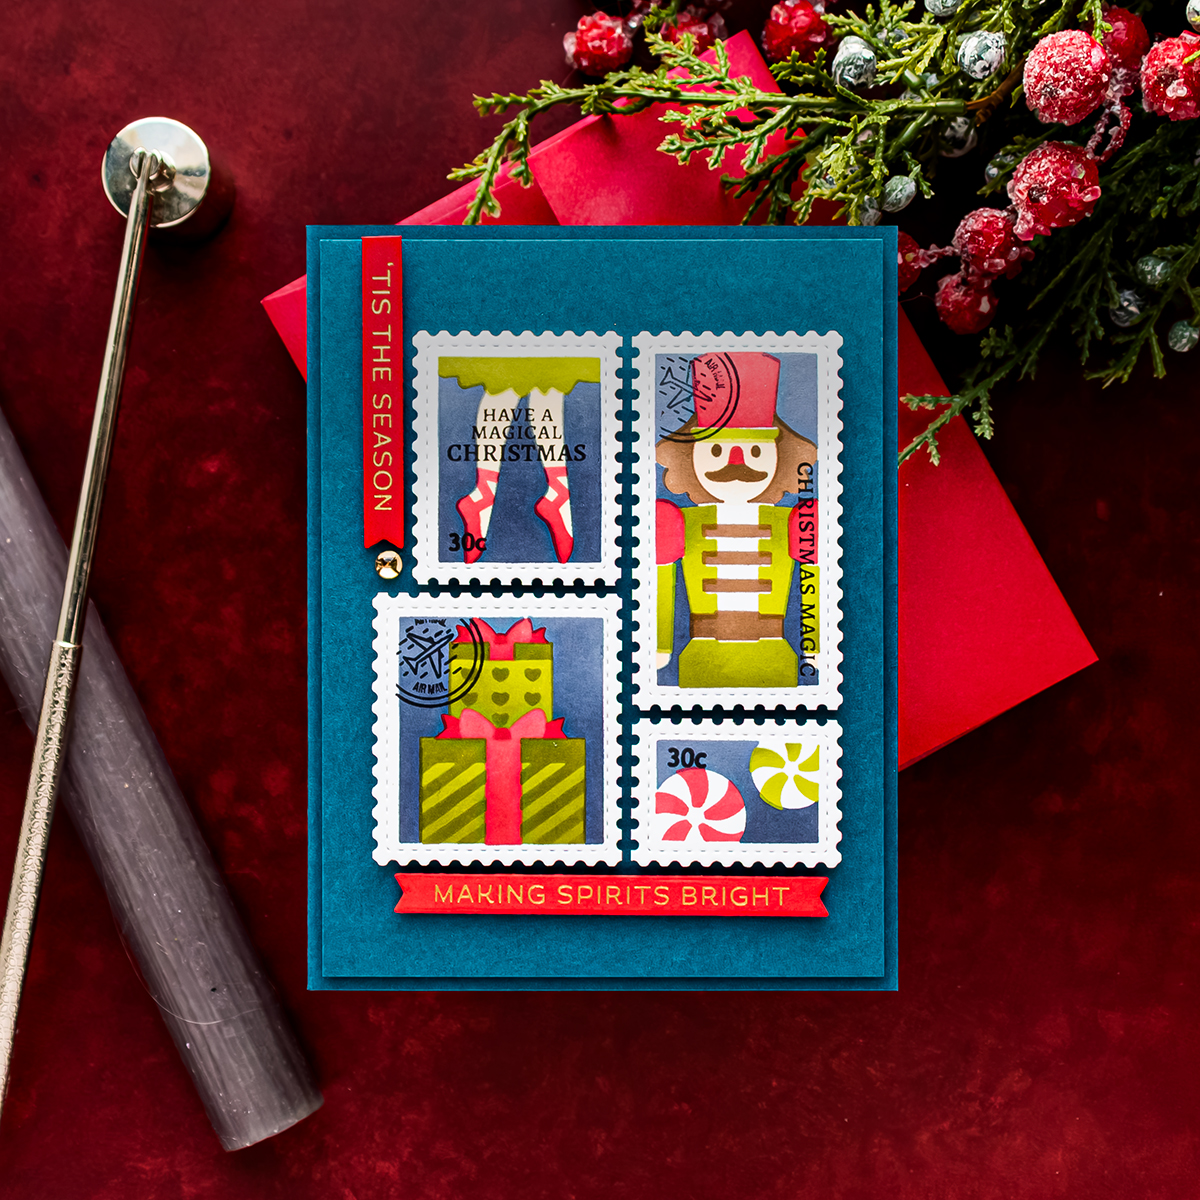
Instead of trying to hide that space, fill it with a vertical “This Season” banner and one Champagne Clear Drop. This turns an awkward gap into a deliberate design detail.
This is a helpful layout lesson for any card made with mismatched elements. When two pieces do not align perfectly, a small sentiment, embellishment, or decorative strip can visually balance the difference.
Card 5 – Build a Three-Stamp Diagonal Layout
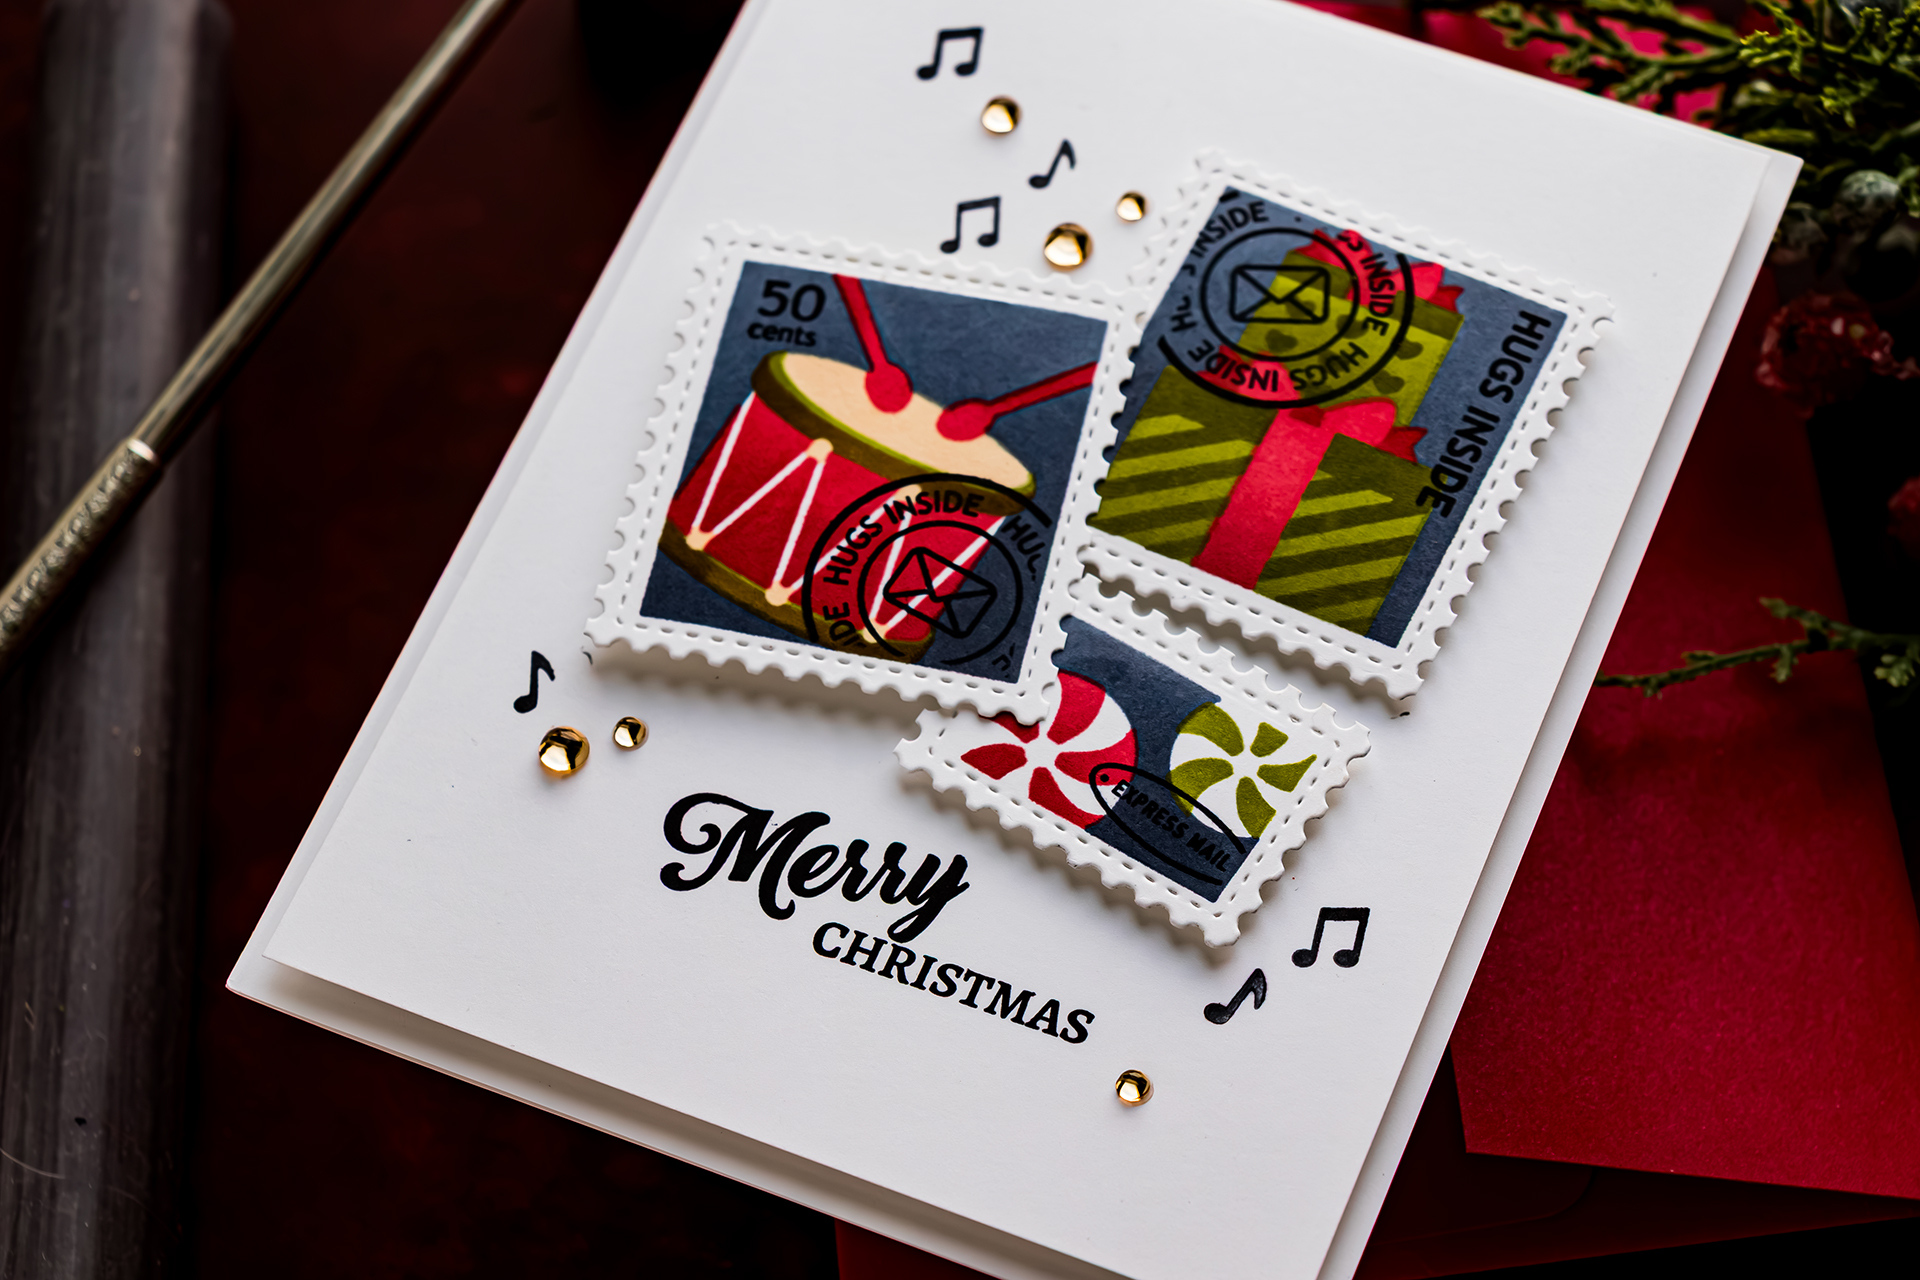
For the final card, select three postage images and arrange them at angles on a 4 x 5 1/4-inch white cardstock panel. Foam mount the completed panel on an A2 white side-folding card base. Stamp “Merry Christmas” directly onto the background and add several musical notes. The notes coordinate especially well with the drum image and help carry the viewer’s eye across the open areas of the card.
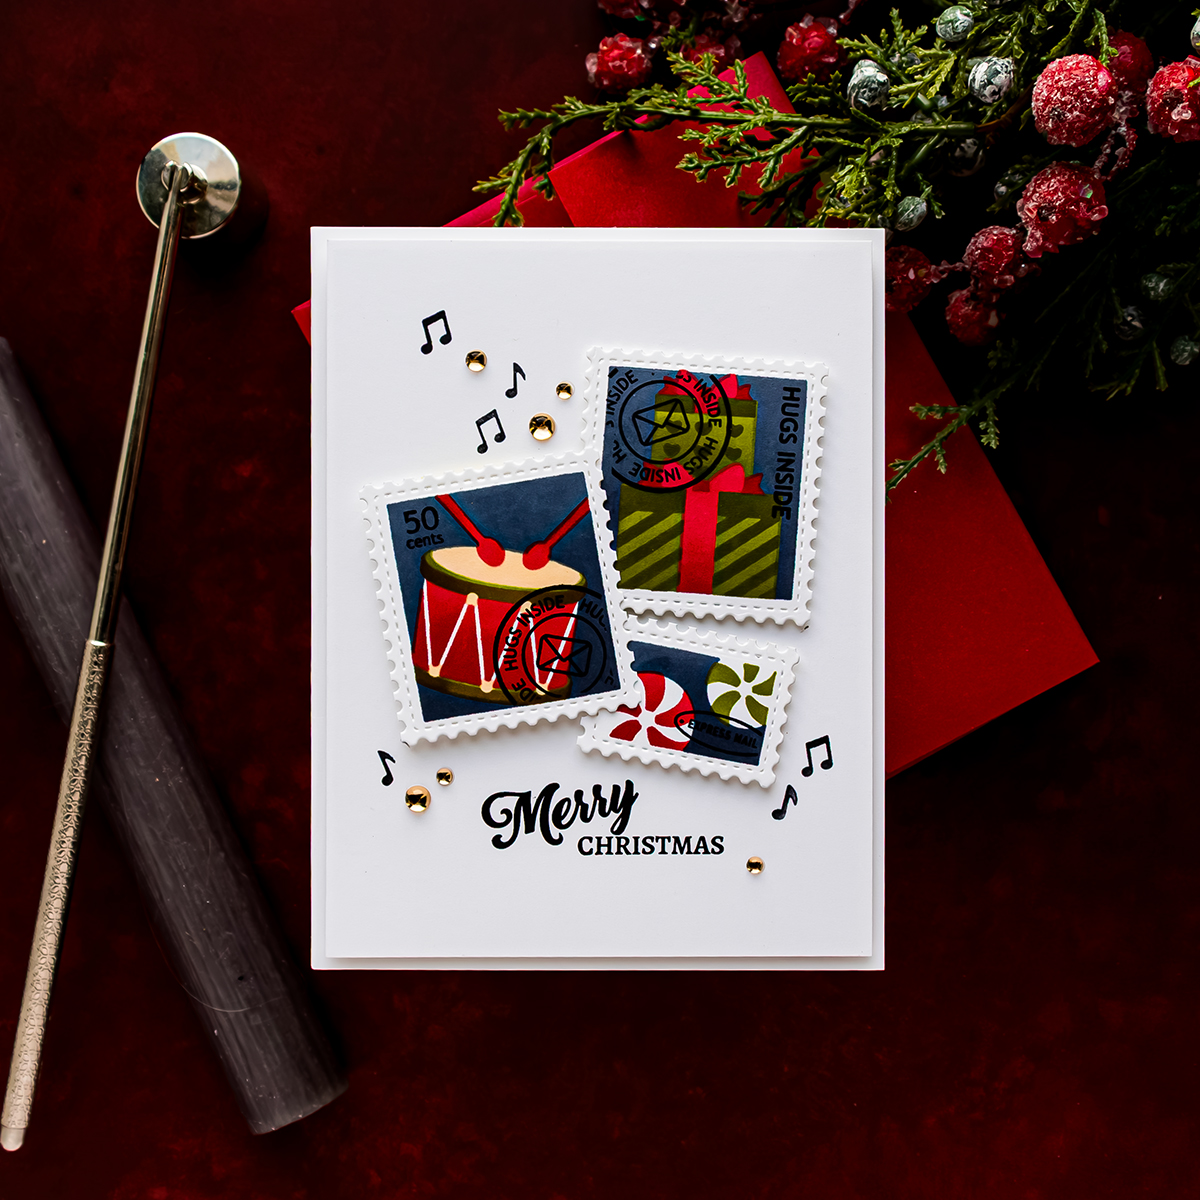
Finish the design with Champagne Clear Drops. Because the card base and panel are both white, the foam-mounted layer adds subtle separation without introducing another color.
A three-piece layout naturally creates a visual triangle. Positioning the stamps at slightly different angles adds movement while keeping the composition balanced.
Tips for the Best Results
- Die cut the Postage Collage panel before stenciling so the cut lines can help with alignment.
- Use the etched guides on every stencil layer rather than aligning only by the previously blended images.
- Secure the cardstock panel well so it does not shift as you move between stencil layers.
- Blend light ink first and add the darker shade gradually. This provides more control over the small areas.
- Use separate blending brushes for very different color families to avoid contaminating pale yellow or skin-tone areas.
- Fade the spotlight from yellow to almost white to create a more convincing stage-light effect.
- Mask the stage opening if you plan to stamp a performer instead of stenciling the ballerina.
- Choose small sentiments that fit comfortably inside the postage scenes.
- Use the Blocks Stencil while adding postal details to protect the white borders.
- Cut the panel apart with a paper trimmer for the straightest edges.
- Test several arrangements before adding adhesive, especially when working with angled layouts.
- Save unused postage pieces for future cards, gift tags, or envelope decorations.
Ways to Customize These Christmas Cards
- Replace the classic red, green, and blue palette with pink, aqua, and lavender for a softer Nutcracker design.
- Use kraft cardstock and muted inks for a vintage Christmas-postage look.
- Stamp a ballerina, pianist, violinist, or orchestra conductor inside the stage opening.
- Keep the stage empty and add a small Christmas sentiment instead of a performer.
- Use a single postage stamp on a gift tag or small note card.
- Arrange six individual stamps in a different order rather than using the original die-cut panel.
- Mix the Nutcracker images with postage stamps left over from older Waffle Flower sets.
- Add metallic splatter, gold thread, or additional foiled sentiments for more shine.
- Adhere the individual stamps flat for easier mailing or use foam adhesive for added dimension.
- Decorate coordinating envelopes with musical notes or postal cancellation stamps.
Frequently Asked Questions
Should I stencil before or after die cutting the Postage Collage panel?
You can use either order, but I prefer to die cut first. The openings and cut marks make it easier to see where the stencil images should be positioned.
Do I have to use the suggested colors marked on the stencils?
No. The etched color suggestions provide a helpful starting point, but you can substitute any coordinated color palette. Keep enough contrast between adjoining layers so the small details remain visible.
How can I stop ink from covering the white postage borders?
Place the Postage Collage Blocks Stencil over the finished panel before stamping the postal details. The stencil masks the borders while leaving the colored centers exposed.
Can I cut clear sentiment stamps apart?
Yes. Carefully cut through the open space between words without cutting through any letters. The individual pieces can still be positioned together later when you want to stamp the complete sentiment.
How many cards can I make from one Postage Collage panel?
The panel contains six individual postage-stamp images. You can use all six on one card or divide them among several clean and simple designs. The final number will depend on how many images you use on each card.
What can I use instead of the stamped pianist?
The coordinating Ballerina Silhouettes Stamp Set includes ballerinas, musicians, musical notes, and other performers. You can also stencil the ballerina included in the Nutcracker stencil set.
More Christmas Cardmaking Ideas
- More Waffle Flower Postage Collage card ideas
- Ways to use small stamped images on cards
- Easy Christmas card layout ideas
- How to mass-produce Christmas cards
The Postage Collage Nutcracker Stencil creates a detailed Christmas design, but the real versatility comes from changing how the individual images are arranged. Keep the full panel intact, feature one stamp, build a structured grid, or create movement with angled groupings. By cutting apart three stenciled panels, I was able to create five distinct Christmas cards without changing the central technique. I hope these layouts inspire you to look at your postage-stamp designs in a few new ways. Have fun stamping!