


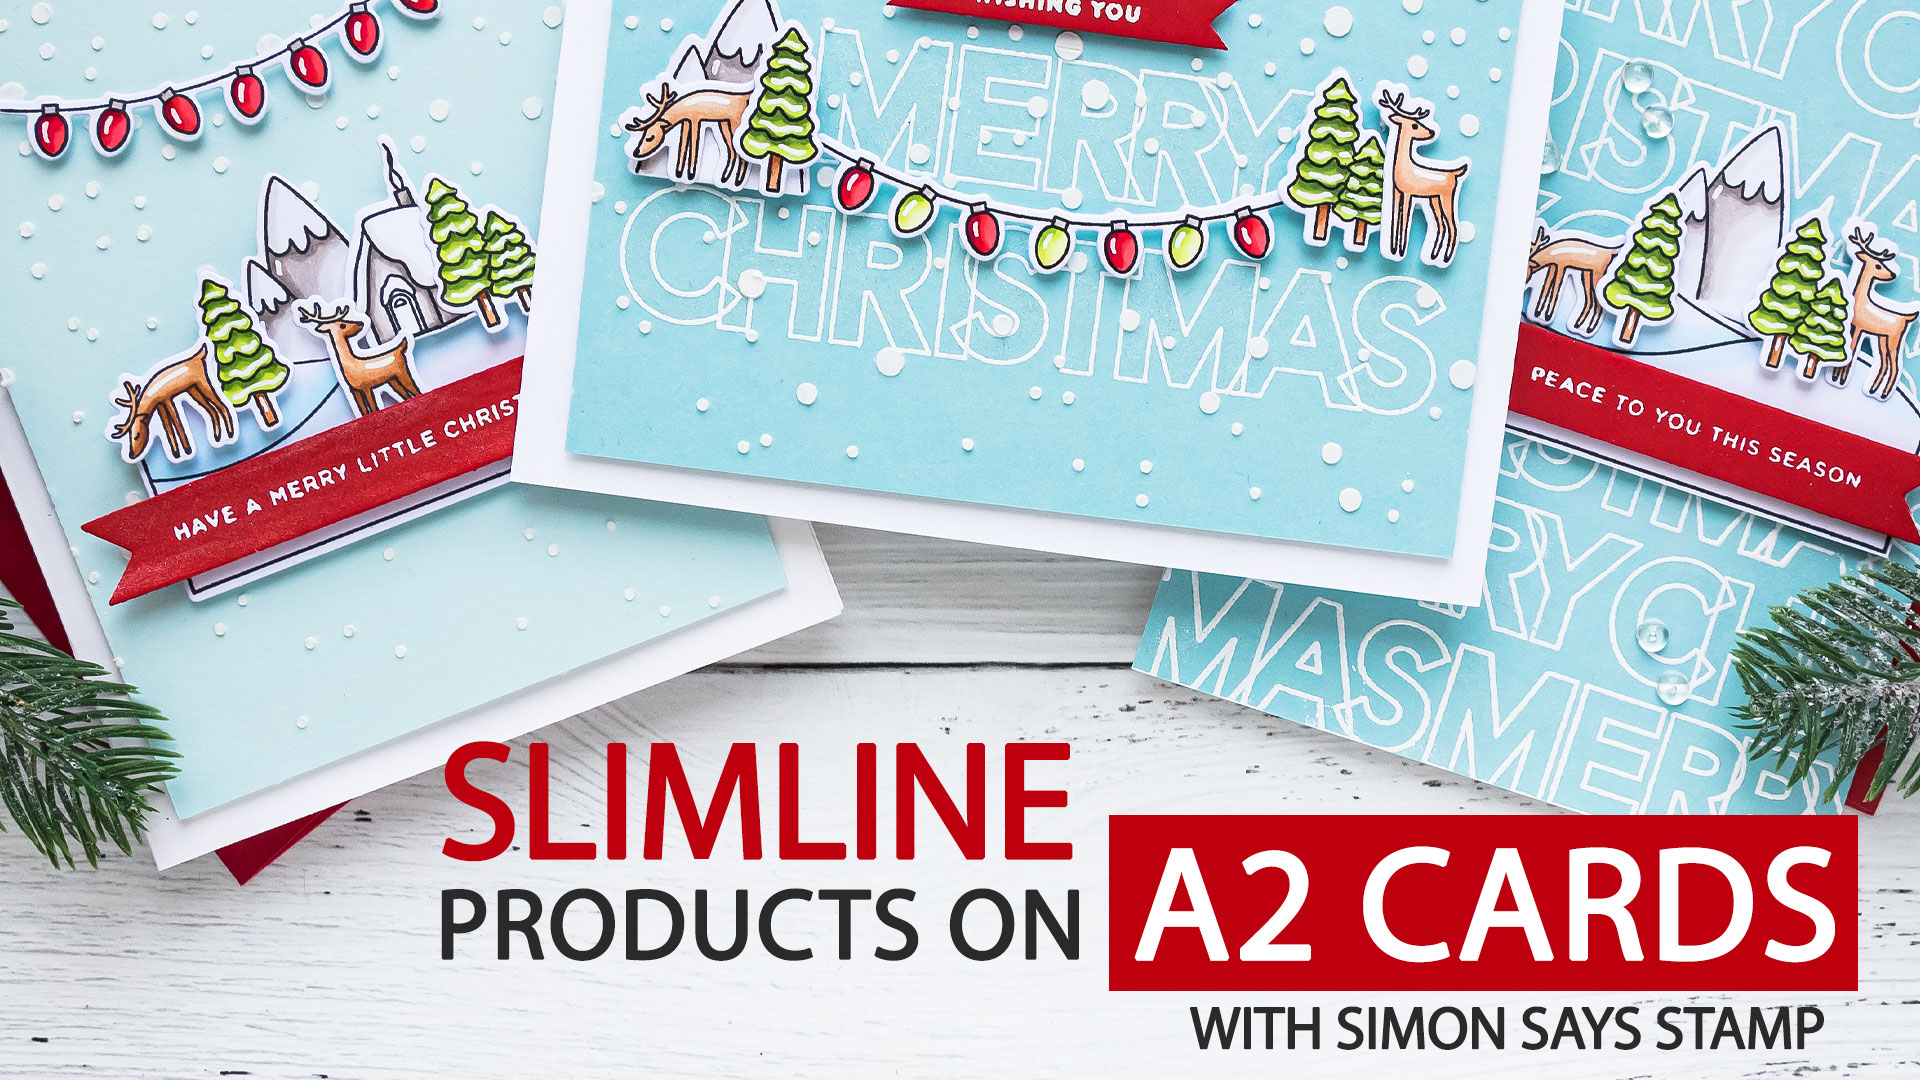
Hello and welcome back for another Yippee For Yana video! Today, similar to my previous video, I’m creating more regular size A2 cards using Slimline products. Maybe for my next video, I’ll try this the over way round – using regular products for slimline cards. What do you say?

Like this project? Pin it and save for later | Curious about my project photography? Click for details.
VIDEO TUTORIAL
Watch the video below or on my Youtube channel.
Like this video? Please give it a big thumbs up (you can do this on Youtube video page right under the video) and share it with a crafty friend! Leave me a comment too, I love hearing from you!
CARD DETAILS
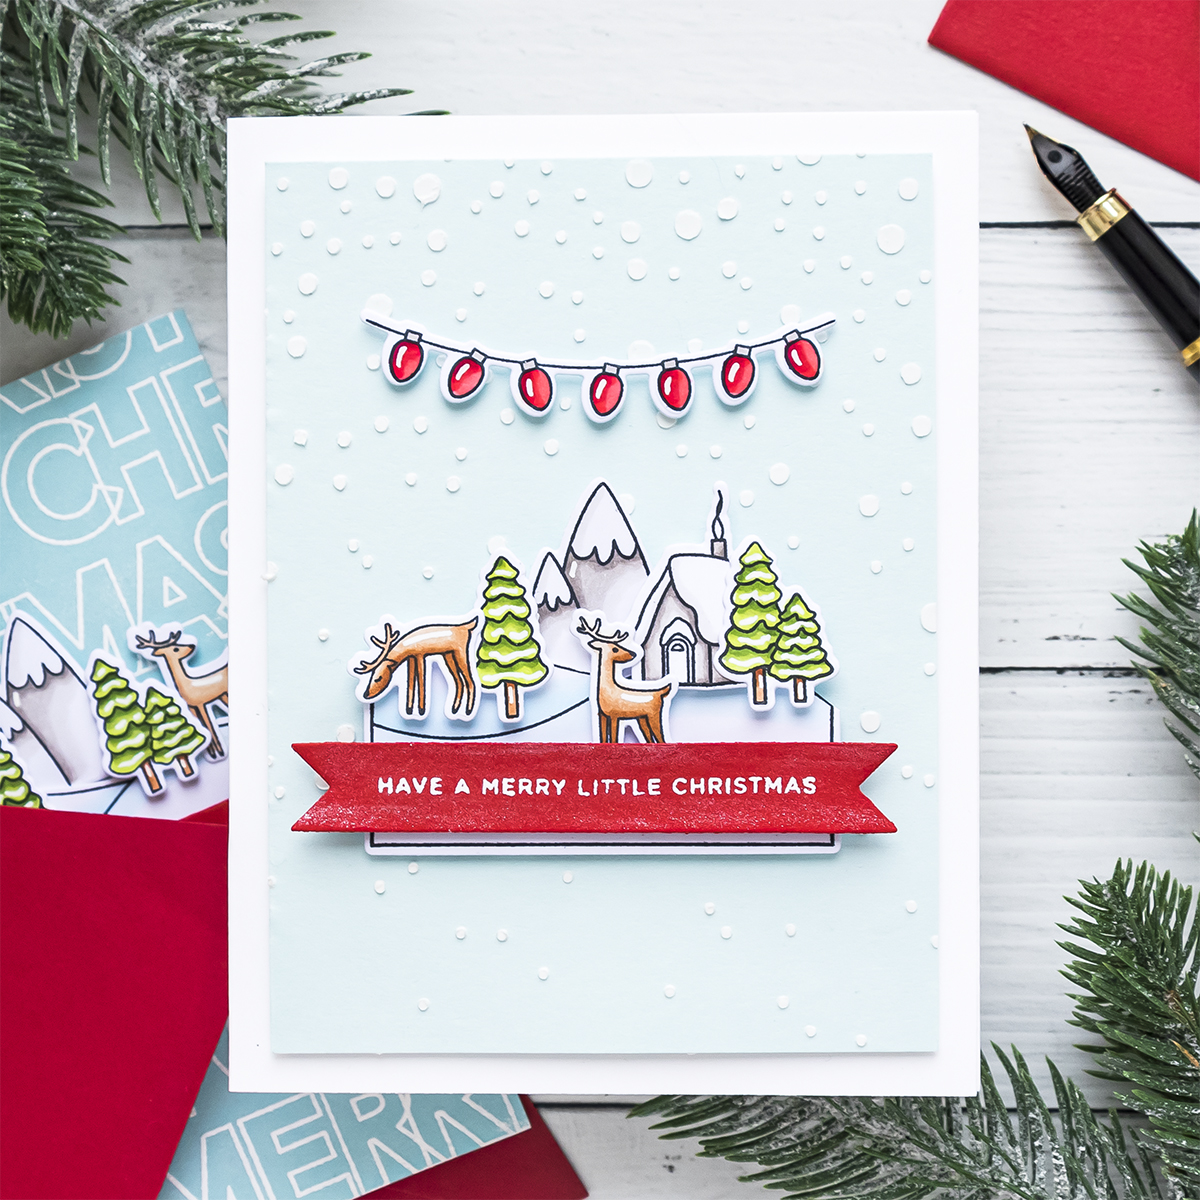
I have 3 cards to share, all A2, so they all measure 4 1/4 x 5 1/2” created using 3 main products from Simon Says stamp – Slimline Greetings stamp set, Large Falling Snow Stencil for Slimline cards, both of these are newer products and an oldie but goodie – Winter Scene stamp & die set.
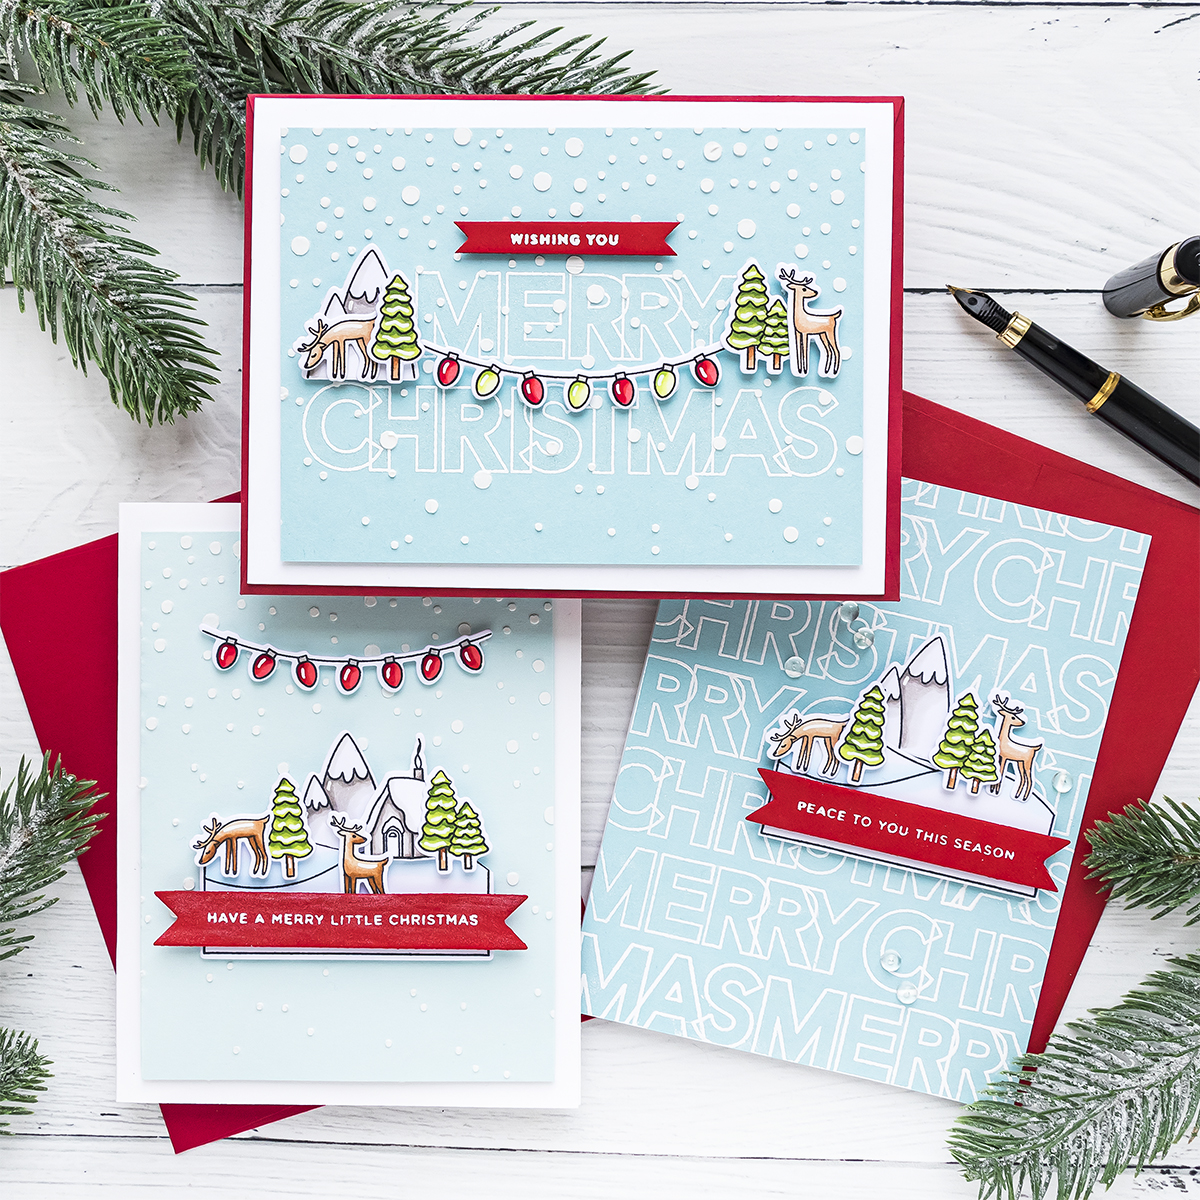
I white heat embossed the Merry Christmas sentiment from the Slimline Greetings stamp set on a panel of Mist cardstock by Hero Arts. Next, I used the Slimline Falling Snow Stencil and texture paste. I stamped, colored, and die-cut images from the Winter Scene stamp set.

Before adhering anything down I used my white pen, and added white highlights to the image, particularly to the lights. I also used an Aqua Shimmer pen from Tonic Studios and colored each letter in. This added a pretty subtle shimmer to my card – it is hard to see on camera or in the photos, but it looks really pretty in real life. I used foam adhesive squares and also glue to add the elements onto the panel and create my scene – I love the way this turned out. I also heat embossed “wishing you” sentiment in white embossing powder, also detail white on red cardstock, I trimmed that to a banner shape and foam mounted above the “merry” finishing up my sentiment. The “wishing you” comes from the Stained Glass Greetings stamp set.
I trimmed this panel to 3 3/4 x 5 “ and foam mounted onto an A2 white top folding card base and this gave me a pretty white border around my panel. Love the result!
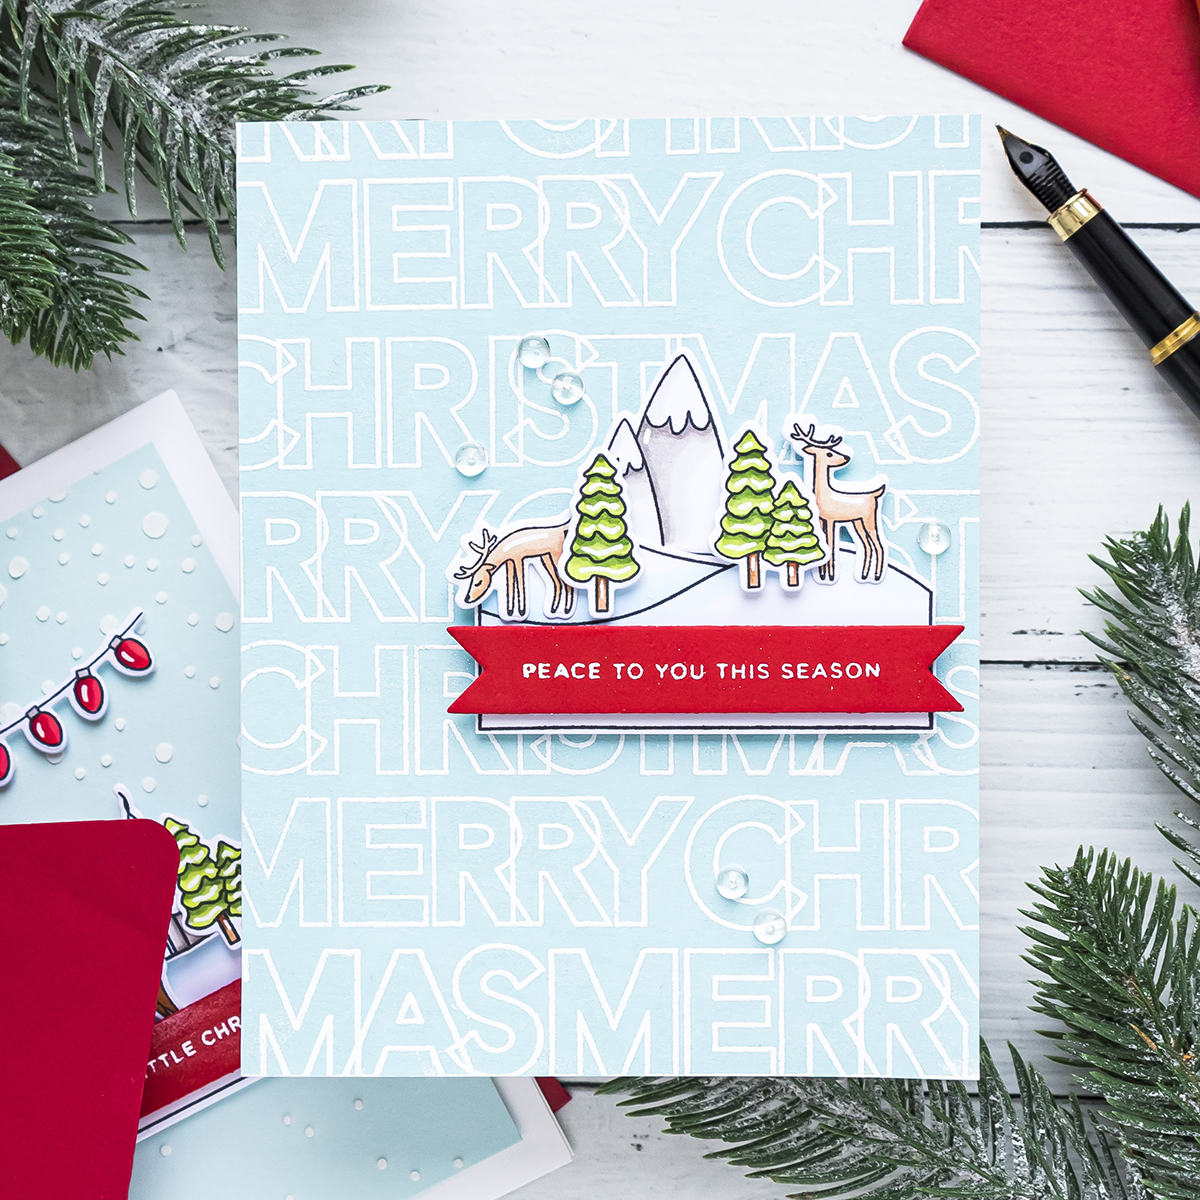
For my 2nd card, I wanted to use the Slimline Sentiment stamp set to make a custom background. The Merry Christmas sentiment is large enough to easily and quickly cover the front of an A2 card. I positioned the stamps on the lid of my regular size MISTI, in the center, and my plan was to move the background panel while keeping the stamps in the same place to create that background. I heat embossed the sentiment in detail white embossing powder to create a background for this card.
Stamping a background like this certainly is time-consuming, it is much easier to stamp a background using a background stamp, but this allows us to stretch our supplies and use them in a variety of additional ways, giving them more bang for the buck so to speak.
Next, I again stamped, colored, and cut out the images to make a scene on this card. I also stamped a rectangle with the hills and used my Copic markers in B00 and B000 to add some basic coloring. The stamping was done in Memento Tuxedo Black ink on Neenah Solar White 80 cardstock. I did use a coordinating die to cut the rectangle out, but I wasn’t planning on using the entire rectangle, in fact, I just wanted to use the bottom part with the hills, so I used my scissors and cut the bottom part out. Next, I white embossed a sub sentiment that reads Peace To You This Season and this comes from the Clean Line Christmas stamp set. I did my embossing in the same detail white embossing powder on red cardstock and cut that to a banner shape. I used foam adhesive squares and foam mounted my images onto the background building my scene. I love to make cards where I have several small scene-building elements as this allows me to arrange them how I like, and make my little scene. I finished this card by adding small clear droplets around the focal point. I didn’t trim this background but rather adhered the entire piece onto an A2 white side folding card base. And this finished my card #2.
For my card #3, I used just the stencil to create falling snow. I love this stencil and that it can be used for both slimline and A2 cards. I repeated the same steps in terms of building this card, so I’m not going to bore you with the process again. Instead, I’ll just show you the finished project!
Thanks so much for joining me today, have fun stamping!
SUPPLIES
I’m listing the products I used below. Click on the link to go directly to the product. Where available I use compensated affiliate links which means if you make a purchase I receive a small commission at no extra cost to you. Thank you so much for your support!
 Simon Says Clear Stamps Slimline Greetings Shop at: SSS |
 Simon Says Stamp Stencil Large Falling Snow Slimline Shop at: SSS |
 Simon Says Clear Stamps Winter Scene Shop at: SSS |
 Simon Says Stamp Winter Scene Wafer Dies Shop at: SSS |
 Simon Says Clear Stamps Stained Glass Greetings Shop at: SSS |
 CZ Design Clear Stamps Clean Line Christmas Shop at: SSS |
 Hero Arts Misti Mini Black Shop at: SSS |
 Mini Misti Stamping Tool Shop at: SSS |
 Neenah 110 Lb Solar White Cardstock Shop at: SSS |
 Neenah 80LB Solar White Cardstock Shop at: SSS |
 Simon Says Stamp Schoolhouse Red Cardstock Shop at: SSS |
 Hero Arts Hero Hues Cardstock Arctic Shop at: SSS |
 Hero Hues Premium Cardstock Mist Shop at: SSS |
 Memento Tuxedo Black Ink Pad Shop at: SSS |
 Hero Arts Clear Embossing & Watermark Ink Shop at: SSS |
 Hero Arts White Modeling Paste Shop at: SSS |
 Simon Says Stamp Embossing Powder White Fine Detail Shop at: SSS |
 EK Success Powder Tool Applicator Shop at: SSS |
 Hero Arts Heat Embossing Gun Shop at: SSS |
 Tonic Aqua Shimmer Pen Nuvo Shop at: SSS |
 Sakura Classic White Gelly Roll Pens Set of 3 Shop at: SSS |
") Pretty Pink Posh 4MM Clear Droplets (small) Shop at: SSS |

Super cute cards.Love the tiny scenes.
Yana – I love your videos and would love for you to make slimline cards making scenes as you did for these cards. I am a big fan of your cards!!
LOVE these cards, Yana – so crisp and beautifully made. The red and aqua are perfect together.