


Hello, crafters. Welcome back for another Yippee For Yana video! In this video, I am showing how to create elegant Christmas cards that are easily mass-produced and easy to mail, too.
I’m working with a new stamp set from Simon called Glistening Snowflakes. This stamp set is filled with beautiful snowflake imagery. If you want, you can also get a coordinating die set to cut these images out and I love that there’s a die for every single snowflake in this set. It makes it very versatile as you can use these snowflakes on many other projects.
There are no sentiments in this set, so I brought in another set, called Simple Holiday Greetings – just like the name says, these are simple font sentiments and they go well with the complexity of the snowflakes and complement them nicely.

Like this project? Pin it and save for later | Curious about my project photography? Click for details.
VIDEO TUTORIAL
Watch the video below or on my Youtube channel.
CARDS DETAILS
My plan for these cards is to heat emboss the image in the center of dark colored cardstock panel using metallic color embossing powder and darken the edges of the panel using an ink blending to bring the eye of the viewer to the center of the card and the beautiful snowflakes.

First, I stamped the image in clear embossing ink and covered it with Antique Gold embossing powder. I love this color of powder from Simon, I come back to this color every time I create Christmas cards. Next, I warmed up my heat tool and heat set the powder to melt it. The trick is to keep the heat tool moving otherwise if you keep it in one spot for too long, the paper might warp affecting the look of the finished card. Mine warped a little bit, it is expected when you do this kind of technique.

Next, I gave the powder a few seconds to cool off, you want to make sure to do that, otherwise, you might smear the hot powder on the paper, I have done that many times because of my lack of patience. Once the powder is cool, and it takes just 5 seconds for it to cool off, I used my pencil eraser and removed and leftover anti-static powder on the panel.
To add wow to this card, I ink blended dark green and black ink around the edges of the panel, staying away from the embossing.
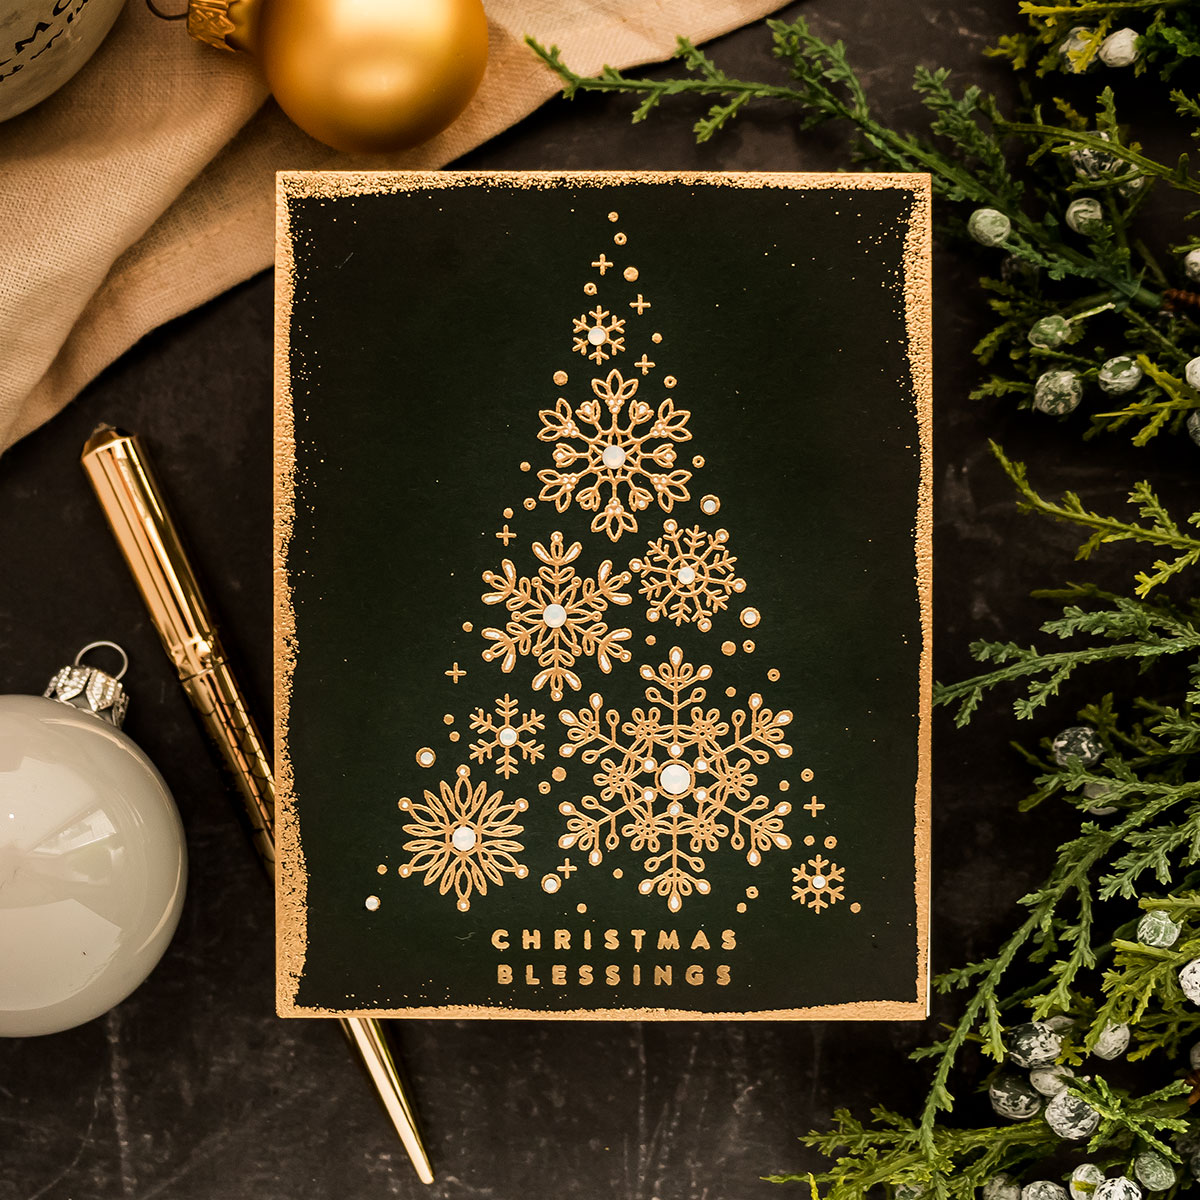
Next, I wanted to add gold embossing around the edges to make it look as if the panel was dipped in gold paint. I love this technique, it always gives very beautiful and elegant results. When doing this, you don’t want to pour the powder directly onto the panel because it will stick to any area that is wet. Instead, add a little bit of powder onto scrap paper, and then just dip the panel into the powder. Imagine you are dipping the panel into the paint. And you can control how deep you want to go in, meaning how much or how little embossing powder you want to get on your panel. And you can also use a paintbrush and knock any excess embossing powder if you feel like you have too much there.

Next, I used the heat tool and heat set the powder in place to create that beautiful gold-dipped edge. Lastly, I want to decorate my card with gems – I added Opal Gems from Spellbinders to the center of each snowflake and colored some snowflake section white using a white pen.
Have fun stamping!
SUPPLIES
I’m listing the products I used below. Click on the link to go directly to the product. Where available I use compensated affiliate links which means if you make a purchase I receive a small commission at no extra cost to you. Thank you so much for your support!
 Simon Says Clear Stamps Glistening Snowflakes Shop at: SSS |
 Simon Says Stamp Glistening Snowflakes Wafer Dies Shop at: SSS |
 Simon Says Stamps and Dies Glistening Snowflakes Shop at: SSS |
 Simon Says Clear Stamps Simple Holiday Greetings Shop at: SSS |
 Mini MISTI Stamping Tool Shop at: SSS |
 Spellbinders Clear Embossing & Watermark Ink Pad Shop at: SSS |
 Simon Says Stamp Intense Black Ink Shop at: SSS |
 Simon Says Stamp Antique Gold Embossing Powder Shop at: SSS |
 Simon Says Stamp Soft Navy Cardstock Shop at: SSS |
 Spellbinders Color Essentials Gems in Opal Shop at: SSS |
 Simon Says Stamp Pawsitively Saturated Ink Pad Field Shop at: SSS |
 Wagner Precision Heat Tool Shop at: SSS |
 Sakura Classic White Gelly Roll Pens Set of 3 Shop at: SSS |


Such a simple and elegant card design. I really like the gold embossing you added around the edges of the card.
Stunning and elegant,
These are so stunning, Yana!
These are gorgeous