

Hello, friends! For my today’s blog post & video tutorial I decided to do something slightly different, like altering die cuts with scissors to make them work for your project. Usually we simply cut the piece out with the help of our dies and use it as is, but one can always alter die cut pieces slightly to make them a better match for a specific project.
Like this project? Pin it and save for later | Curious about my project photography? Click for details.
VIDEO TUTORIAL
As always, I filmed a video tutorial showing how to create this project from start to finish. I’m hoping you’ll enjoy it. Watch it below or on my Youtube channel.
Like this video? Please give it a big thumbs up (you can do this on Youtube video page right under the video) and share with a crafty friend! Leave me a comment too, I love hearing from you!
CARD DETAILS
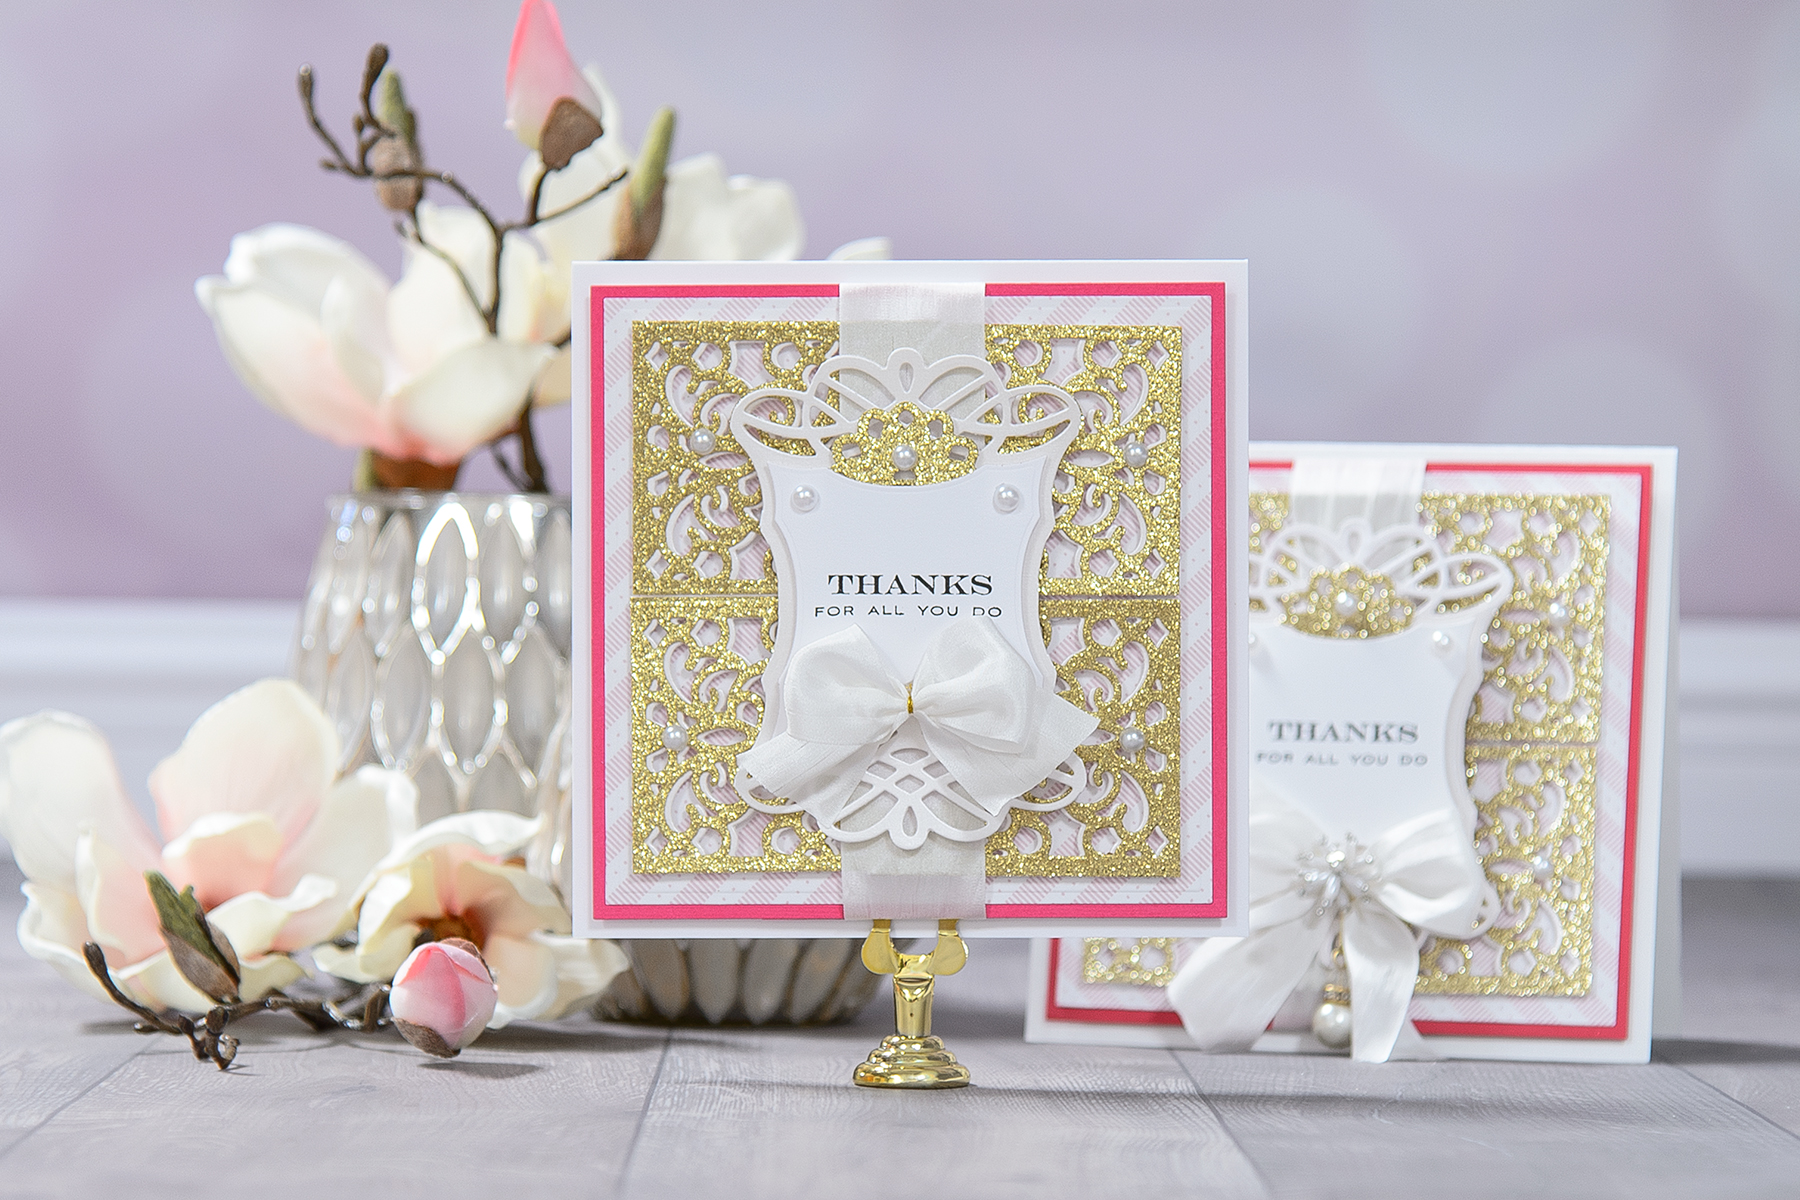
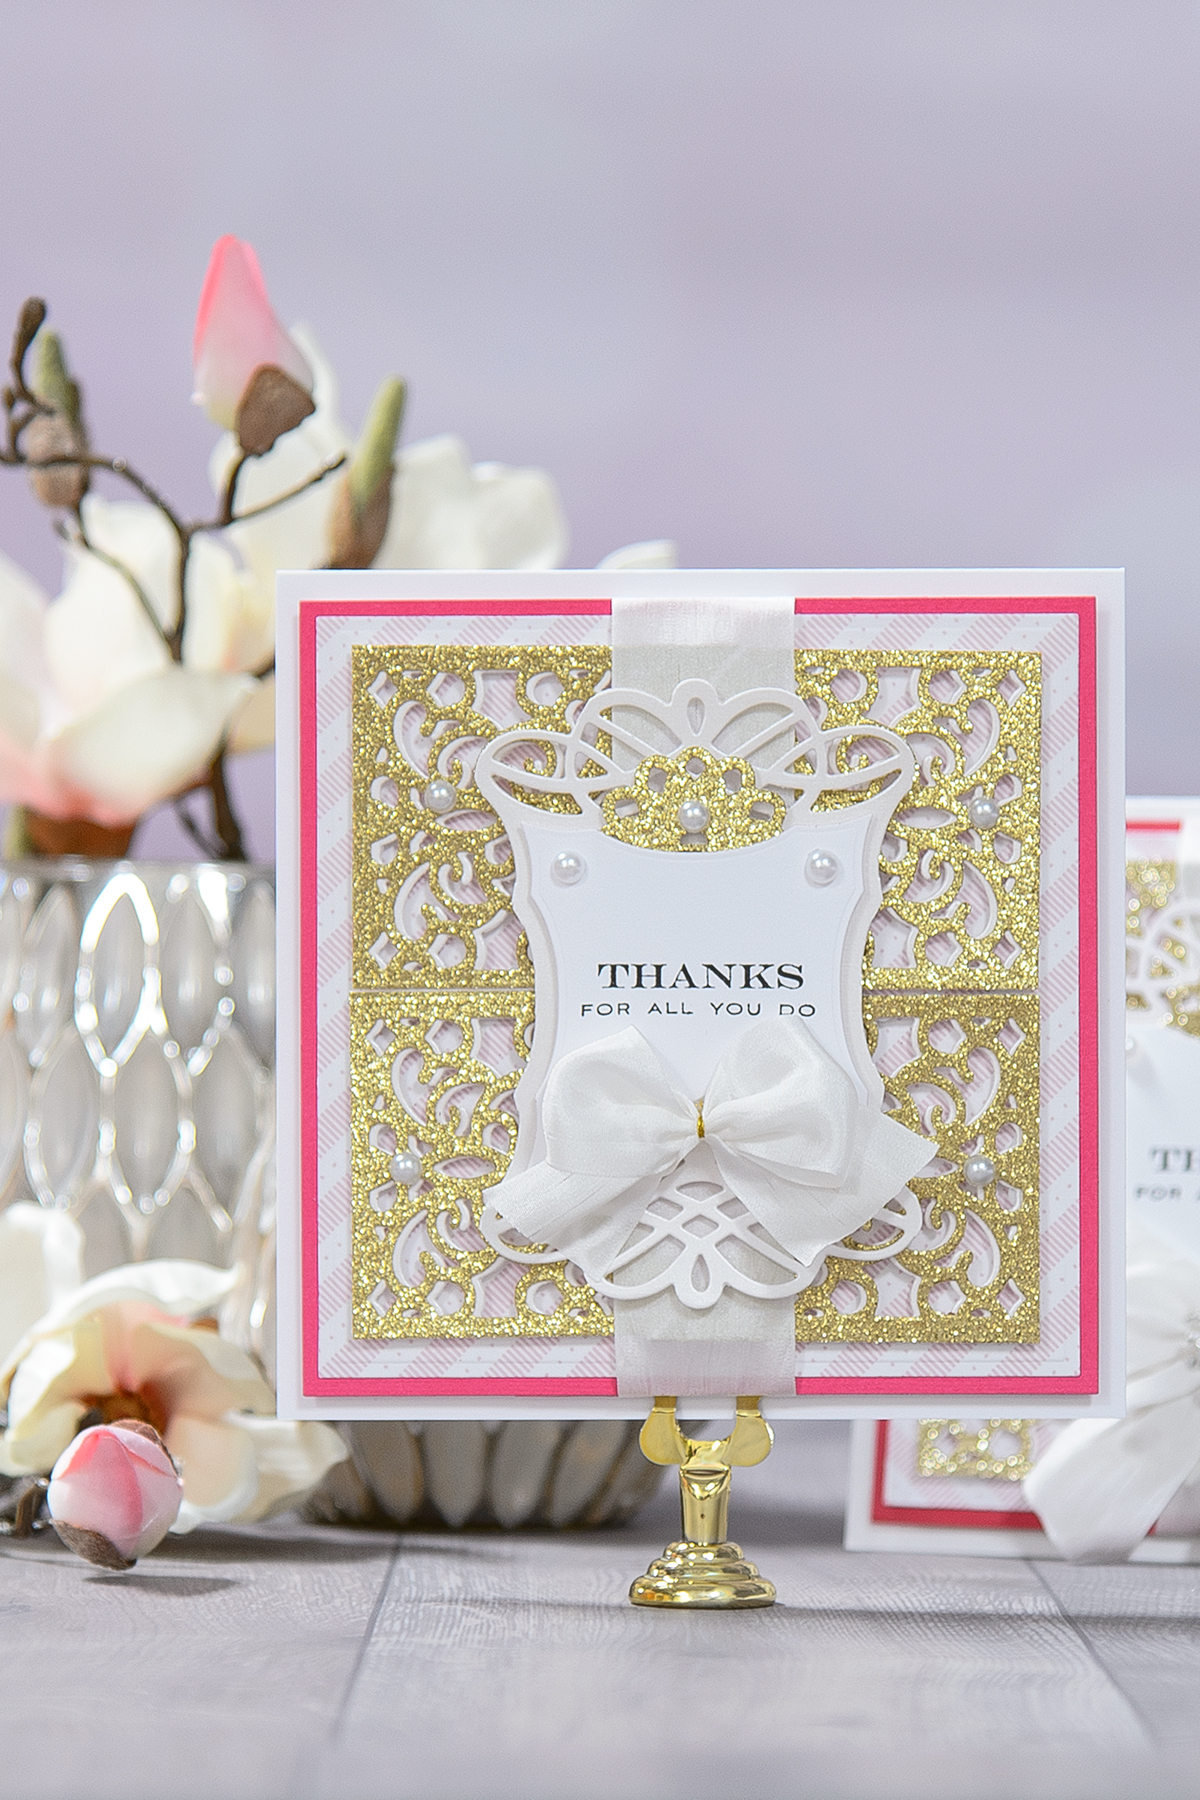
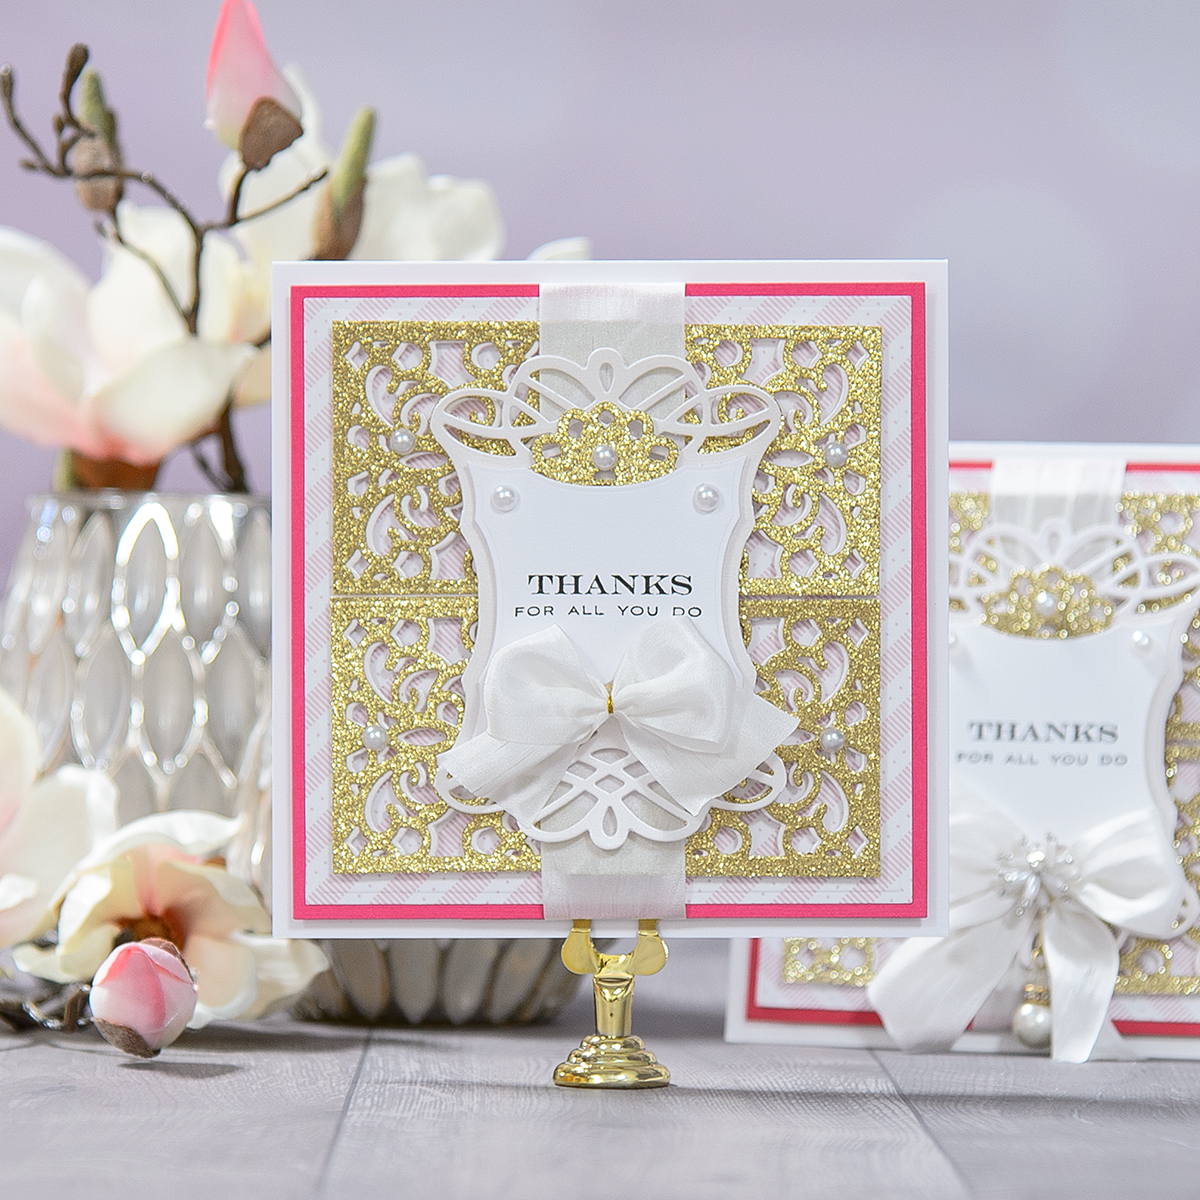
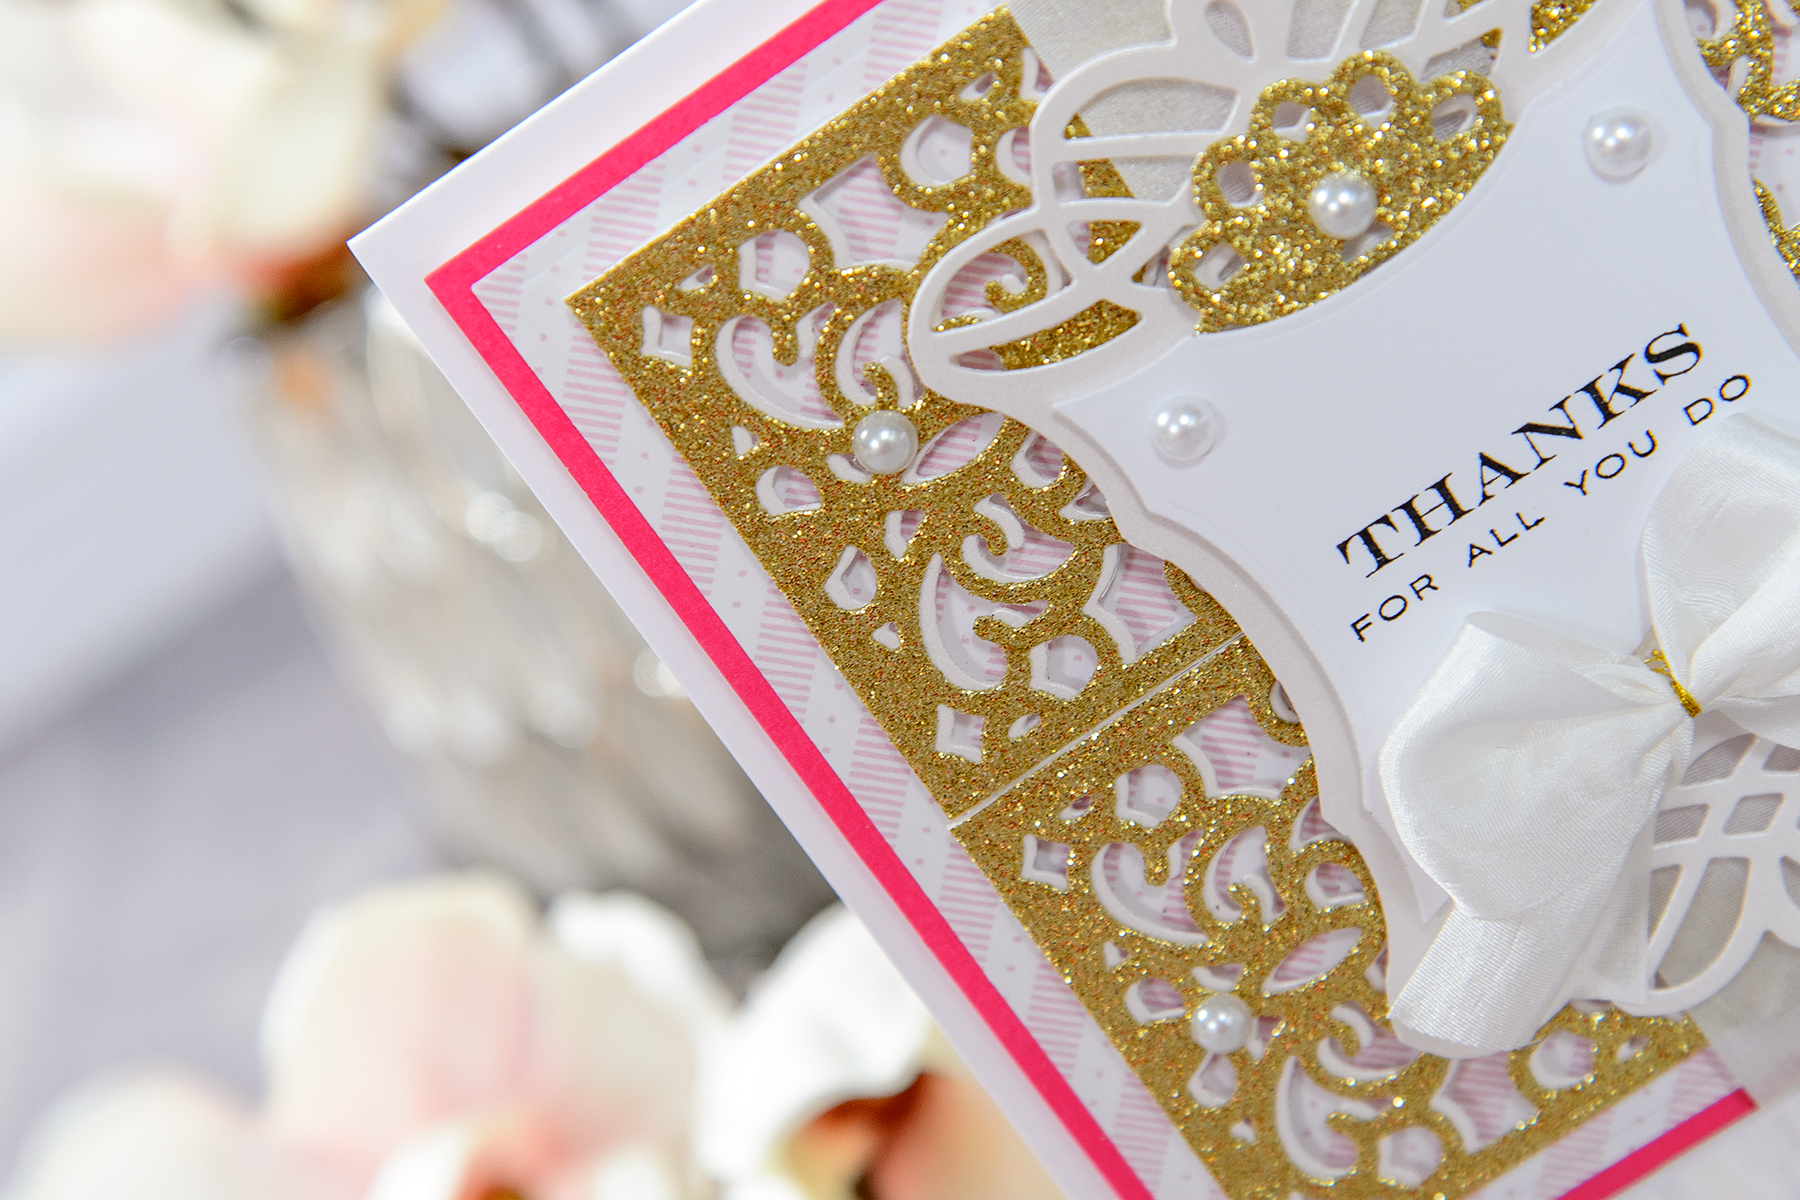
I started working on this project by die-cutting base panels for my project. I cut one out of pink cardstock and one, slightly smaller, out of patterned paper. You can cut panels like these using your paper trimmer, but I love to use my Matting Basics dies for this as I always get perfectly sized panels. And I can also dry emboss them and add a bit of extra detail.
This card was published in the Die-cutting Essentials Magazine Issue 25 along with a few other cards done in a similar style – check it out for more inspiration.
While I didn’t emboss the pink cardstock panel as it is mostly covered up by the pink one, I did emboss the patterned paper one. The embossing is hard to see on a photo, but it looks really beautiful in real life.

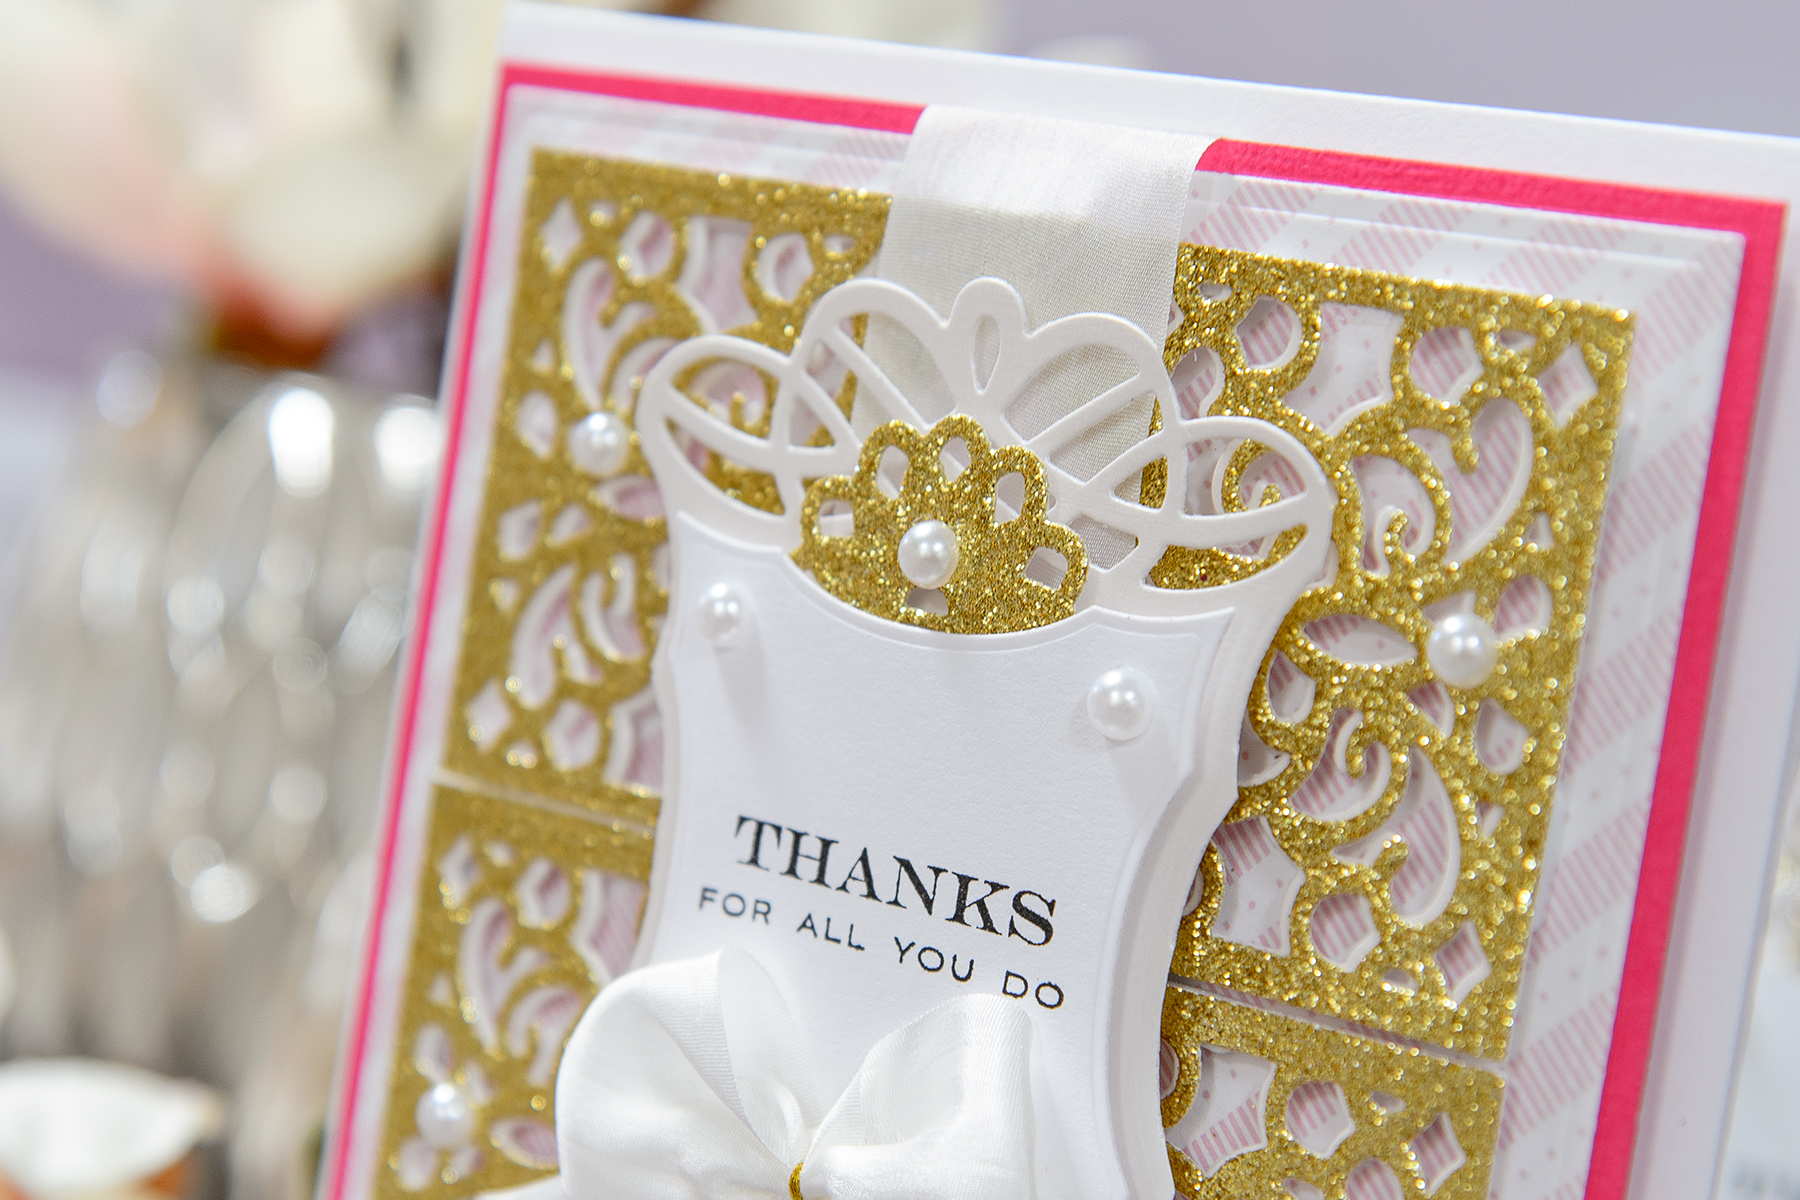
Next, I die-cut 8 identical elements using two dies from the Filigree Pocket set. I secured them together using washi tape and cut 4 identical elements out of gold glitter cardstock and 4 out of pearlescent white cardstock. The pocket die not only cuts the pocket shape, but also adds score lines to your die cut. I used those lines as a guide and trimmed my pieces with my scissors. Using double sided tape I adhered the two together (a gold glitter and a pearlescent one) and offset slightly positioning the gold one on top and pearlescent one on the bottom.
I adhered my 2 background panels together and added a layer of fun foam from the back to later pop this background up on a 6” square card base. Using foam adhesive I foam mounted 4 filigree elements to create the illusion of a seamless background. After adding white silk ribbon onto my card I adhered my background onto a white top folding card base.
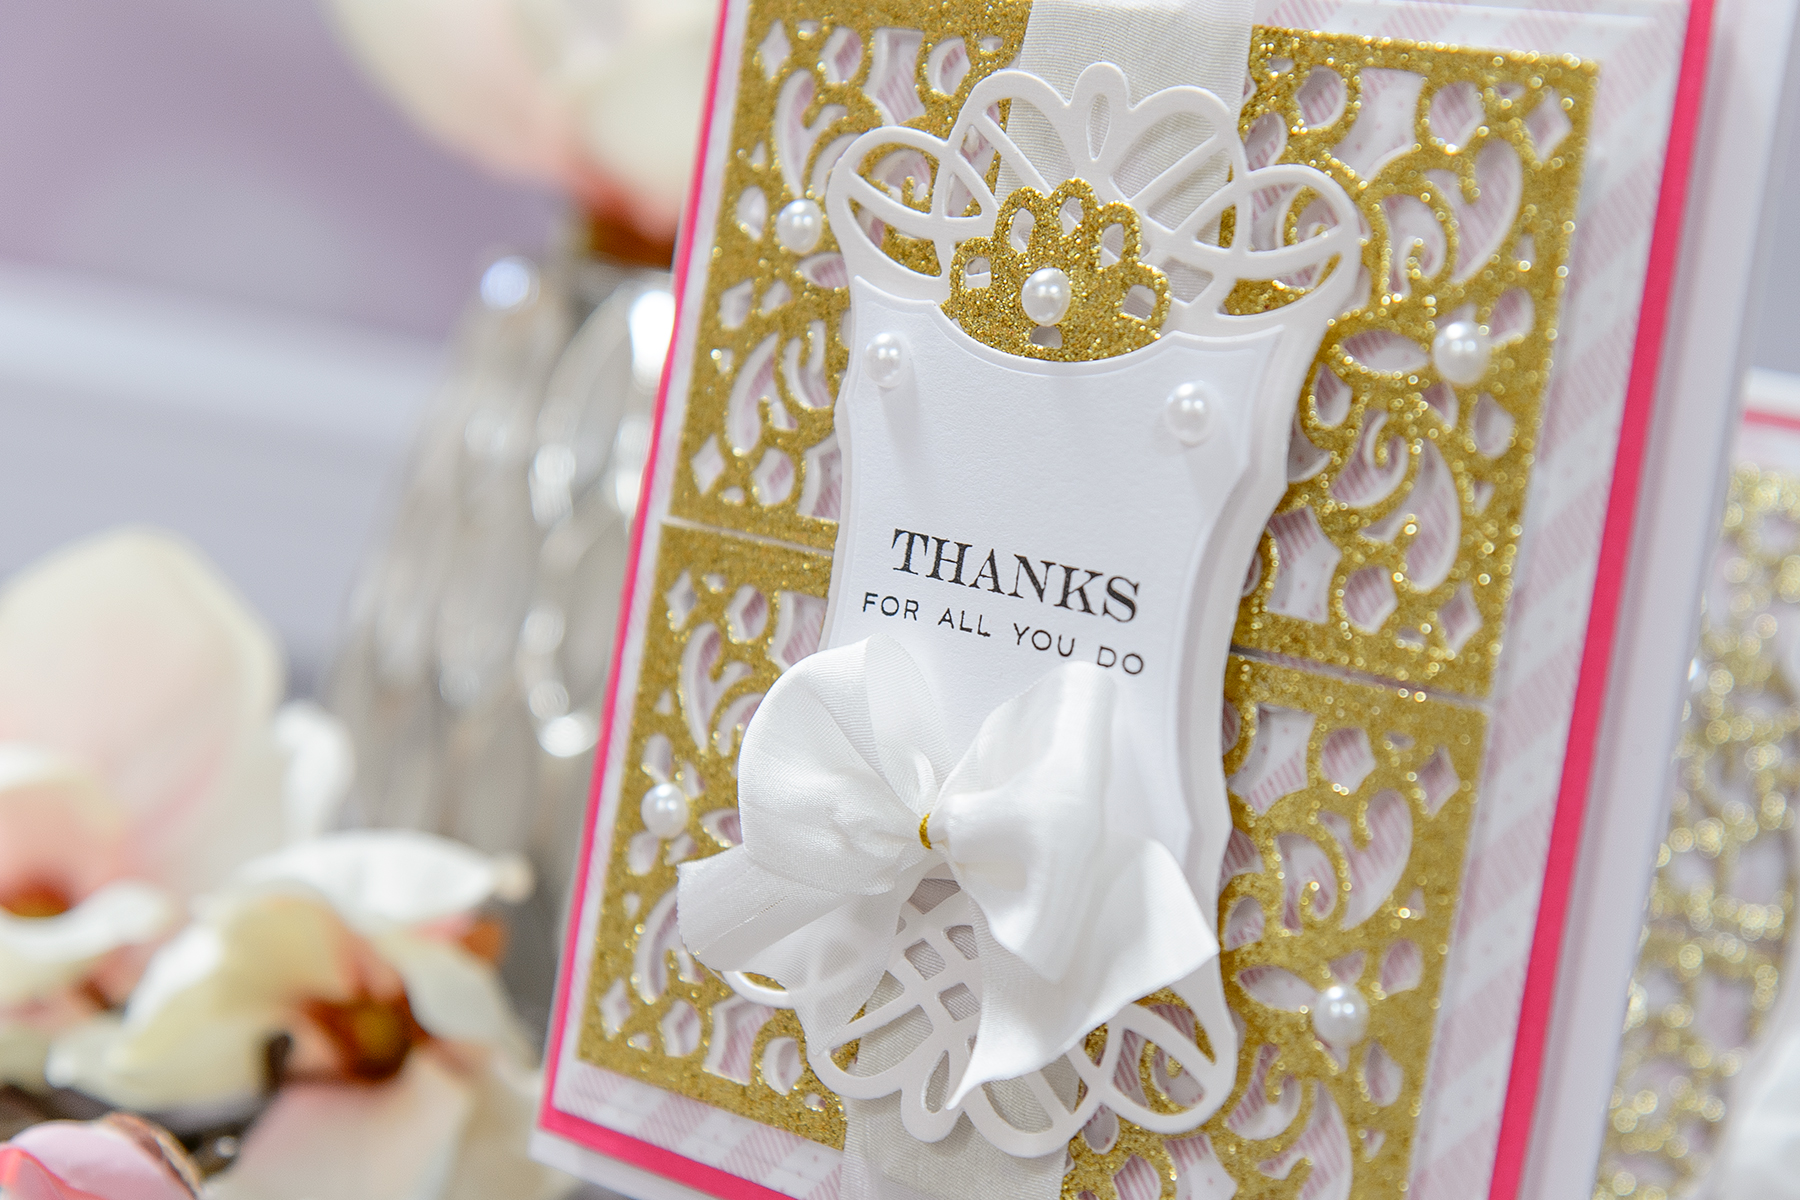
To create a focal point I die cut Braided Grace Square out of pearlescent white paper and also a smaller label out of white paper, the latter housed my “Thanks For All You Do” sentiment.
Before adhering the Braided Grace Square piece, I used my scissors and altered it to have a more rectangular rather than square shape (I simply cut some of the loops off). I didn’t want to cover a lot of that beautiful filigree background, but I also wanted to use this particula, Braided Grace Square die, so altering it with scissors was the best option!
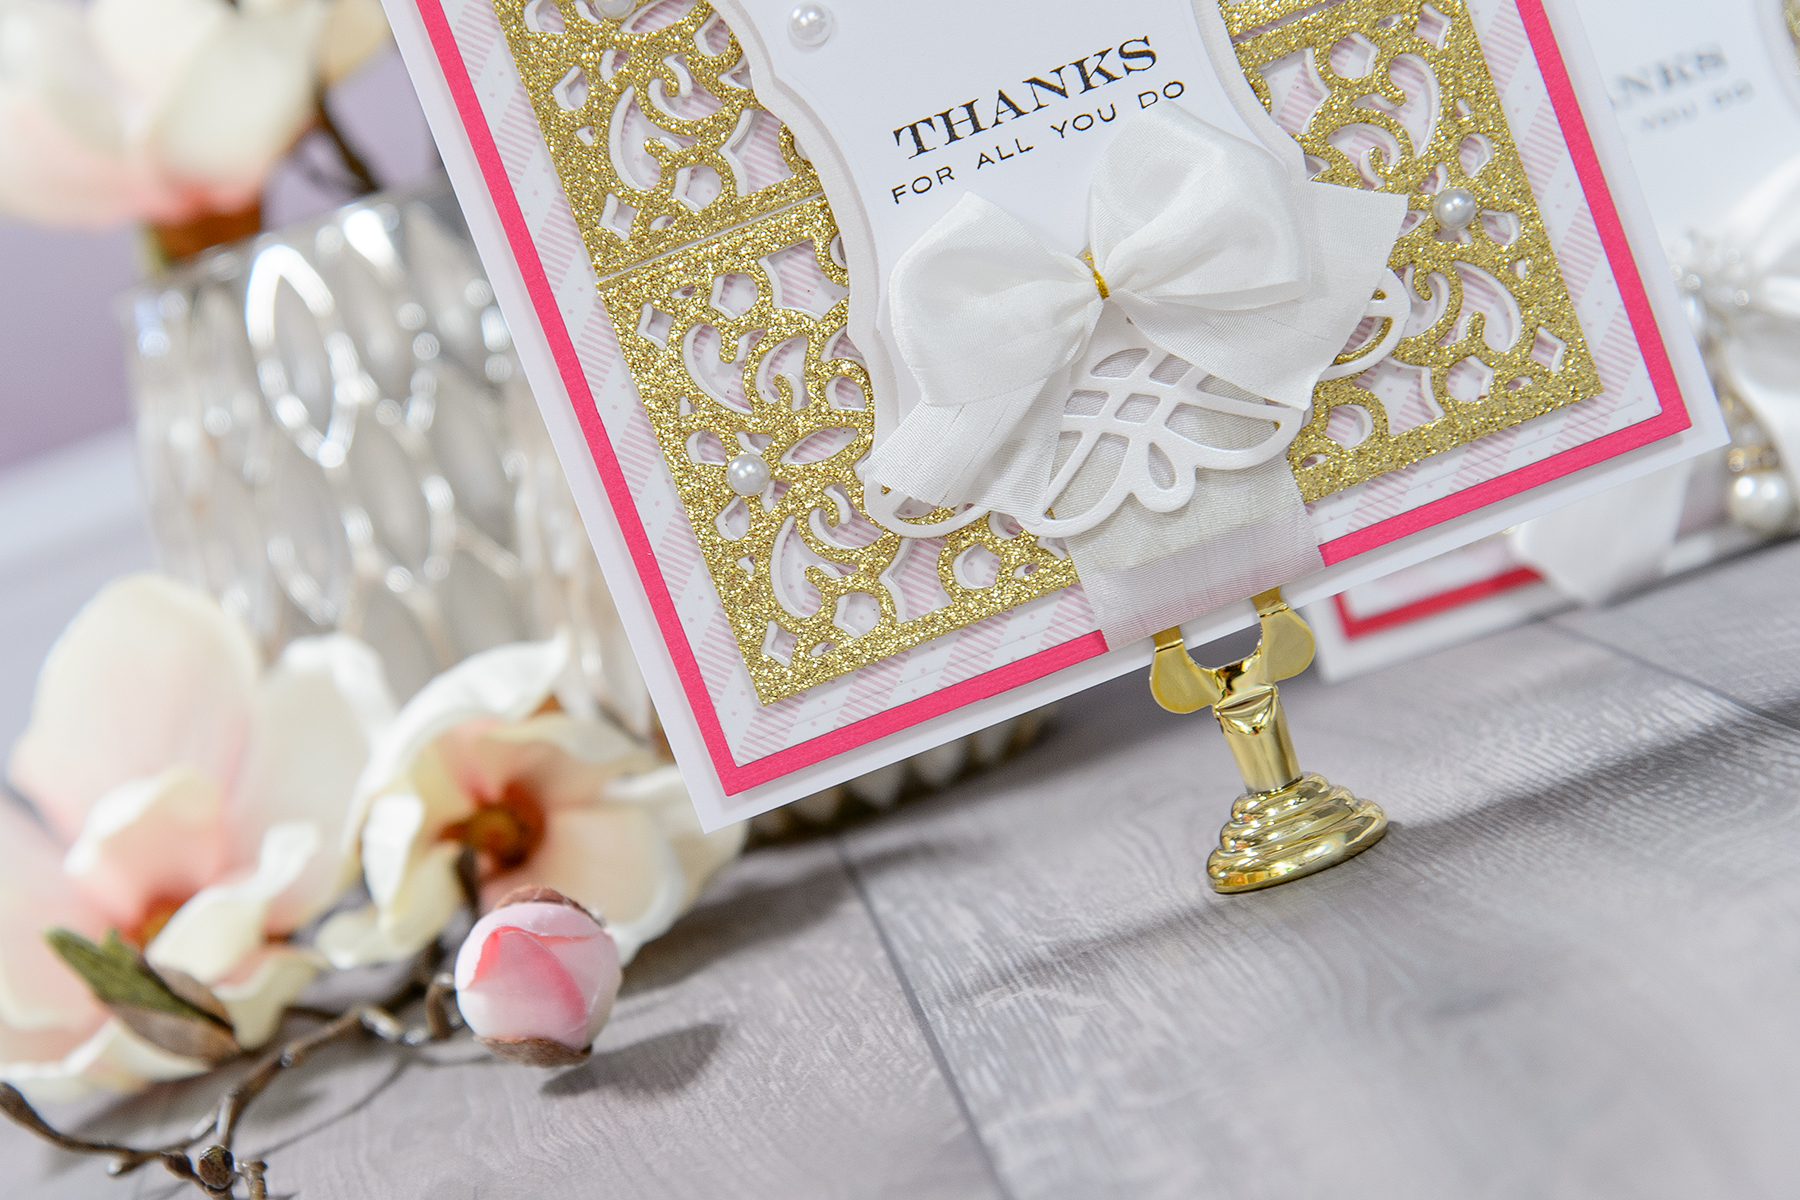
To embellish this card I added a ribbon bow and adhered several self adhesive pearls.
Thank you so much for stopping by today and have fun die cutting!
SUPPLIES
I’m listing the products I used below. Click on the link to go directly to the product. Where available I use compensated affiliate links which means if you make a purchase I receive a small commission at no extra cost to you. Thank you so much for your support
 Spellbinders Filigree Pocket Dies Shop at: SSS | SC | SPEL | AZ |
 Spellbinders Braided Grace Square Dies Shop at: SSS | SC | SPEL | AZ |
 Spellbinders 6 x 6 Matting Basics A Dies Shop at: SSS | SC | SPEL | AZ |
 Spellbinders 6 x 6 Matting Basics B Dies Shop at: SC | SPEL | AZ |
 Spellbinders Tool ‘n One Shop at: SSS | SC | SPEL | AZ |
 Spellbinders Platinum Machine Shop at: SSS | SC | SPEL | AZ |
 Tsukineko VersaFine Onyx Black Ink Shop at: SSS | AZ |
 Altenew Many Thanks Stamp Shop at: SSS | BL |
 Hero Arts 48 Count Pearls 3mm Small Shop at: AZ |
 Scrapbook Adhesives White Foam Squares Shop at: SSS | SC | AZ |
 Be Creative Tape 3mm Sookwang Shop at: SSS |
 Neenah 110 Lb Solar White Cardstock Shop at: SSS | AZ |
 Scor-tape 2 1/2 Inch Crafting Tape Shop at: SSS |
 White Fun Foam 12 Pack 9 x 12 Shop at: SSS | AZ |
 First Edition 12×12 Designer Paper Pad – Sweet Nothings Shop at: AZ |
 My Colors Cardstock – Watermelon Pink Shop at: SC | AZ |
 Therm O Web iCraft Mixed Media Adhesive Shop at: SC | AZ |
Other supplies not linked above:
My Paper Studio Solid Glitter Gold 12×12 cardstock; Worldwin White pearlescent cardstock; May Arts 1 ¼” wide Silk Ribbon – White; Hot Glue Gun.
WOW! And holy cow!!! Another stunning card!!! I love the background and appreciate your tips on creating it. I also really love the shape of the label! How different. And the font of the sentiment goes so well with the card. Really, Yana, you create such gorgeous cards with the Spellbinders dies. I do have a question. On the first card. The ribbon. I noticed this on another card you made and was wondering. It doesn’t look (from the photo) like you have tied a bow. It looks like there is a gold ring of some kind there instead. I really like the look. Am I mistaken and you just tied a regular bow??? Sometimes I have great luck tying a good bow and other times … not so much!! If there’s another “trick” you have, would you mind sharing it?? The bling on the bow in the second card is really pretty. Thank you so much for the video, Yana.
thank you, Debbie! Yes, I sometimes cheat because I am never good with bows – I cut ribbon into pieces to make a bow and then put it together (secure it) using white or gold thread. This gives me more control and makes my ribbon a lot less bulky.
Great idea! Thank you for sharing it!!
Beautiful card. I love how you did the gold and pearl cardstock together. Great look and just the right touch to make it stand out. The idea of cutting the die is an awesome idea. Stunning beautiful card.
These are so elegant!