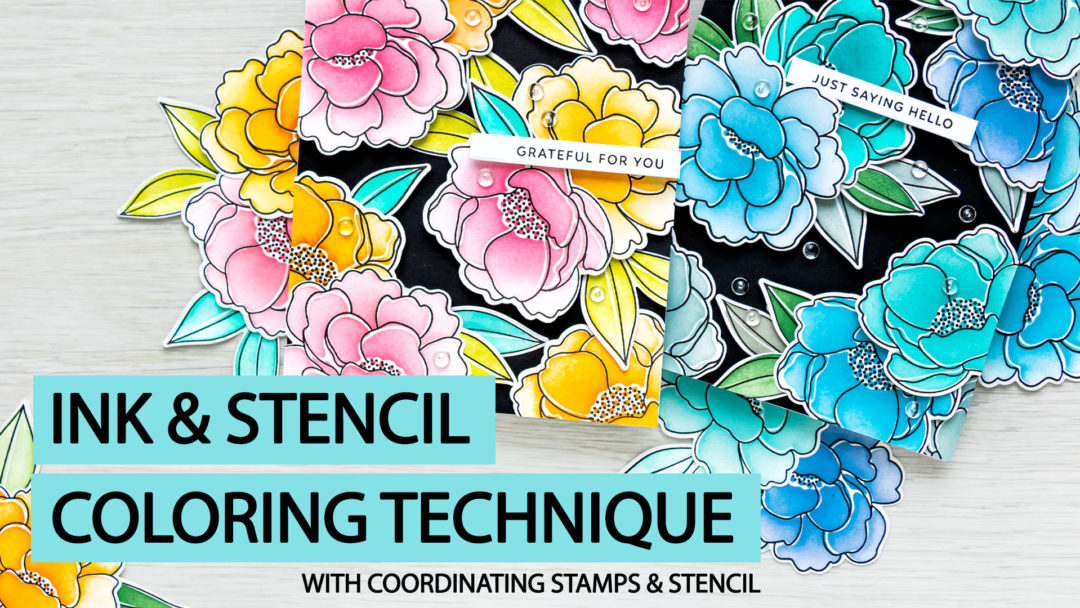
Pretty Pink Posh | Ink & Stencil Coloring Technique | Video | Blog Hop + Giveaway
Hello crafters! Pretty Pink Posh recently came out with a clever new product – a stencil that matches a previously released stamp set. I thought it was simply genius. Whenever I see a product that can allow me to get more use out of the products I already have, I get very excited and I immediately want to play.
The new peony stencil coordinates with the previously released floral stamp set and, even the previously released floral coordinating die. So you have 3 products that work perfectly well together letting you stretch the use of each product and create more, create differently.
Like this project? Pin it and save for later | Curious about my project photography? Click for details.
VIDEO TUTORIAL
Watch the video below or on my Youtube channel.
Like this video? Please give it a big thumbs up (you can do this on Youtube video page right under the video) and share it with a crafty friend! Leave me a comment too, I love hearing from you!
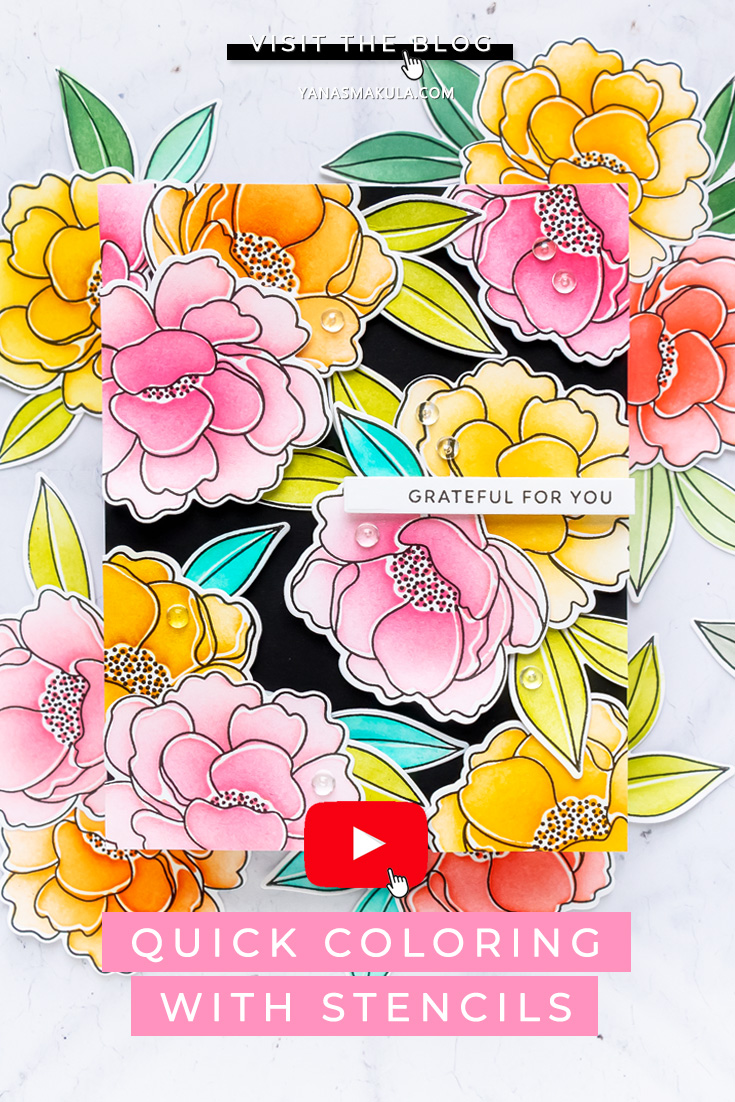
CARD IDEA
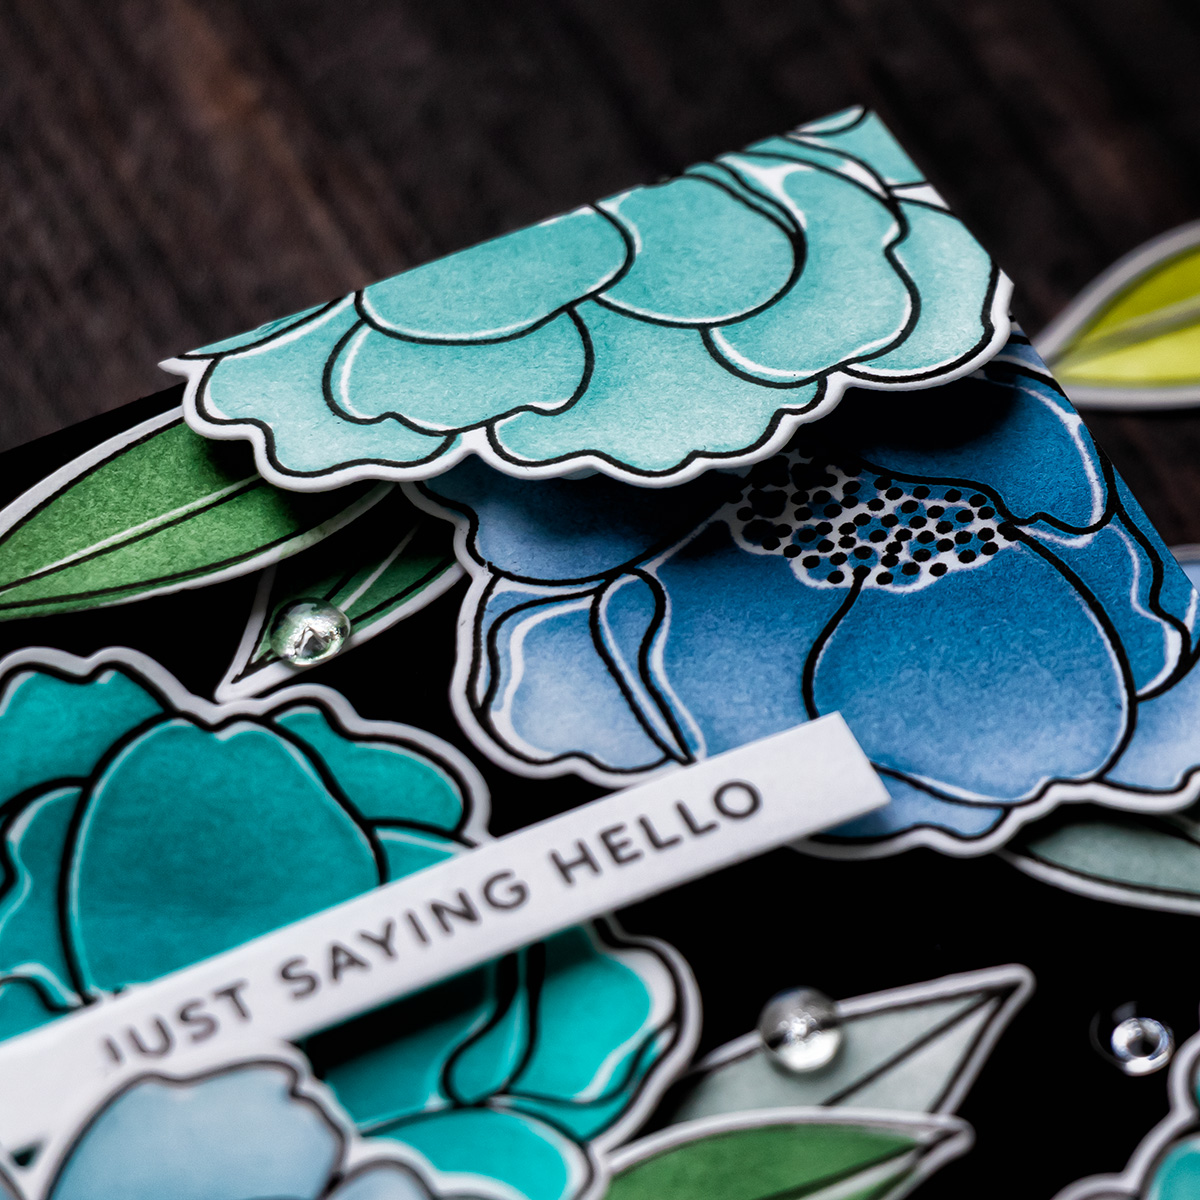
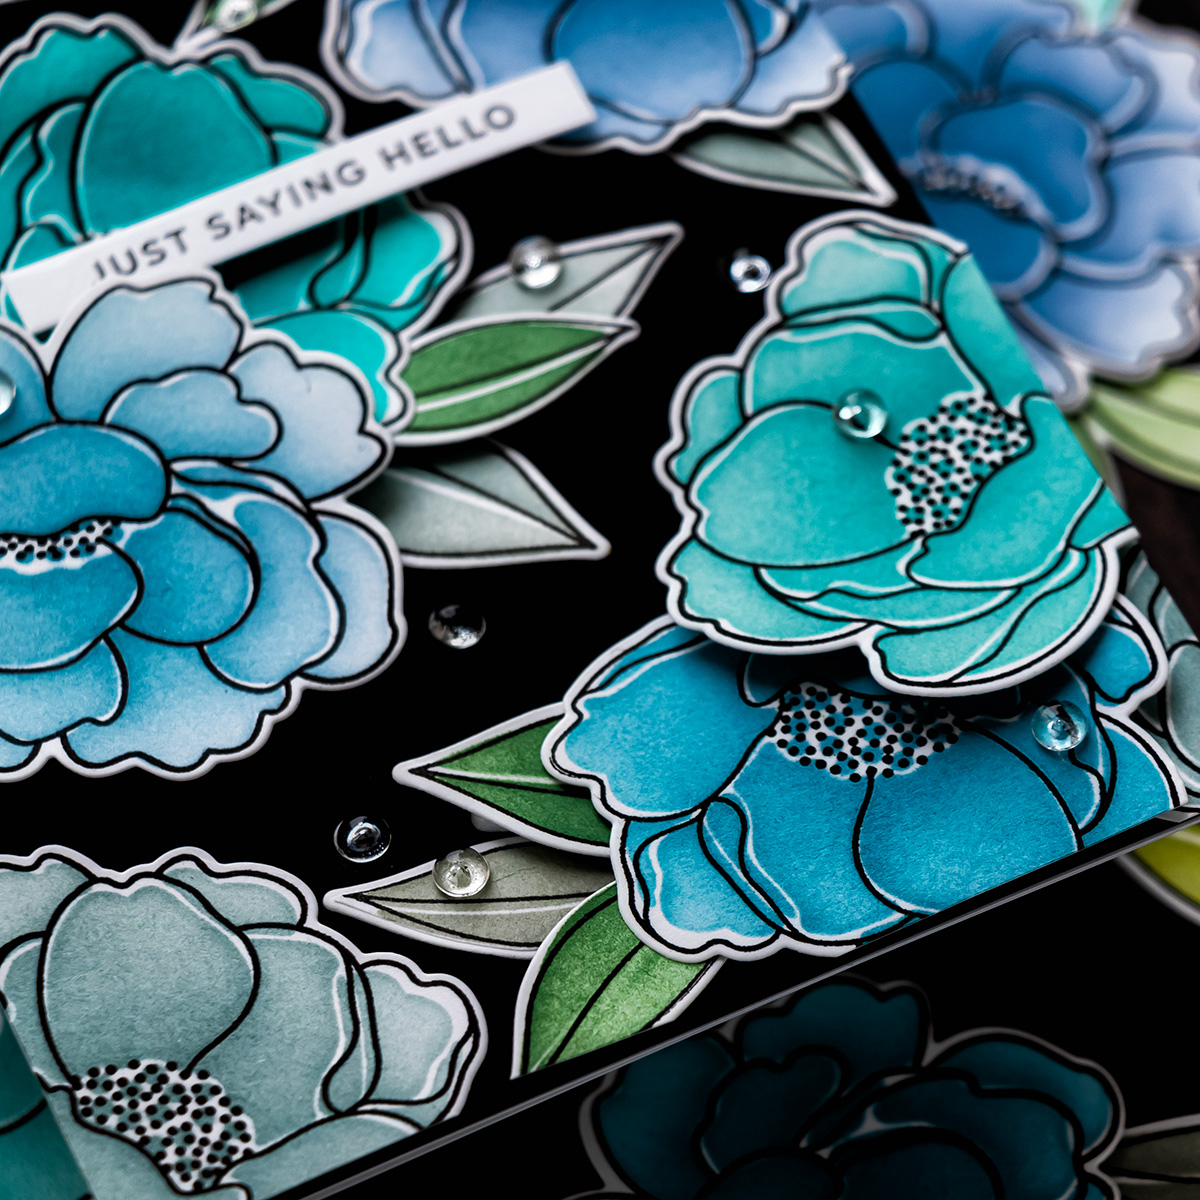
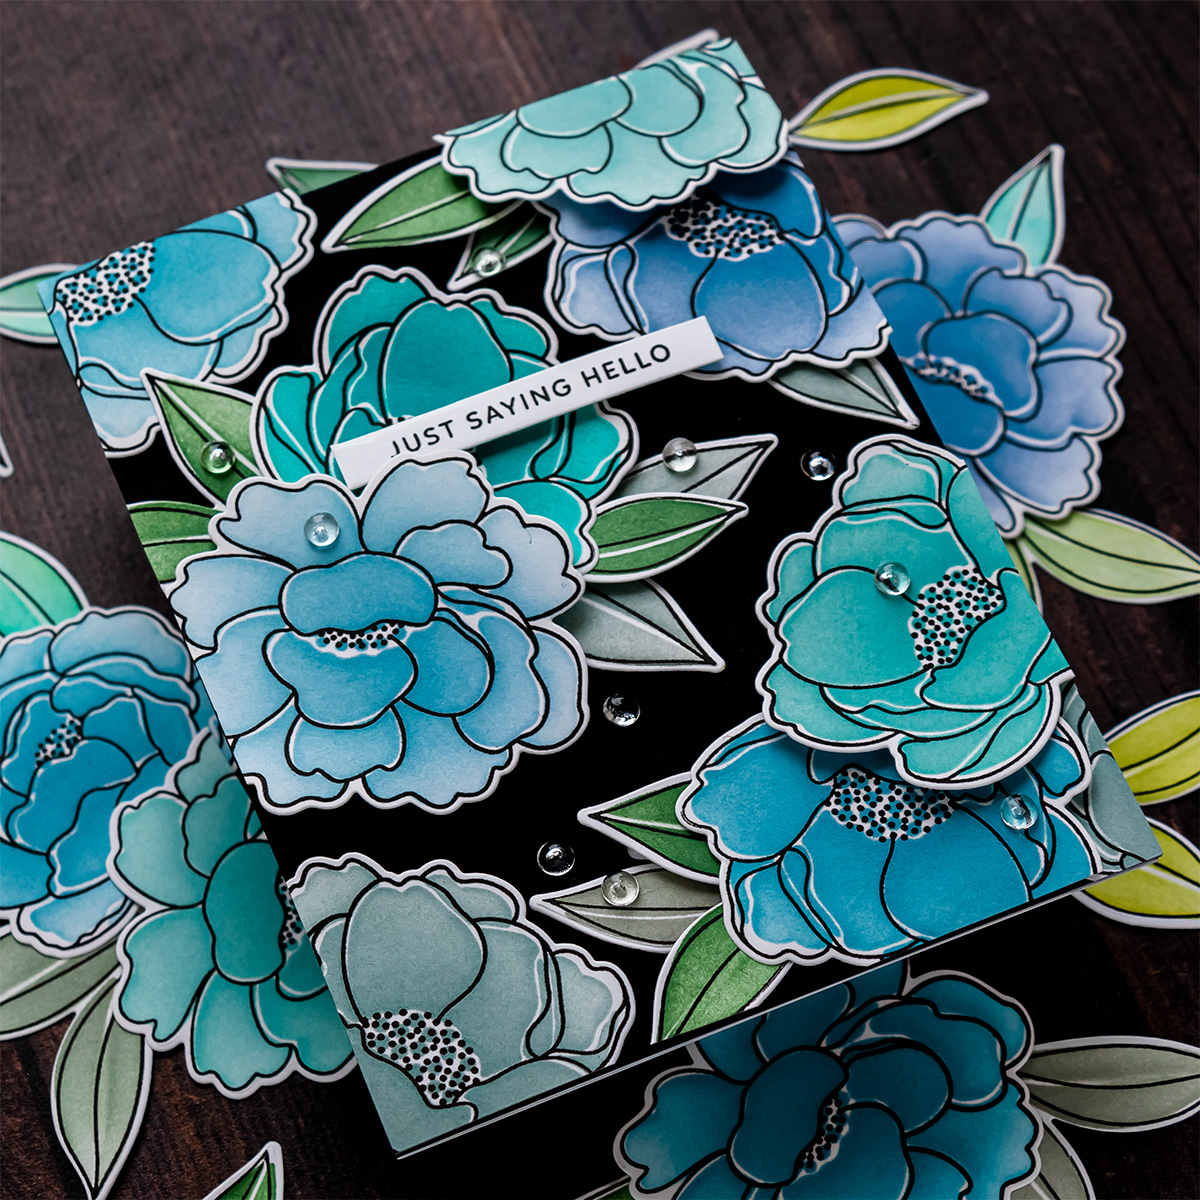
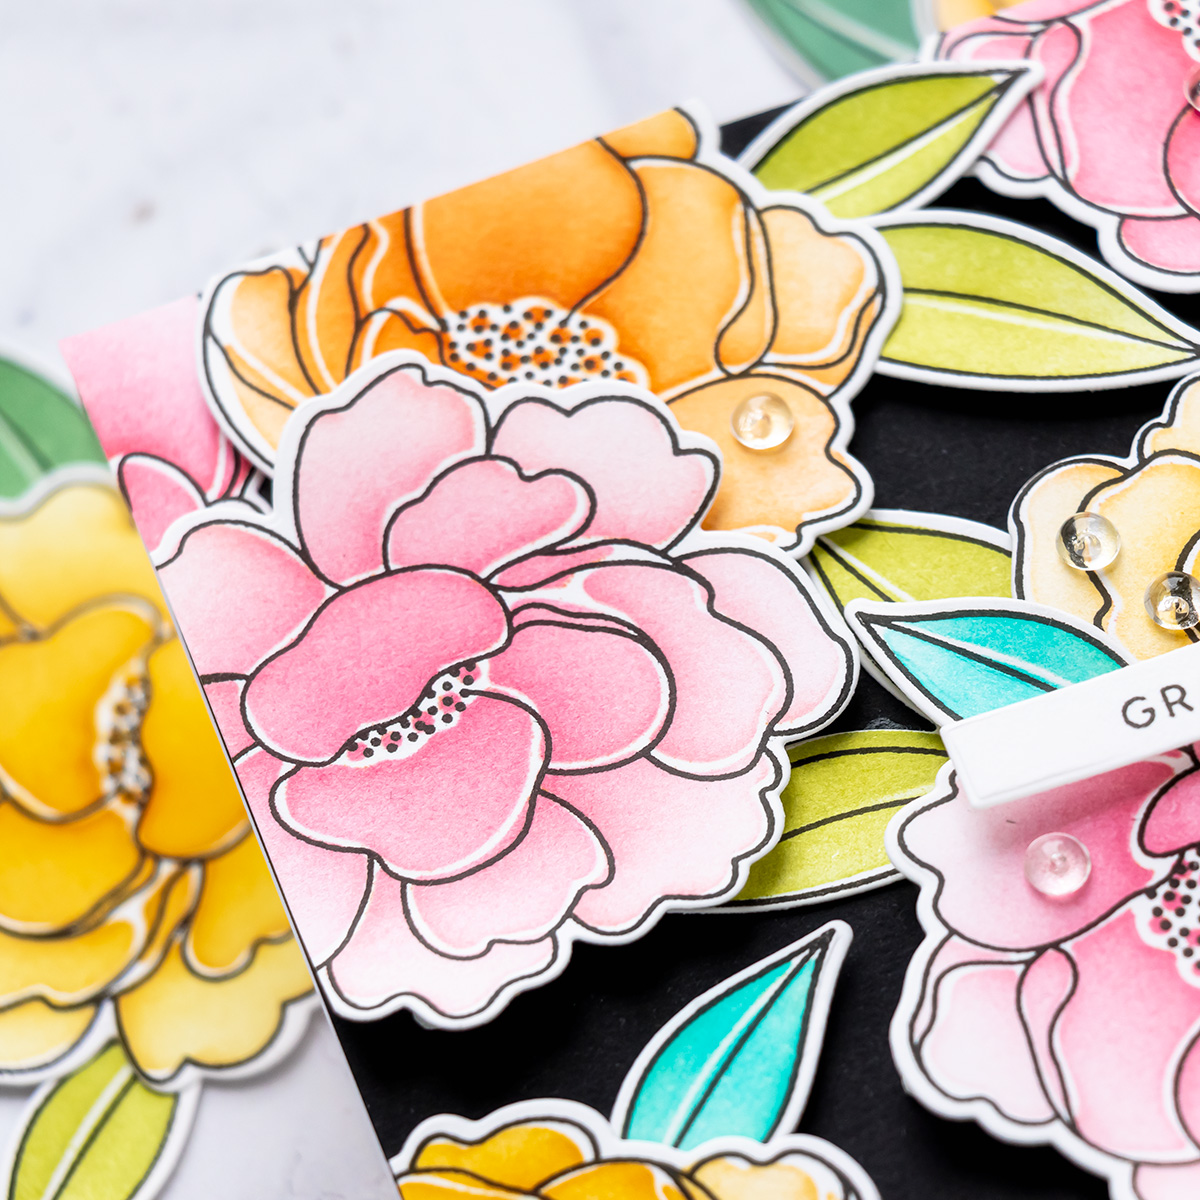
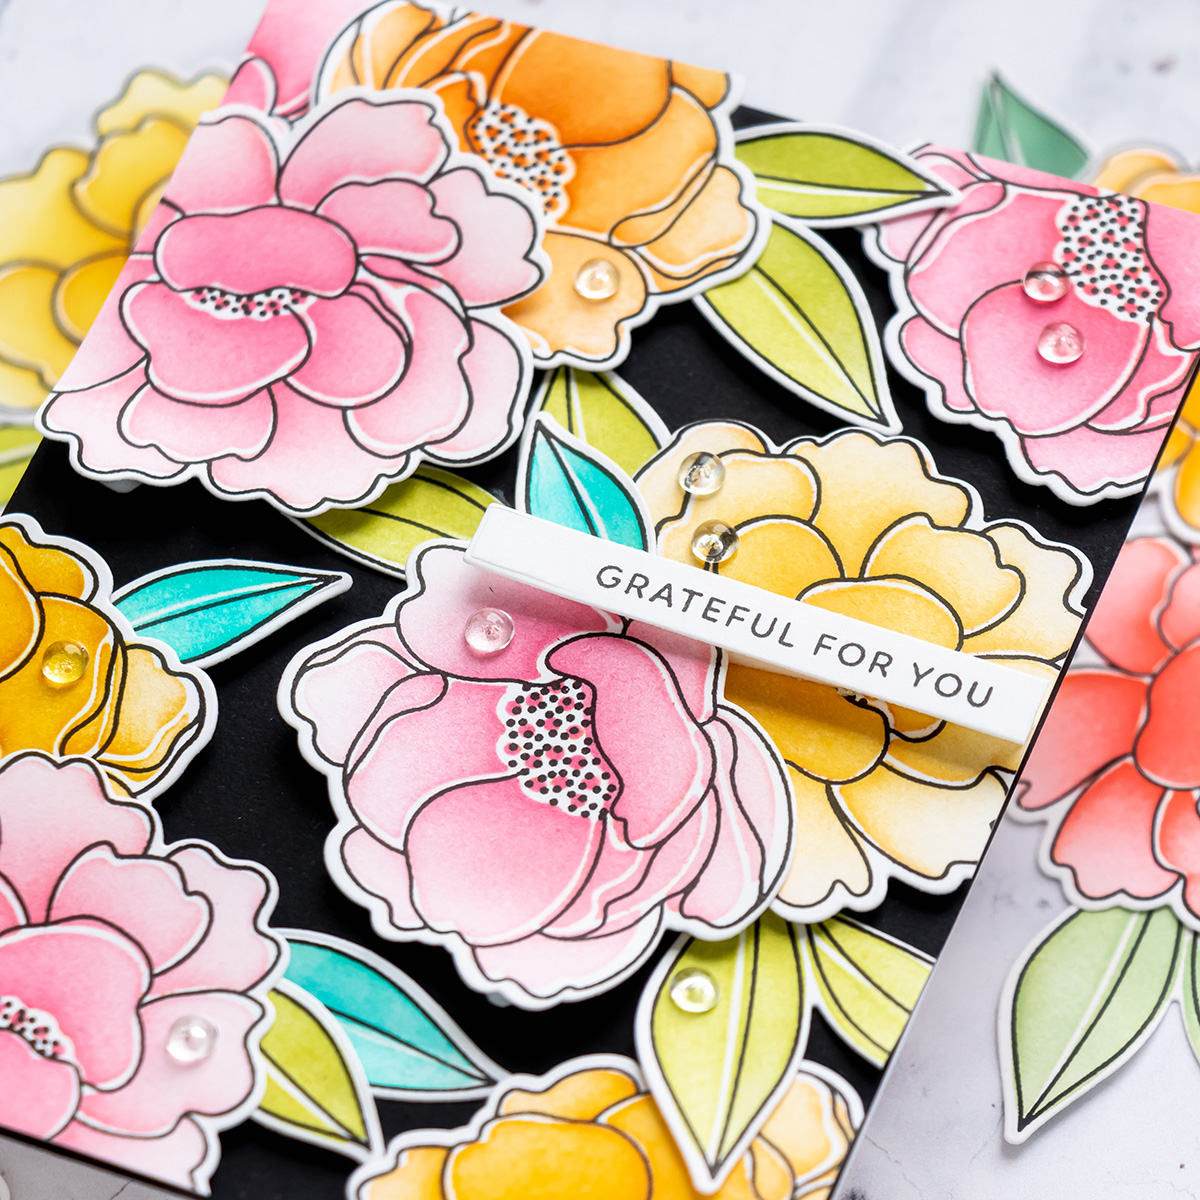
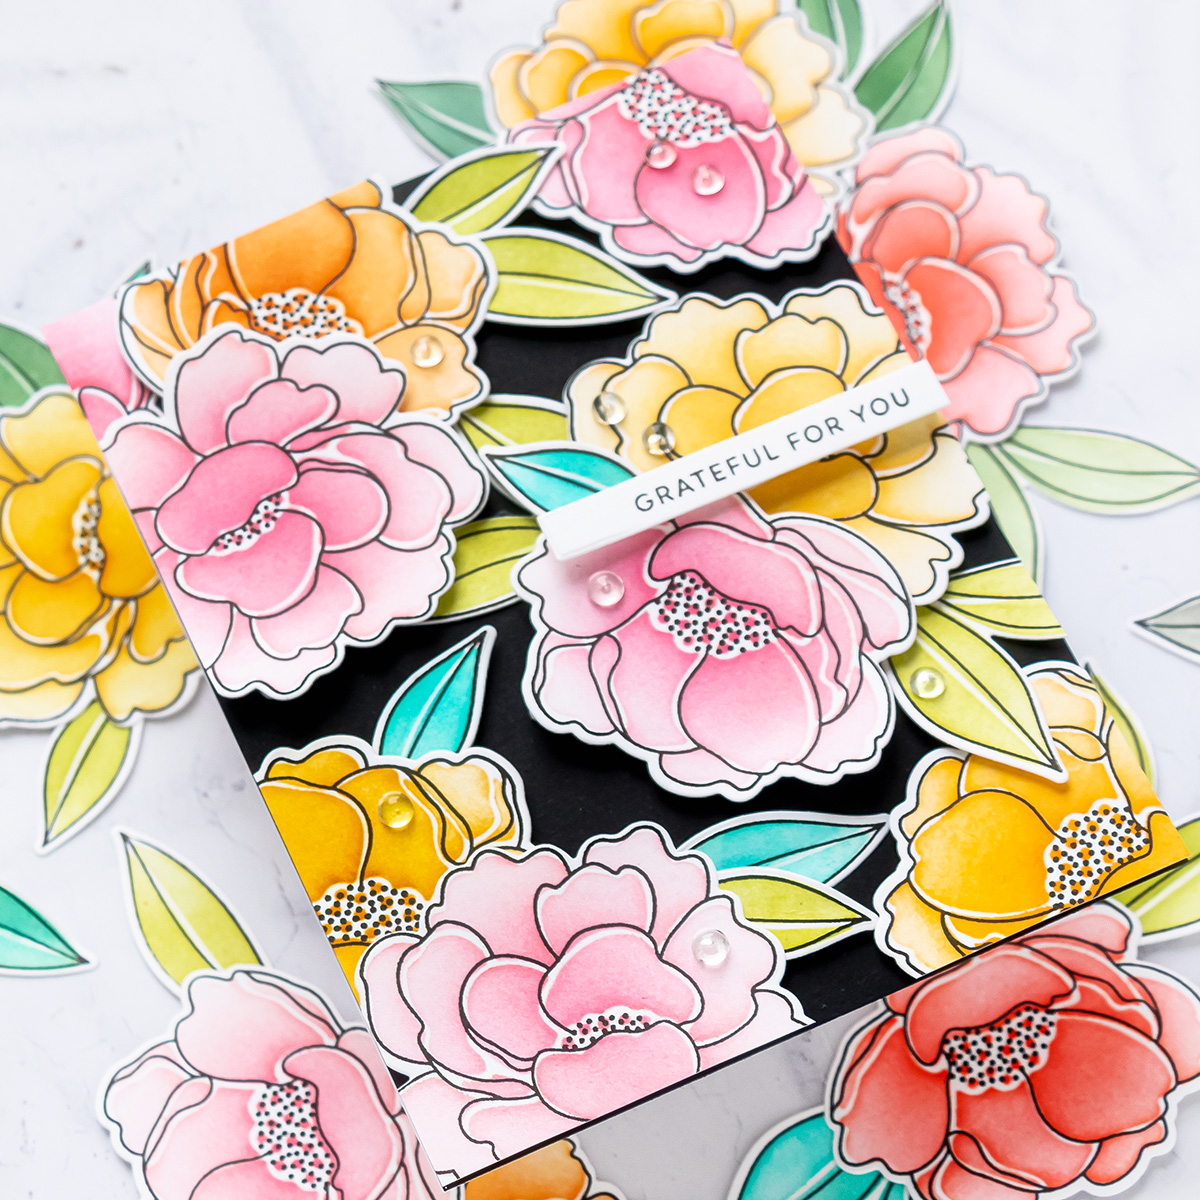
The images I am able to get with this technique are so simple, yet they look rather interesting due to the white offset lines in the coloring. That was achieved using a stencil, to ink blend the color of the flower, then, using a stamp to add the black outline, and finally using a die to cut that flower out.
Of course, it doesn’t look as spectacularly as when you meticulously color a flower using a coloring medium, but this also doesn’t take nearly as much time. Also, not everyone is good at coloring, after years of practice I still struggle and I know many of you feel intimidated by coloring. So this, I find to be a great alternative to traditional coloring.
CARD INSTRUCTIONS
Follow these instructions step by step to re-create this card:
- The first step is to ink blend the images using the stencil. I prefer to ink blend first and stamp the black outline afterward, as this gives me a very true black color. If I stamp first and do my ink blending over the black stamped outline I might dull the blackness of that black. So I suggest you ink blend first and stamp the outline afterward.
I used Neenah Solar White 80lb cardstock for the ink blending. I am not a big ink blender, I don’t have any of the fancy paper for the ink blending, or fancy ink, or any of the fancy brushes, although I did recently get blender brushes and I do enjoy using them.
- Cut the images out using the coordinating dies.
- Kept the negative die-cut panel to help position and align the images in the MISTI to speed up the stamping portion of this process. Stamp image outlines in VersaFine Onyx Black ink.
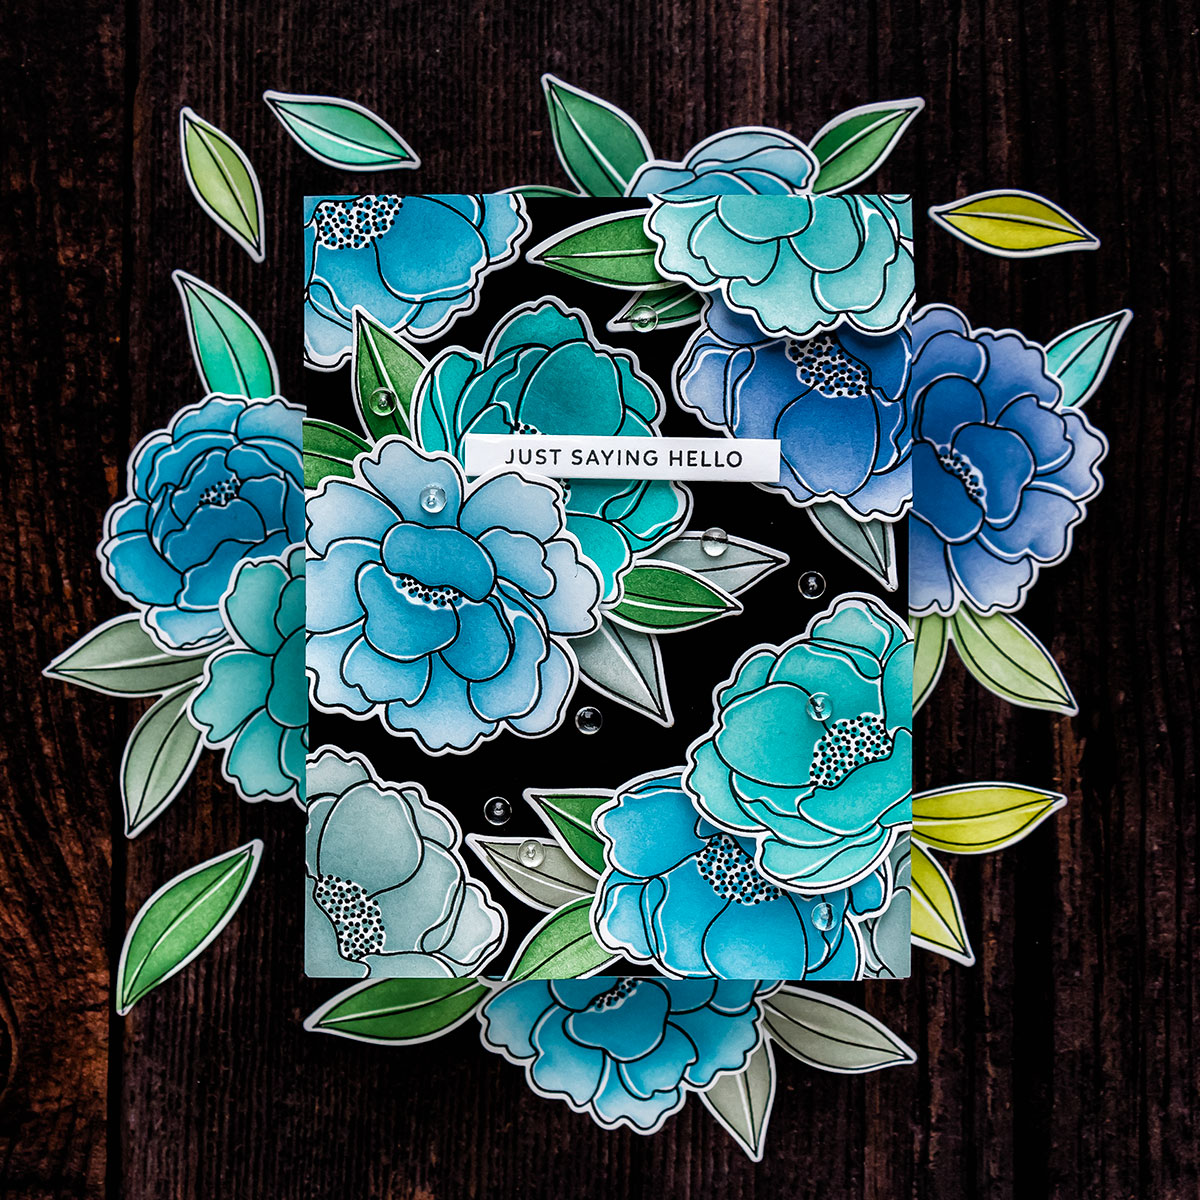
- Build a floral pattern on a black cardstock panel. When building floral patterns like this, I typically like to start somewhat in the center, but not exactly in the dead center of the panel. I want things a bit offset to either left or right, making the pattern appear more dynamic, and more as if it was cropped from a bigger sheet, as opposed to being made right there on the background. I like to cluster my flowers and have groups of 2 or 3, or more depending on the floral size. These florals are rather big, so do you don’t need many to cover the entire background of an A2 card.

- Adhere images using foam adhesive and glue.
- Cut excess off using scissors.
- Adhere panel to A2 white card base.
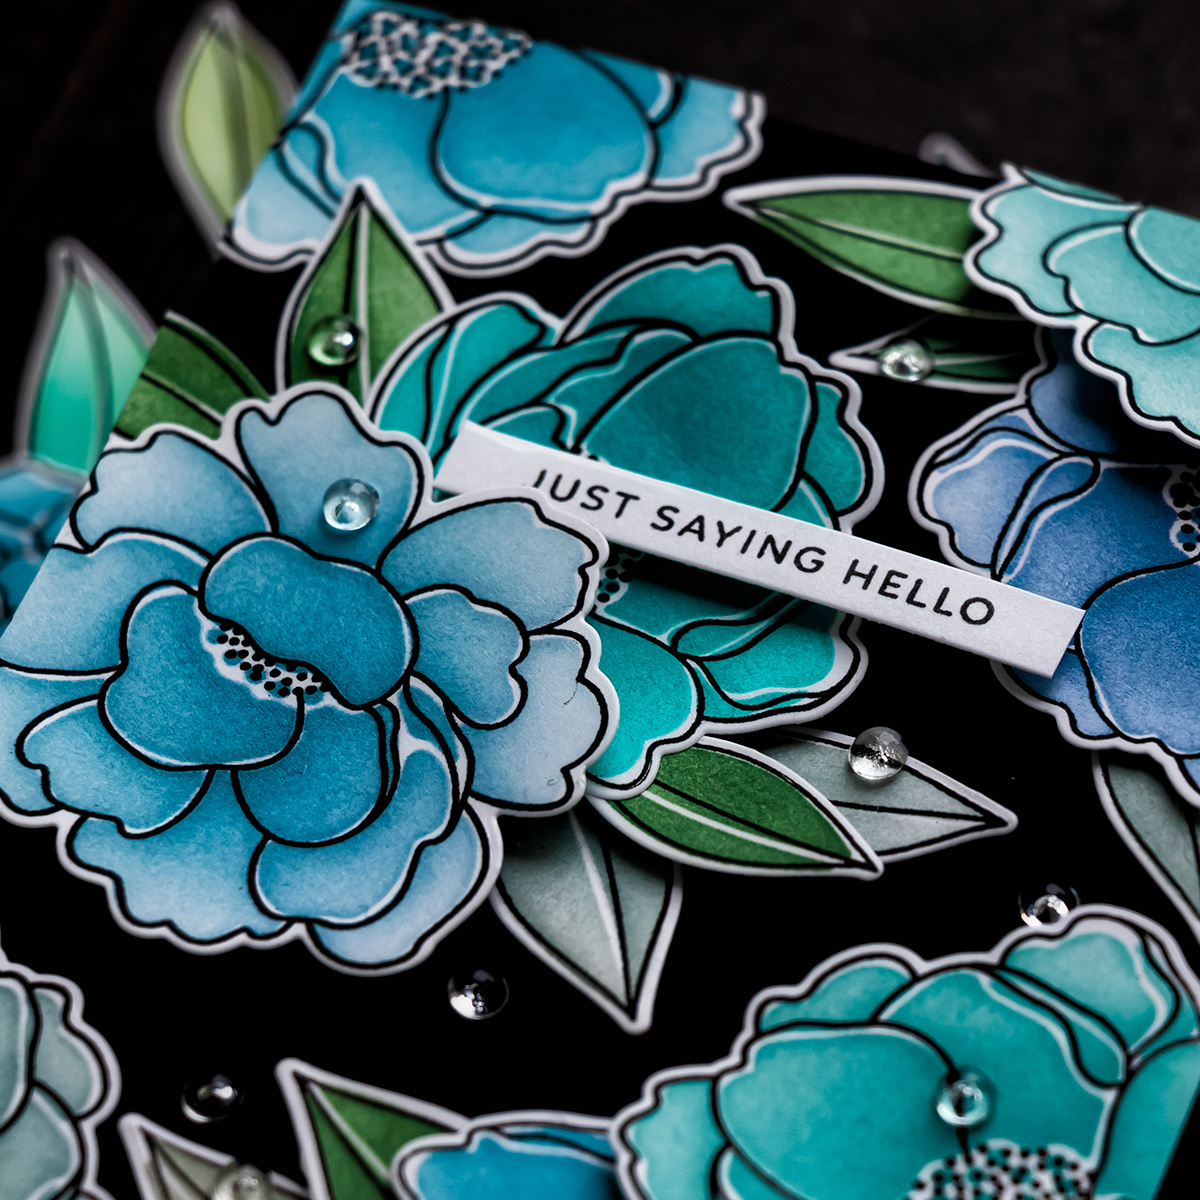
- Add skinny strip sentiment. With a busy floral background like this, I don’t ever want to add a big sentiment on top as it would cover much of the background. I prefer to stamp skinny strip sentiments – here I stamped a simple “Just Saying Hello” in black ink on white cardstock, I cut it out to a skinny skip and used foam adhesive to add it to my card. I love the simplicity this offers – I still have a meaningful sentiment on my card, but it doesn’t take away from the background, which of course is the star of the show.
- Embellish the card with clear droplets.
Have fun stamping!
BLOG HOP
Pretty Pink Posh
Rachel Alvarado
Angelica Conrad
Channin Pelletier
Tammy Stark
Gemma Campbell
Yana Smakula – you are here!
GIVEAWAY
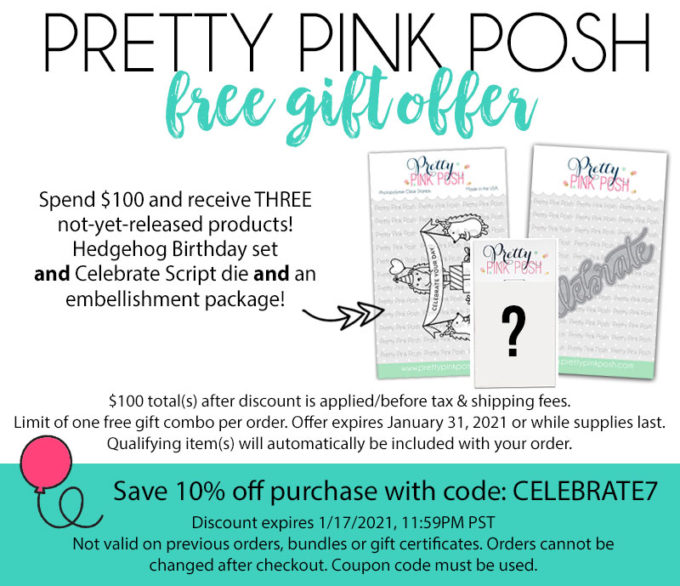
Pretty Pink Posh is giving away We’ll be giving away 6 $25 gift certificates total during the three-day blog hop celebration. Comments must be left by 11:50 pm on January 15, 2021, and the winners will be announced on the Pretty Pink Posh blog.
SUPPLIES
I’m listing the products I used below. Click on the link to go directly to the product. Where available I use compensated affiliate links which means if you make a purchase I receive a small commission at no extra cost to you. Thank you so much for your support!
 Pretty Pink Posh Peonies Stencil Shop at: SSS | PPP |
 Pretty Pink Posh Peonies Stamp Set Shop at: SSS | PPP |
 Pretty Pink Posh Peonies Dies Shop at: SSS | PPP |
 Pretty Pink Posh Simple Sentiments Stamp Set Shop at: SSS | PPP | BL |
 Spellbinders Platinum 6 Die Cutting Machine Shop at: SSS | SC | SB | AZ |
 Mini Misti Stamping Tool Shop at: SSS | SC | HA | AZ |
 Spellbinders A2 White Card Bases – Side Fold – 25 pack Shop at: SB |
 Simon Says Stamp Black Cardstock Shop at: SSS |
 Neenah 80LB Solar White Cardstock Shop at: SSS | AZ |
 Simon Says Stamp Dusty Sage Dye Ink Pad Shop at: SSS |
 Tsukineko VersaFine Onyx Black Ink Shop at: SSS | SC | AZ |
 Simon Says Stamp Willow Dye Ink Pad Shop at: SSS |
 Simon Says Stamp Duckling Ink Pad Shop at: SSS |
 Simon Says Stamp Clementine Dye Ink Pad Shop at: SSS |
 Simon Says Stamp Twirling Tutu Dye Ink Pad Shop at: SSS |
 Simon Says Stamp Hollyhock Ink Pad Shop at: SSS |
 Hero Arts Pool Ink Pad Shop at: SSS | SC | HA | AZ |
 Hero Arts Shadow Ink Pad Dusty Blue Shop at: SSS | HA |
 Hero Arts Stone Wash Mid-tone Shadow Ink Shop at: HA |
 Simon Says Stamp Audrey Blue Ink Pad Shop at: SSS |
 Simon Says Stamp High Dive Dye Ink Pad Shop at: SSS |
 Simon Says Stamp Seafoam Dye Ink Pad Shop at: SSS |
 Simon Says Stamp Smoke Gray Ink Pad Shop at: SSS |
 Simon Says Stamp Lake Shores Dye Ink Pad Shop at: SSS |
 Simon Says Stamp Laurel Green Dye Ink Pad Shop at: SSS |
 Simon Says Stamp Sunkist Ink Pad Shop at: SSS |
 Simon Says Stamp Evergreen Ink Pad Shop at: SSS |
 Simon Says Stamp Orange Slush Ink Pad Shop at: SSS |
 Set of 5 Rainbow Pack Multi Size Blender Brushes Shop at: SSS |
") Pretty Pink Posh 4MM Clear Droplets (small) Shop at: SSS | PPP |
 Jewel Picker Pick Up Tool Shop at: SSS | PPP | AZ |
 White Foam Squares Shop at: SSS | SC | SB | AZ |
 Zig Glue Pen Fine Tip Shop at: SSS | SC | AZ |
 Journey Craft Glue Shop at: SC | SB |
 FSJ Grand Pro Shears Shop at: SB |
Lori Lehnen
January 12, 2021Your cards are stunning!
Thanks for walking us through the creative process step by step and for sharing your talent!
Lisa Byers
January 12, 2021Absolutely stunning!! Love your techniques, the colors are exquisite!
Ann Ito
January 12, 2021Beautiful cards as always!!
Meghan Kennihan
January 12, 2021OMG! Your coloring is incredible! I LOVE the blue one!!!
Jane
January 12, 2021Lovely cards !
Autumn Bell
January 12, 2021Yana, these cards are absolutely gorgeous! I’ve never used a stencils before, but I have to try them now that I’ve seen your cards. Thanks so much for sharing your creativity!
Andre M.
January 12, 2021The colours on these cards are so spectacular, thanks for sharing and the fun technique video. The pinks and yellows are my fave!!
Casandra Bennett
January 12, 2021Wow! So many details and time put into your creations. TFS.
Mayra Martinez
January 12, 2021As always your cards area amazing Yana! Thanks so much for the detailed instructions you’re awesome. I really love the color combinations. What a great release.
Anne Sturgeon
January 12, 2021I am always amazed at how lovely the clear droplets look on a finished card… these florals are so amazing and you have really made them extra beautiful. Love this technique and am definitely going to give it a try.
Dayna Audirsch
January 12, 2021just simply beautiful!
beccab33324
January 12, 2021Your cards are simply WOW!!
Lauryne Cunningham
January 12, 2021Your cards are gorgeous! I really love the blue one- the flowers really pop against the dark background!
Cyndi Morris
January 12, 2021I agree, Yana. Releasing a stencil that matches a previously released stamp and die set is genius! This one is gorgeous. I love your beautiful cards.
Jade McClung
January 12, 2021Fantastic ink blended cards! I am so impressed. Thank you for the wonderful information to stamp the image after you blend. Great idea!
Vickie Davis
January 12, 2021Beautiful cards and color combinations!
Giselaine Ellison
January 12, 2021Beautiful cards, Yana. Enjoyed the video and the thank you for sharing the instructions.
Ang
January 12, 2021Thank you for the wonderful card ideas. Love these new PPP products.
jazzyscrapper1
January 12, 2021What a great technique Yana! I love both of your cards.
fondarush
January 12, 2021Your cards are gorgeous!
sparcl77
January 12, 2021Beautiful cards, Yana. I love using stencils because it’s easier for me to shade the color than to use alcohol markers or colored pencils. I have this stencil on my wish list for my next order.
Denise Bryant
January 12, 2021Beautiful stencil design! Love the colors you used on these gorgeous floral cards!
Marisela Delgado
January 12, 2021Oh my goodness, Yana! Absolutely gorgeous cards! I LOVE black cardstock!
gabmccann
January 12, 2021oh wow, these are gorgeous
Golda Peterson
January 12, 2021Wow! These are gorgeous!
Hanh
January 12, 2021Oh these cards are absolutely beautiful! I LOVE the colors that you chose for the flowers! Thank you for the inspiration and for the list of ink colors! I will definitely be referring to these!
Carla Hundley
January 13, 2021Fabulous plan on
achieving the end
result that is to pretty!
Carla from Utah
susie sonnier
January 13, 2021Love your style.
Lisa H
January 13, 2021These cards are gorgeous, love the blending technique using the stencil. Your video was well done and an inspiration for my next project.
Janis in ID
January 13, 2021What a great technique!!! Love your gorgeous work. The black background really makes these beautiful flowers pop!
<3 J
jwoolbright at gmail dot com
HerPeacefulGarden.blogspot.com
Jeanne Beam
January 13, 2021Absolutely gorgeous cards! Love the colors…
Thanks so much for sharing.
Sharon Gullikson
January 13, 2021Your colors look wonderful. I like how you shaded them all.
Lindar C
January 13, 2021I always enjoy your videos, you have so many useful tips, I always learn something new. Your cards are gorgeous!!
Mary Holshouser
January 13, 2021The flowers are gorgeous. Great idea to do the inking
first and then stamp – going to try that idea. Love
the black background – really sets off the flowers.
thanks for sharing. txmlhl(at)yahoo(dot)com
gigi1754
January 13, 2021Beautiful cards! I even liked the look of the flowers and leaves before you stamped them. Both ways are so pretty!
spilor / Lori Spitzer
January 13, 2021Dear Yana – Should I say YAY or Yippee for Yana at the happy sight of seeing several Yana videos in my inbox this week? Either one, I suppose. I love this technique, this stamp and this stencil. I don’t have the stamp or stencil yet. I really like PPP and have missed seeing them on social media in recent months. I love peonies so I will check this out. BTW, the flower’s name is pronounced /PEE-oh-nee/ with the stress on syllable #1. Your English continues to dazzle me. I wish I had kept going w/ Japanese and Russian, but I didn’t. Pity……
Lori S in PA
Patricia E Wilson
January 13, 2021Stencils have really come a long way lately and make beautiful cards. Yours were lovely and liked the black background. Did you foil your sentiments strip. Want to try that with some of my SSS strips. Thanks for the tips and techniques and signed up with Pretty Pink Posh.
Dee Earnshaw
January 13, 2021love your cards!!! – very inspiring
Sheri Kempke
January 13, 2021Yana, your cards are gorgeous! Thanks for this terrific technique and love that PPP makes products that work so well together. Definitely going to put them on my wish list!
Maureen Reiss
January 13, 2021Wow!!! Really Gorgeous cards!!!!
Patt H.
January 13, 2021Wonderful creations, Yana!! The colors are awesome & I am just waiting for the supplies to come back in stock so I can play with them also! Thanks for sharing!
BillieJo Bergeron
January 13, 2021Peonies are one of my favorite flowers! Your cards are gorgeous and lovely colors!
Heather Mills
January 14, 2021These are so gorgeous!!! The black backgrounds really make these beautiful flowers pop!
Jo Malicoat
January 14, 2021Your cards are gorgeous! Love the idea of having a stencil match a stamp set, too!
Kelly B
January 14, 2021Beautiful! Love it all!
janetd23
January 14, 2021Sooo, so pretty!
Carol Wehner
January 14, 2021Outstanding! I love how you stenciled, stamped and cut these. Just beautiful!
Michelle Bundy
January 14, 2021I love how those flowers pop off that black background!
Engineered Baker
January 14, 2021wow!! I would have never thought to use the stamp and stencil as such!
Beverly Jordan
January 15, 2021Yana, your cards are dreamy!!! Gorgeous stenciling and designs!! You never cease to amaze me!!