

Hello, friends. We are safe today. I am back with a video tutorial featuring a Hip Hip Yay Alphabet stamp set from MFT Stamps. I made this card back in February, before the war.
I am a big fan of any alphabet products, be it a die set (you might remember my custom sentiment die-cut cards I shared HERE), or a stamp set, as these types of sets offer amazing versatility. When you have an alphabet you can create any sort of custom message for your handmade cards or even more, you can make larger size art with inspiring quotes and I’m sure there are lots more you can do with it, but that’s what I typically use my alphabet sets for. This particular set has caught my eye as the font is so unique – it is fun, quirky, and playful.
Like this project? Pin it and save for later | Curious about my project photography? Click for details.
VIDEO TUTORIAL
Watch the video below or on my Youtube channel.
Like this video? Please give it a big thumbs up (you can do this on Youtube video page right under the video) and share it with a crafty friend! Leave me a comment too, I love hearing from you!
CARD DETAILS
There are 2 ways to use this set. You can either first decide on the sentiment you want to spell using these alphas or stamp just the letters you’ll need for that sentiment. Or you can stamp all of the letters and stamp multiples. I like to mass produce with sets like this one, so I stamped several panels by using my MISTI stamping tool. I used all alphas and stamped them all at once onto several white cardstock panels.
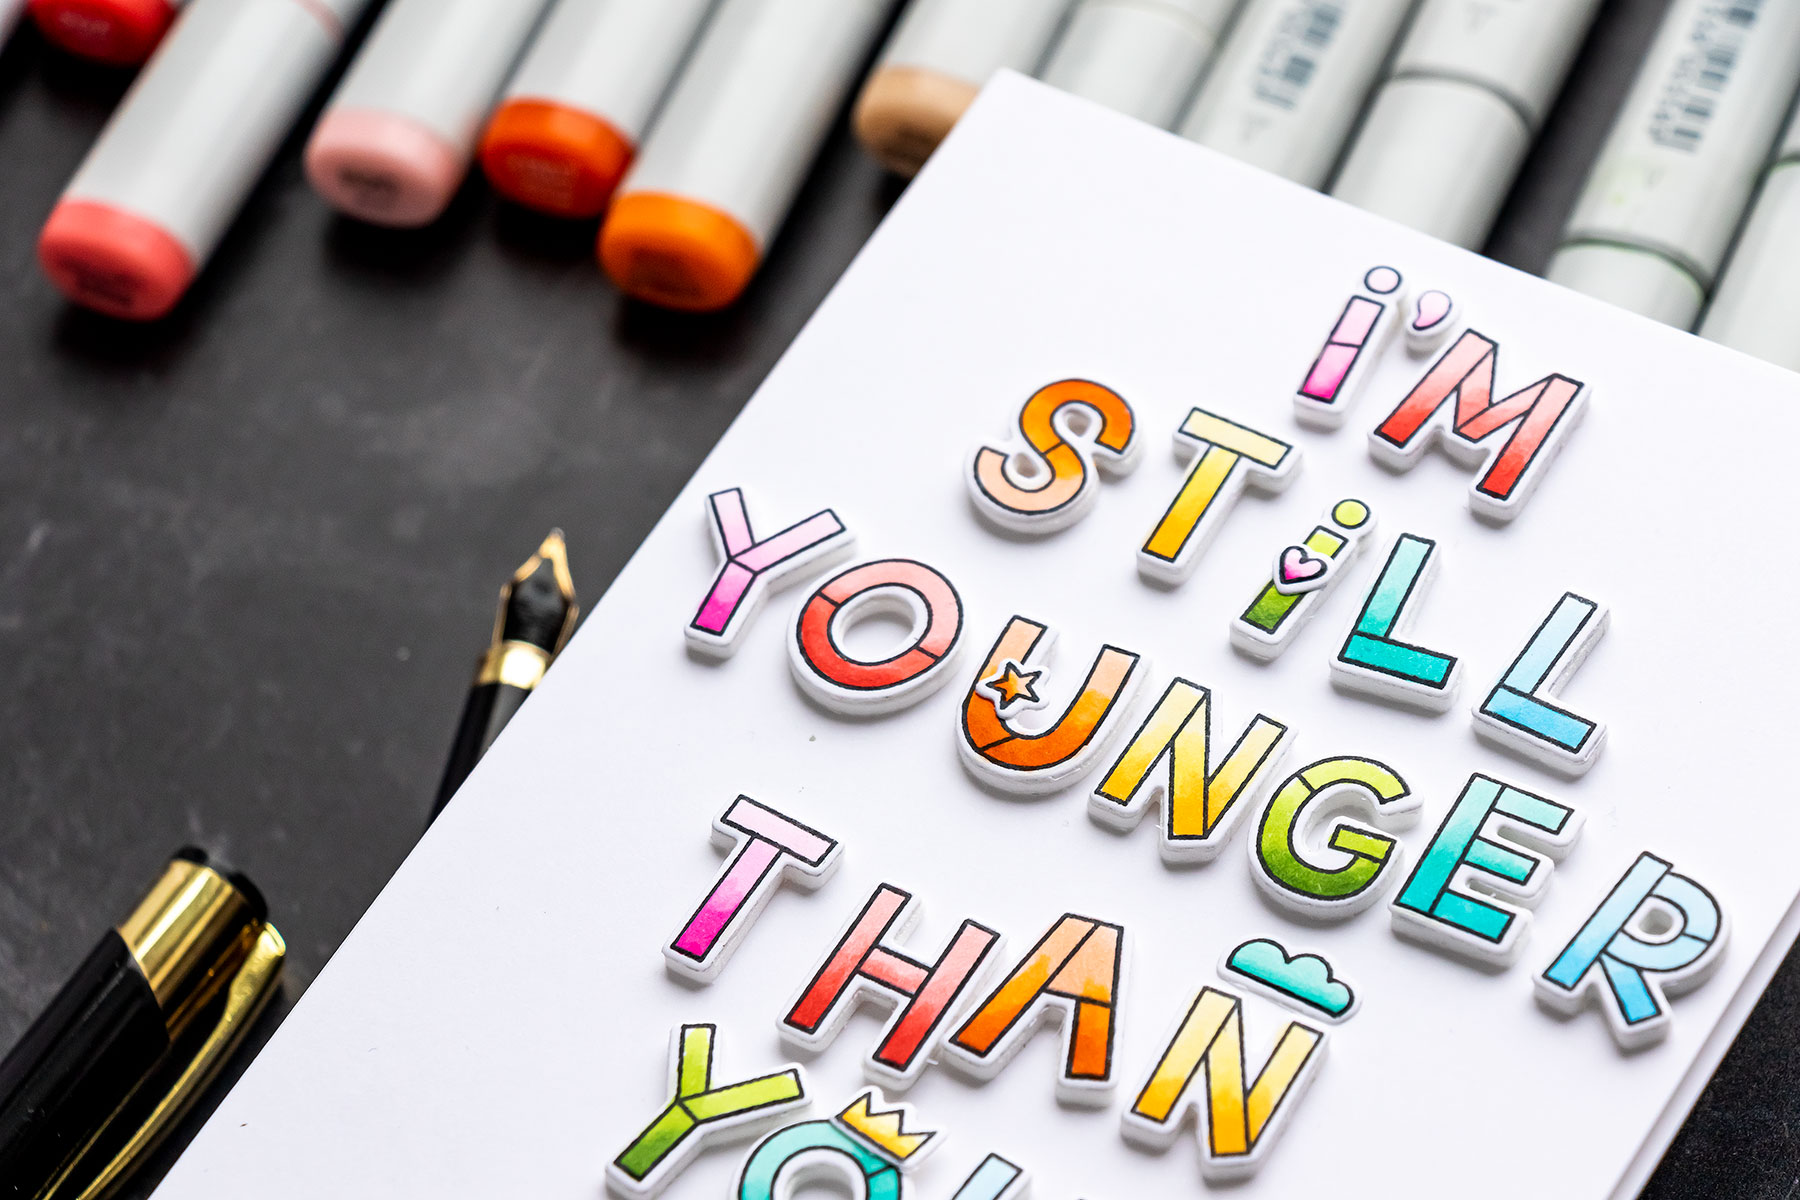
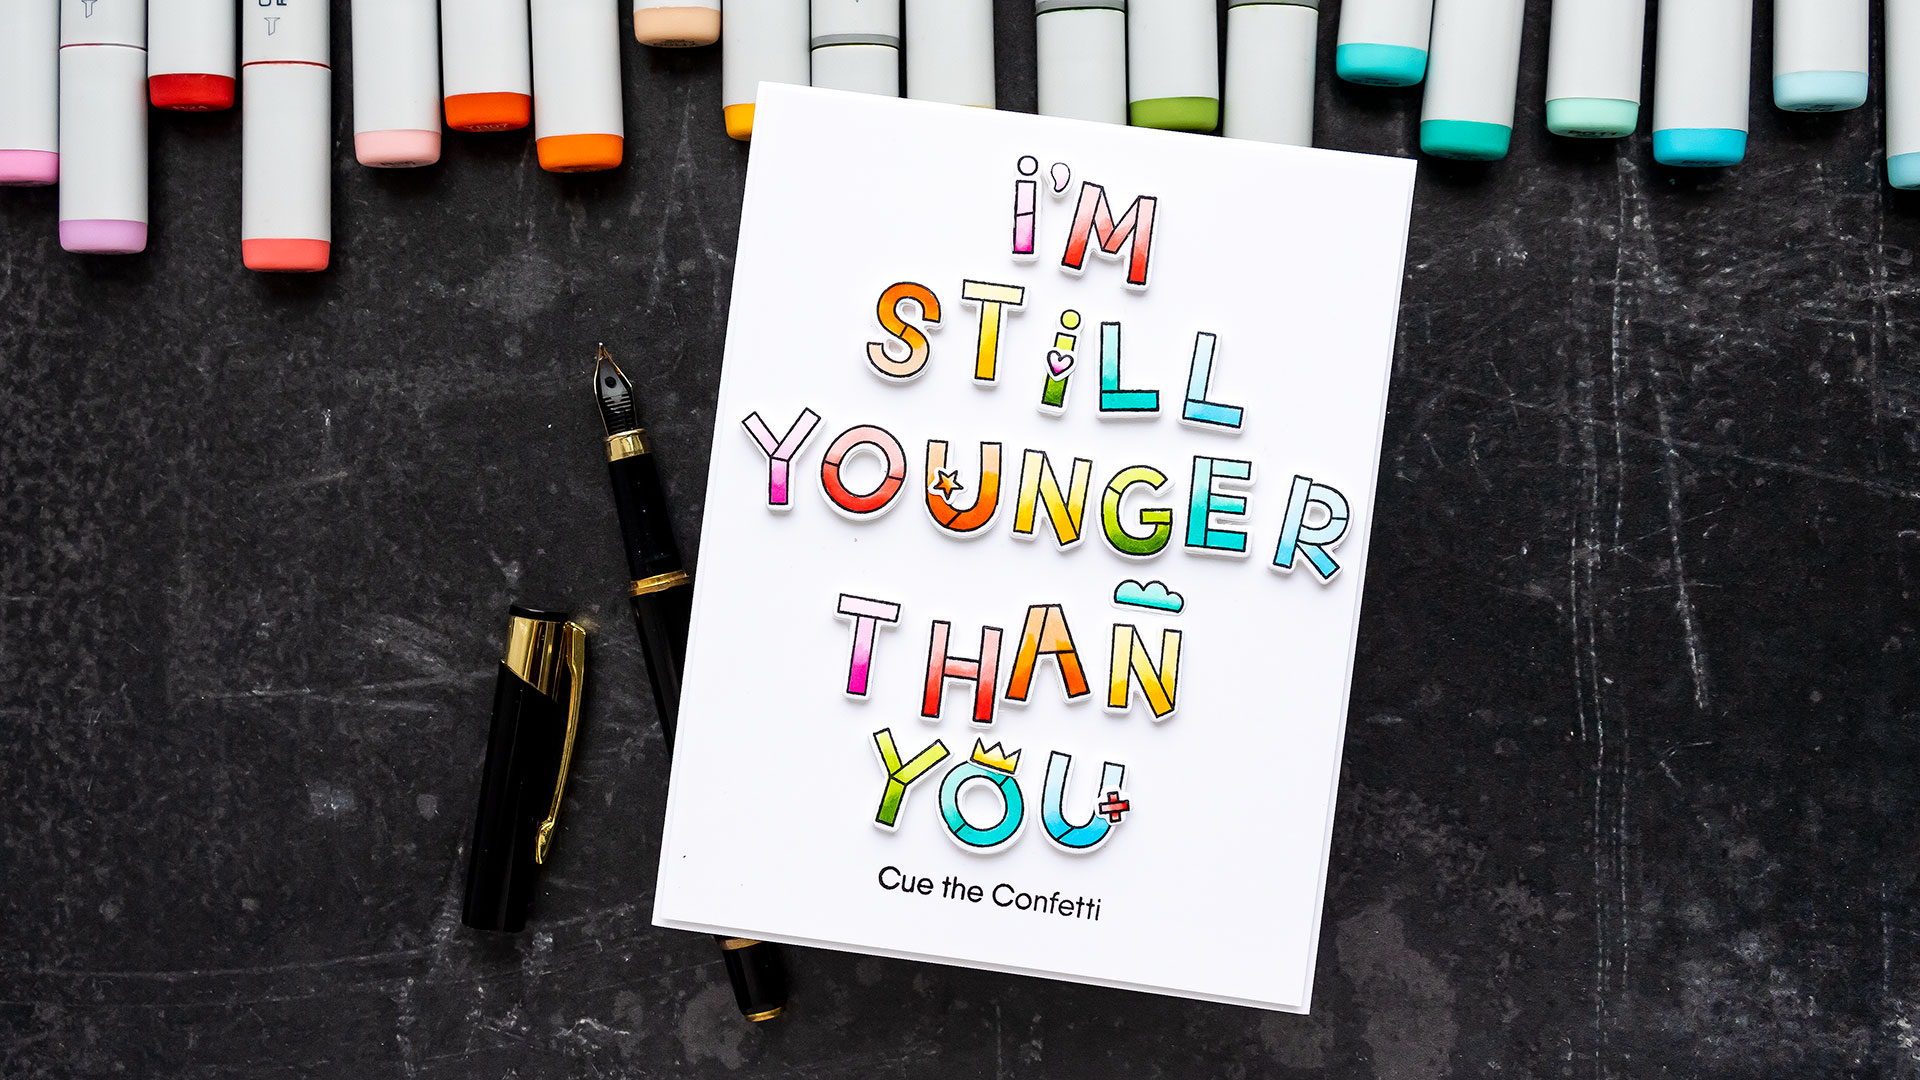
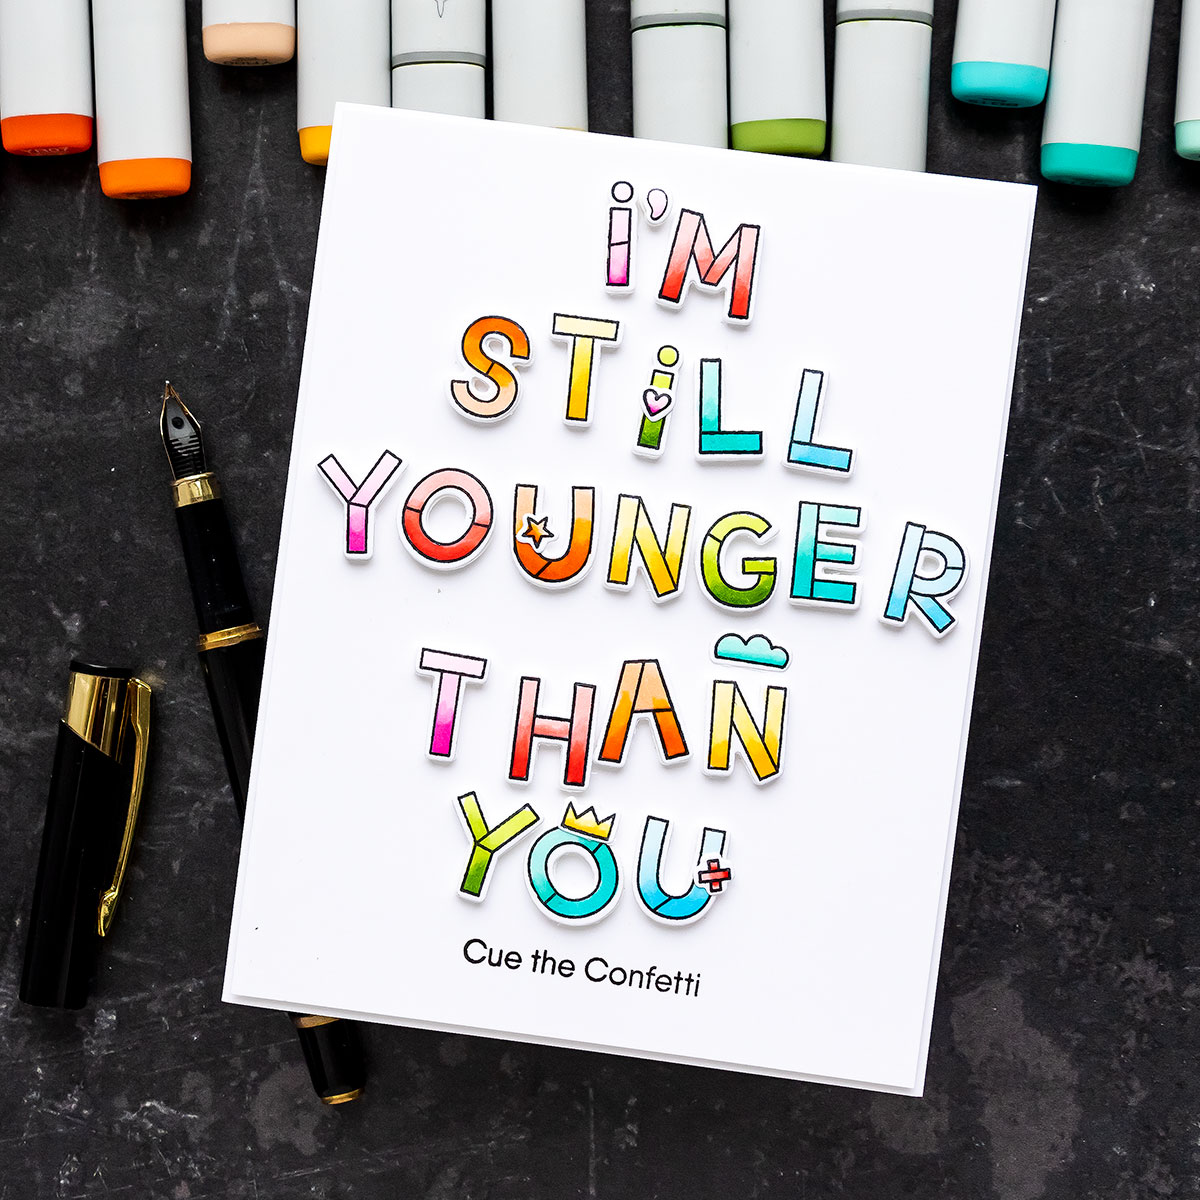
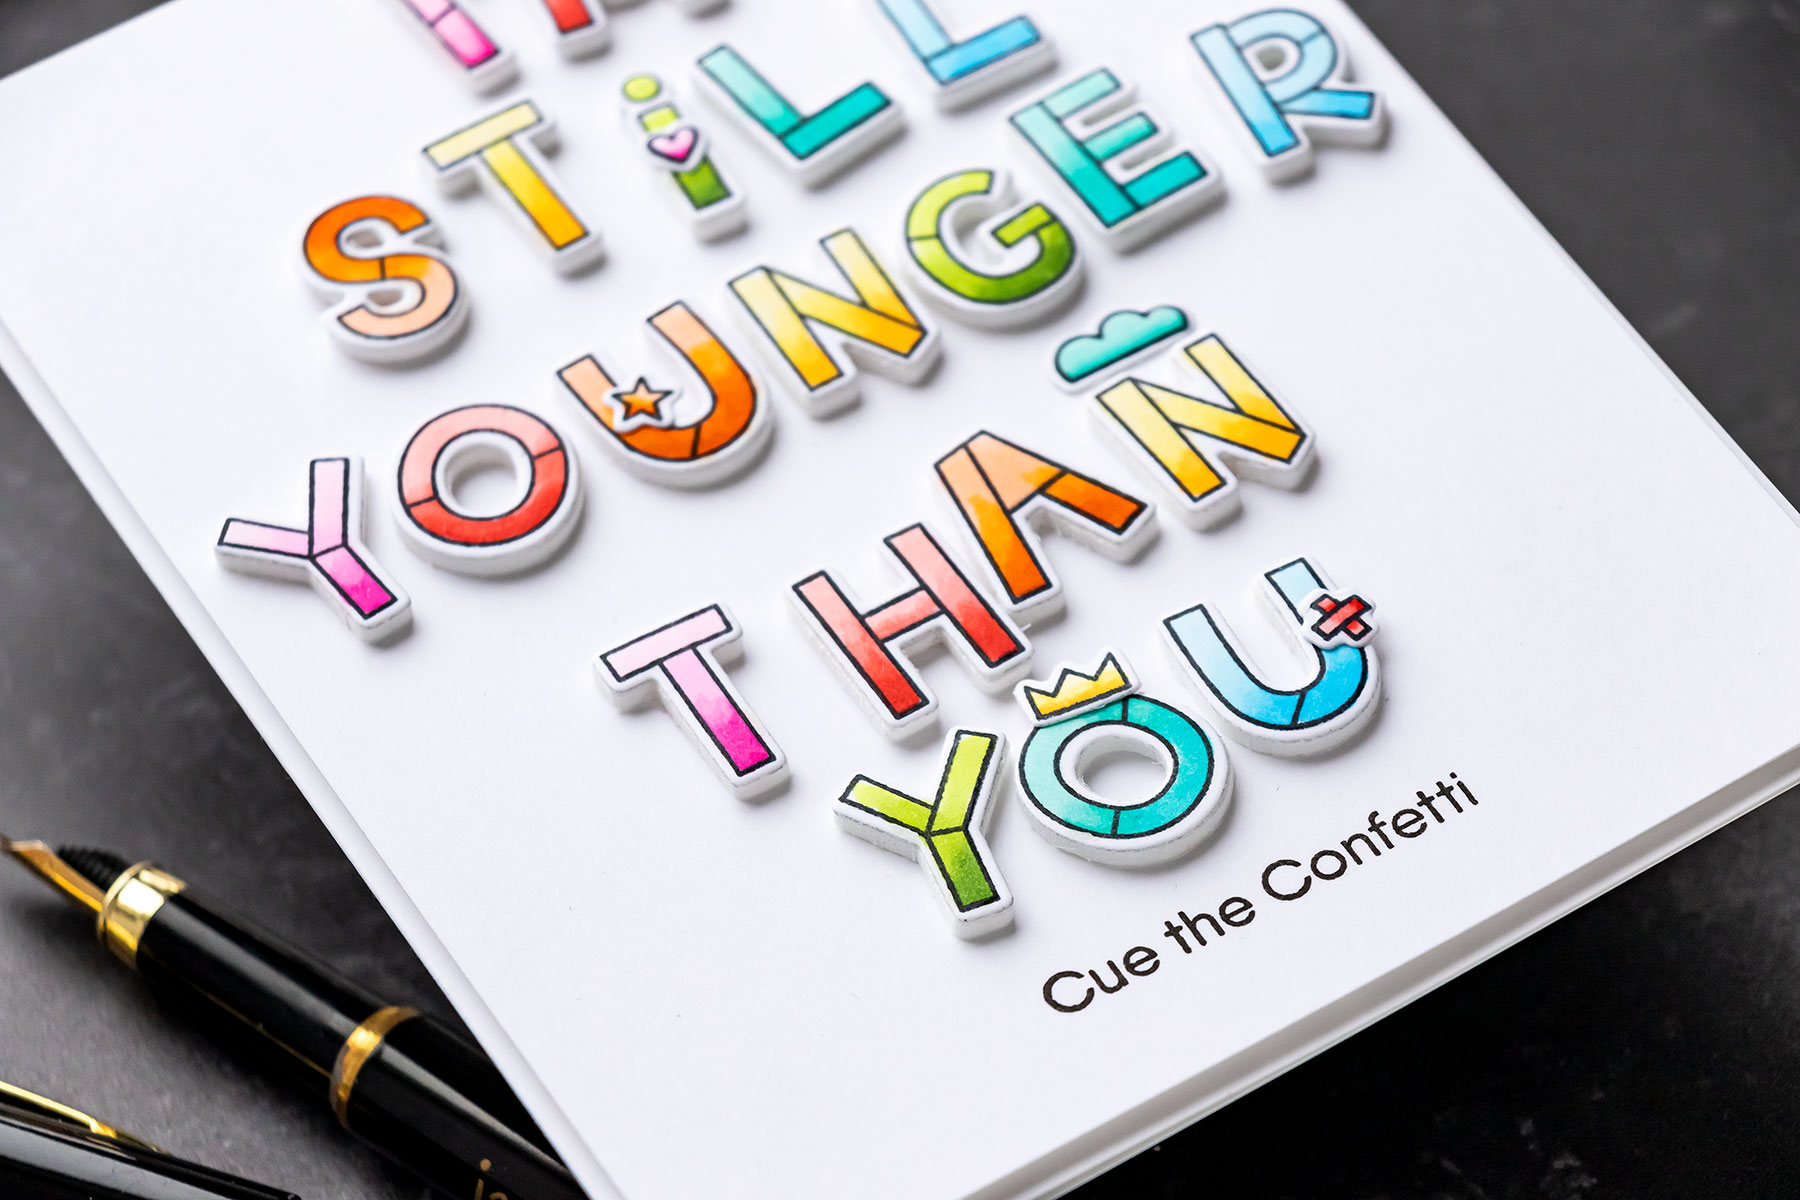
I never have enough Birthday cards, so naturally, I wanted to make another Birthday one. I also don’t ever have any snarky cards in my stash, so I opted for a snarky sentiment – I’m still younger than you.

My coloring was simple – going from dark at the bottom of the letter, to light at the top. I used RV04, RV02 and RV00; R24, R22, and R20; YR07, YR04, and YR00; Y35, Y13, and Y11; YG17, YG03 and YG01; BG15, BG13 and BG11; B02, B00, and B000.
There are coordinating dies available for this set and so I use mine to cut the letters out and I also die-cut identical shapes from white fun foam. I love to add dimension to my cards and I do that by either using foam adhesive squares, which I didn’t want to do for this card as that would mean a lot of cutting of the foam squares into smaller pieces or by using fun foam. Next, I spelled out the sentiment on my work surface.

Btw, I used a new glass mat for my crafting. And I LOVE it! I feel like it makes everything look so much brighter. It is a magnetic glass craft mat from Glassboard Studio. The mat is heat resistant, meaning you can heat emboss on it or place your hot foil plates on top of it. It also wipes clean and is scratch-resistant, which is great for us messy crafters. I have the largest 24 x 36” size which is perfect for my craft desk as it provides ample crafting space. I’ve been looking for a great mat for a long time and I feel like this is it.
Use code YANA20 to get 20% off anything from Glassboard Studio. They package these mats exceptionally well, they arrive without any problems even if shipped overseas.
I played a bit with the letter placement and used the grid of my glass mat to get the placement and spacing just right. Next, I went to the kitchen and got my press ‘n seal – I finally managed to order several rolls. I used the piece and placed it over the sentiment to help me secure the placement and transfer the sentiment safely onto the card.
I flipped the letters to the other side using my piece of press and seal and added glue to each of the letters, then, I carefully picked the press and seal up and transferred my sentiment onto my white cardstock panel. And I can’t believe how easy this was! And I also cannot believe my stupidity for not getting press and seal sooner. It would have made my cardmaking life and probably my kitchen life so much better. So don’t be like me.
I did place my sentiment slightly toward the top of the panel leaving room at the bottom as I planned to stamp a sub sentiment. I trimmed the panel down a bit – just 1/8” off. Next, I used a sentiment from the Little Birthday Notes stamp set and stamped it in black under my main message. And that reads – Cue the confetti.
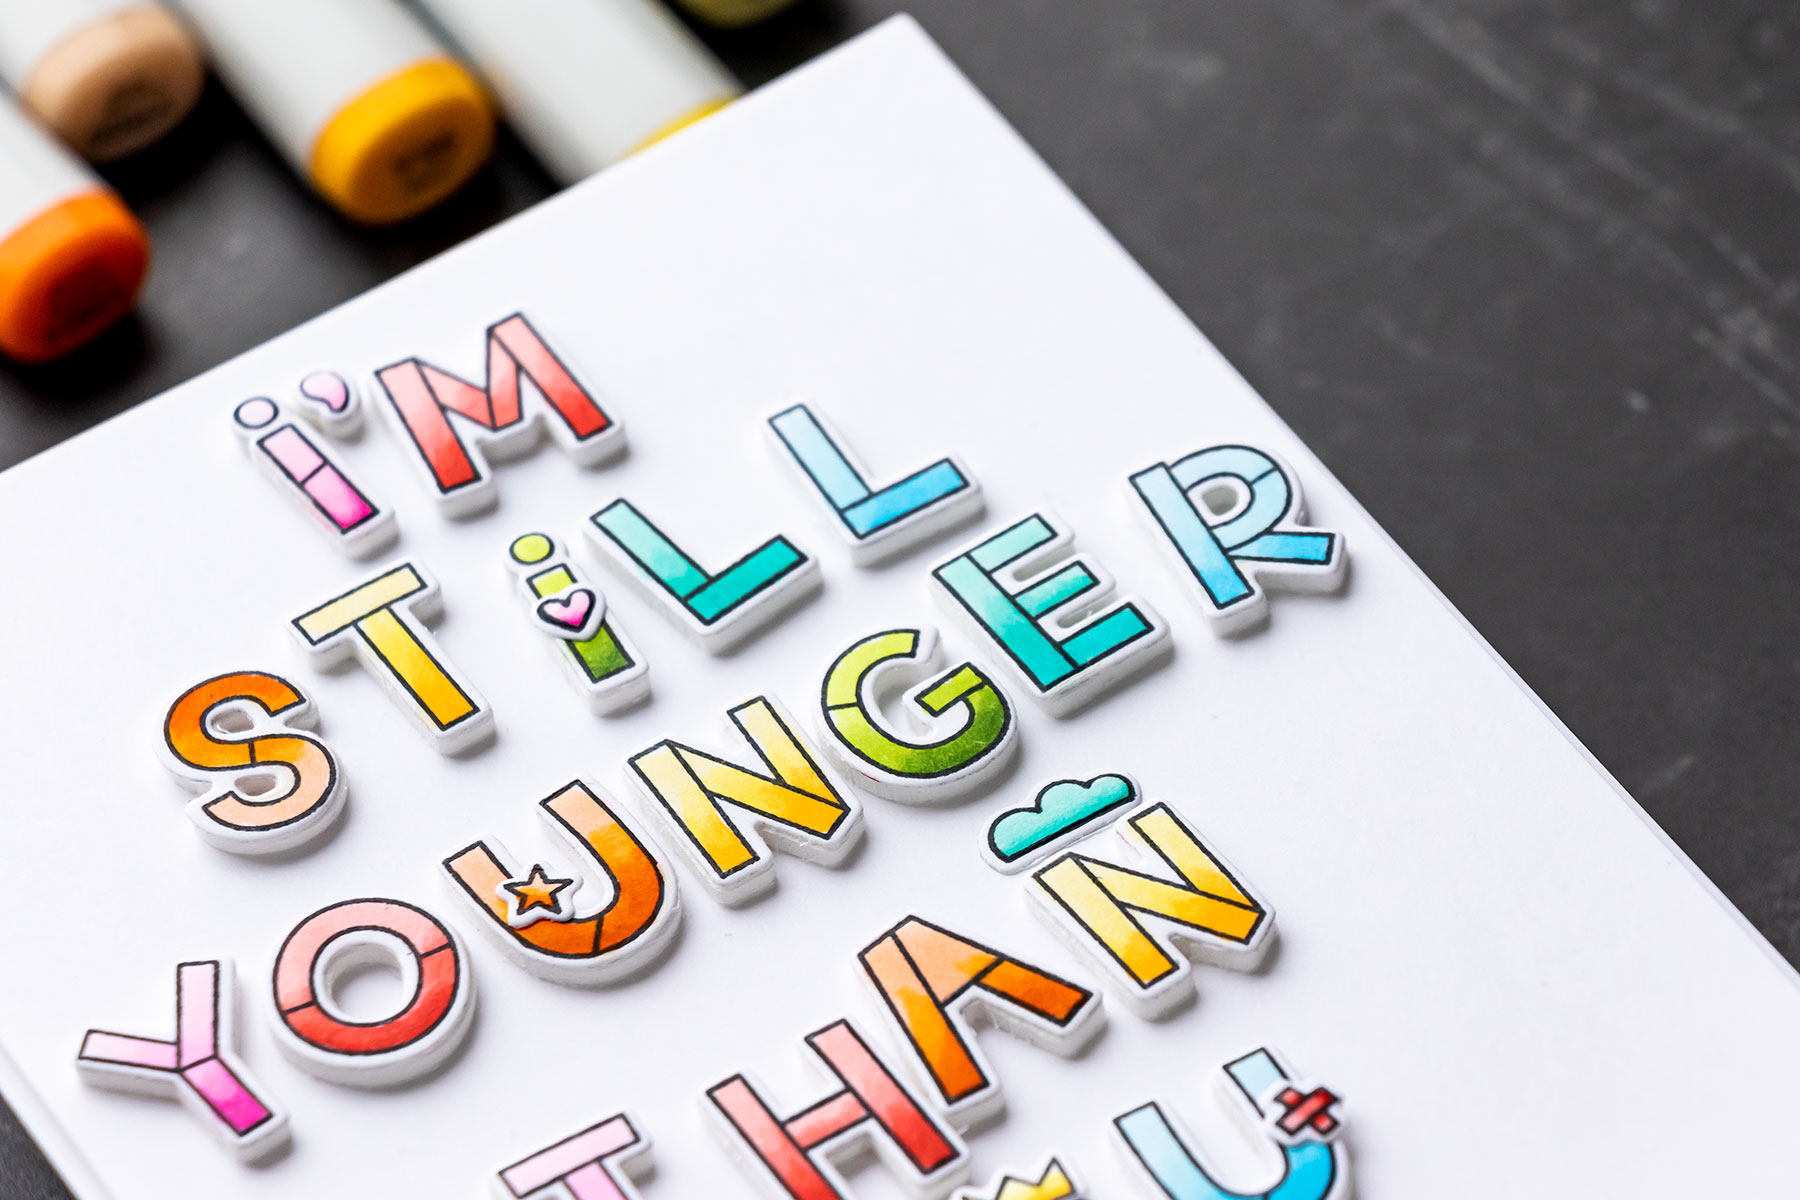
This alphabet stamp set also has a few extra images to add character to each letter and there are dies to cut them out as well. I colored and cut out a few and used them to spice up my sentiment.
And that finished my card! I hope you’ll feel inspired to create and will give this idea a try. Have fun crafting! Love you guys and I’ll see you next time.
SUPPLIES
I’m listing the products I used below. Click on the link to go directly to the product. Where available I use compensated affiliate links which means if you make a purchase I receive a small commission at no extra cost to you. Thank you so much for your support!
 MFT Stamps MSTN Hip Hip Yay Alphabet Shop at: SSS | MFT |
 MFT Stamps MSTN Hip Hip Yay Alphabet Die-namics Shop at: SSS | MFT |
 MFT Stamps Little Birthday Notes Shop at: SSS | MFT |
 Glassboard Studio True White Glass Craft Mat Shop at: GBS |
 Glad Press’n Seal Multipupose Sealing Wrap Shop at: SSS | AMZ |
 Spellbinders A2 White Card Bases – Side Fold – 25 pack Shop at: SB |
 Simon Says Stamp White Cardstock 120LB Shop at: SSS |
 Memento Tuxedo Black Ink Pad Shop at: SSS | SC | AMZ |
 Mini MISTI Stamping Tool Shop at: SSS | SC | SB | AMZ |
 Copic Sketch Marker RV00 Water Lily Shop at: SSS | AMZ | BLICK |
 Copic Sketch Marker Rv02 Sugared Almond Shop at: SSS | BLICK |
 Copic Sketch Marker Rv04 Shock Pink Shop at: SSS |
 Copic Sketch Marker Y11 Pale Yellow Shop at: SSS | AMZ | BLICK |
 Copic Sketch Marker Y13 Lemon Yellow Shop at: SSS | AMZ | BLICK |
 Copic Sketch Marker Y35 Maize Shop at: SSS | AMZ | BLICK |
 Copic Sketch Marker YR00 Powder Pink Shop at: SSS |
 Copic Sketch Marker YR04 Chrome Orange Shop at: SSS | AMZ |
 Copic Sketch Marker YR07 Cadmium Orange Shop at: SSS | AMZ |
 Copic Sketch Marker R20 Blush Pink Shop at: SSS | AMZ | BLICK |
 Copic Sketch Marker R22 Light Prawn Shop at: SSS | AMZ | BLICK |
 Copic Sketch Marker R24 Prawn Shop at: SSS | AMZ | BLICK |
 Copic Sketch Marker YG01 Green Bice Shop at: SSS | AMZ | BLICK |
 Copic Sketch Marker YG03 Yellow Green Shop at: SSS | AMZ | BLICK |
 Copic Sketch Marker YG17 Grass Green Shop at: SSS | AMZ | BLICK |
 Copic Sketch Marker B000 Pale Porcelain Shop at: SSS | AMZ | BLICK |
 Copic Sketch Marker B00 Frost Blue Shop at: SSS | AMZ | BLICK |
 Copic Sketch Marker B02 Robin’s Egg Shop at: SSS | AMZ | BLICK |
 Copic Sketch Marker BG11 Moon White Shop at: SSS | AMZ | BLICK |
 Copic Sketch Marker BG15 Aqua Blue Shop at: SSS | AMZ |
 Copic Sketch Marker BG13 Mint Green Shop at: SSS | AMZ |
 Fun Foam Sheets Shop at: SSS | SB | AMZ |
 Simon Says Stamp 2 Dot Runner Refills Adhesive Shop at: SSS |
 Bearly Art Mini Precision Craft Glue Shop at: SSS | SB | AMZ |
Love your videos. Sending paper hugs -stay safe
Think of you every day and pray for your safety. It seems that there is so little that we can do from so far away other than sending money and letting you know that people all over the world have you in our thoughts and prayers. Even many people in Russia are against this war. Putin is a monster. Love your card.
Sending paper hugs to friends in honor of you. Prayers for your safety and peace for Ukraine.
what a fabulous card idea! love it! will continue to keep you and your country in my thoughts and prayers. stay strong.
Thanks for your great card. I loved how this was created and the wonky is working for me. Thanks for all you do. Thoughts and prayers are with you.
Glad to hear you are safe. You and you people are in my thoughts and prayers.
Stay safe Yana. I am thinking about you all the people of Ukraine every day!
This is so fun
Please stay safe
I think of you every day
Think of you and ALL of your countrymen. Praying this will end soon in a Positive way. Love the Bright FUN Colors of your cards.
THE LORD IS WITH YOU. HE IS FAITHFUL!
Fantastic card!!! Glad to hear you are safe! Sending love and BIG HUGS!!!