

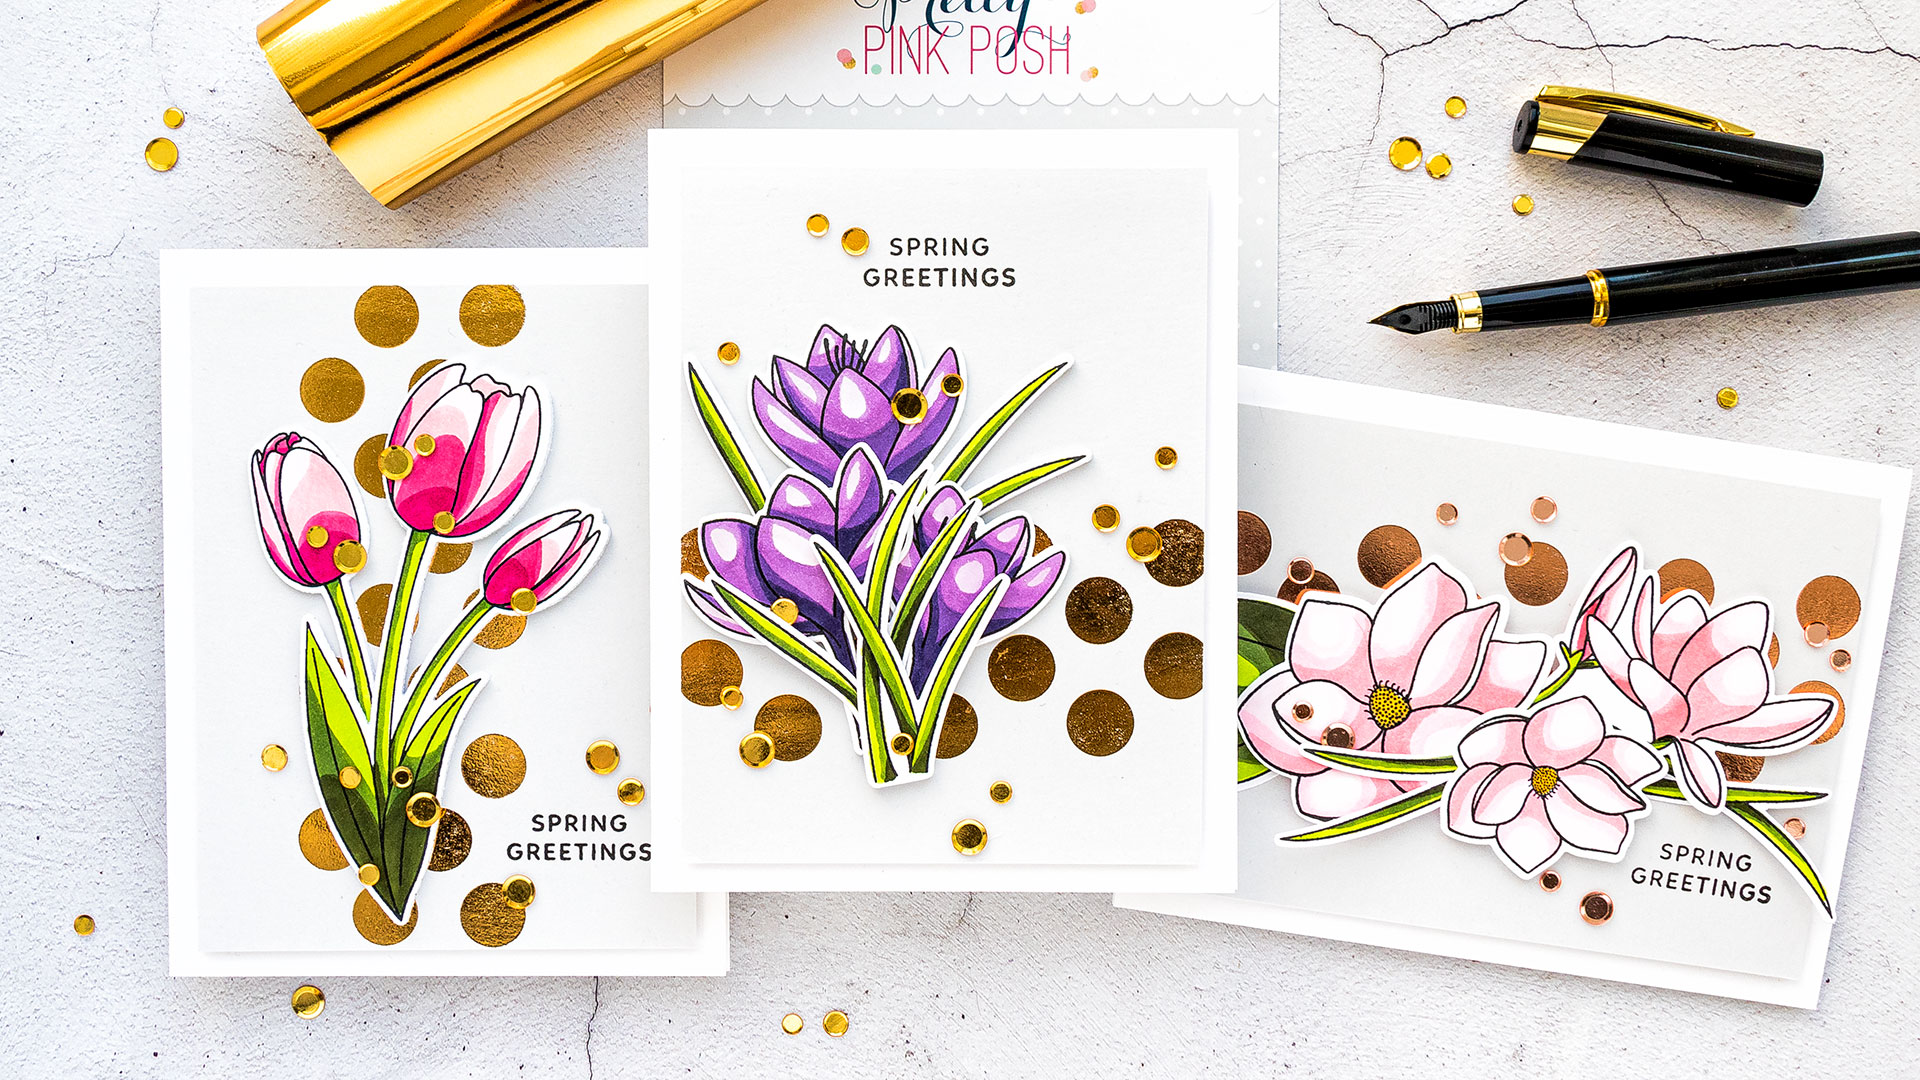
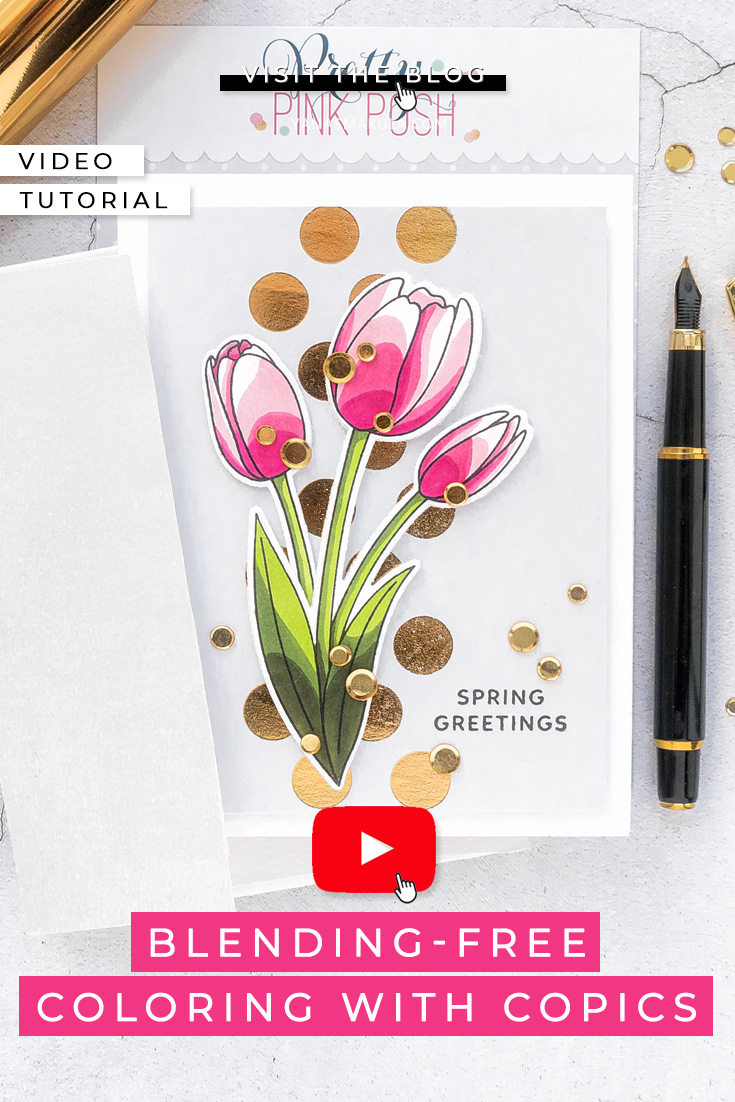
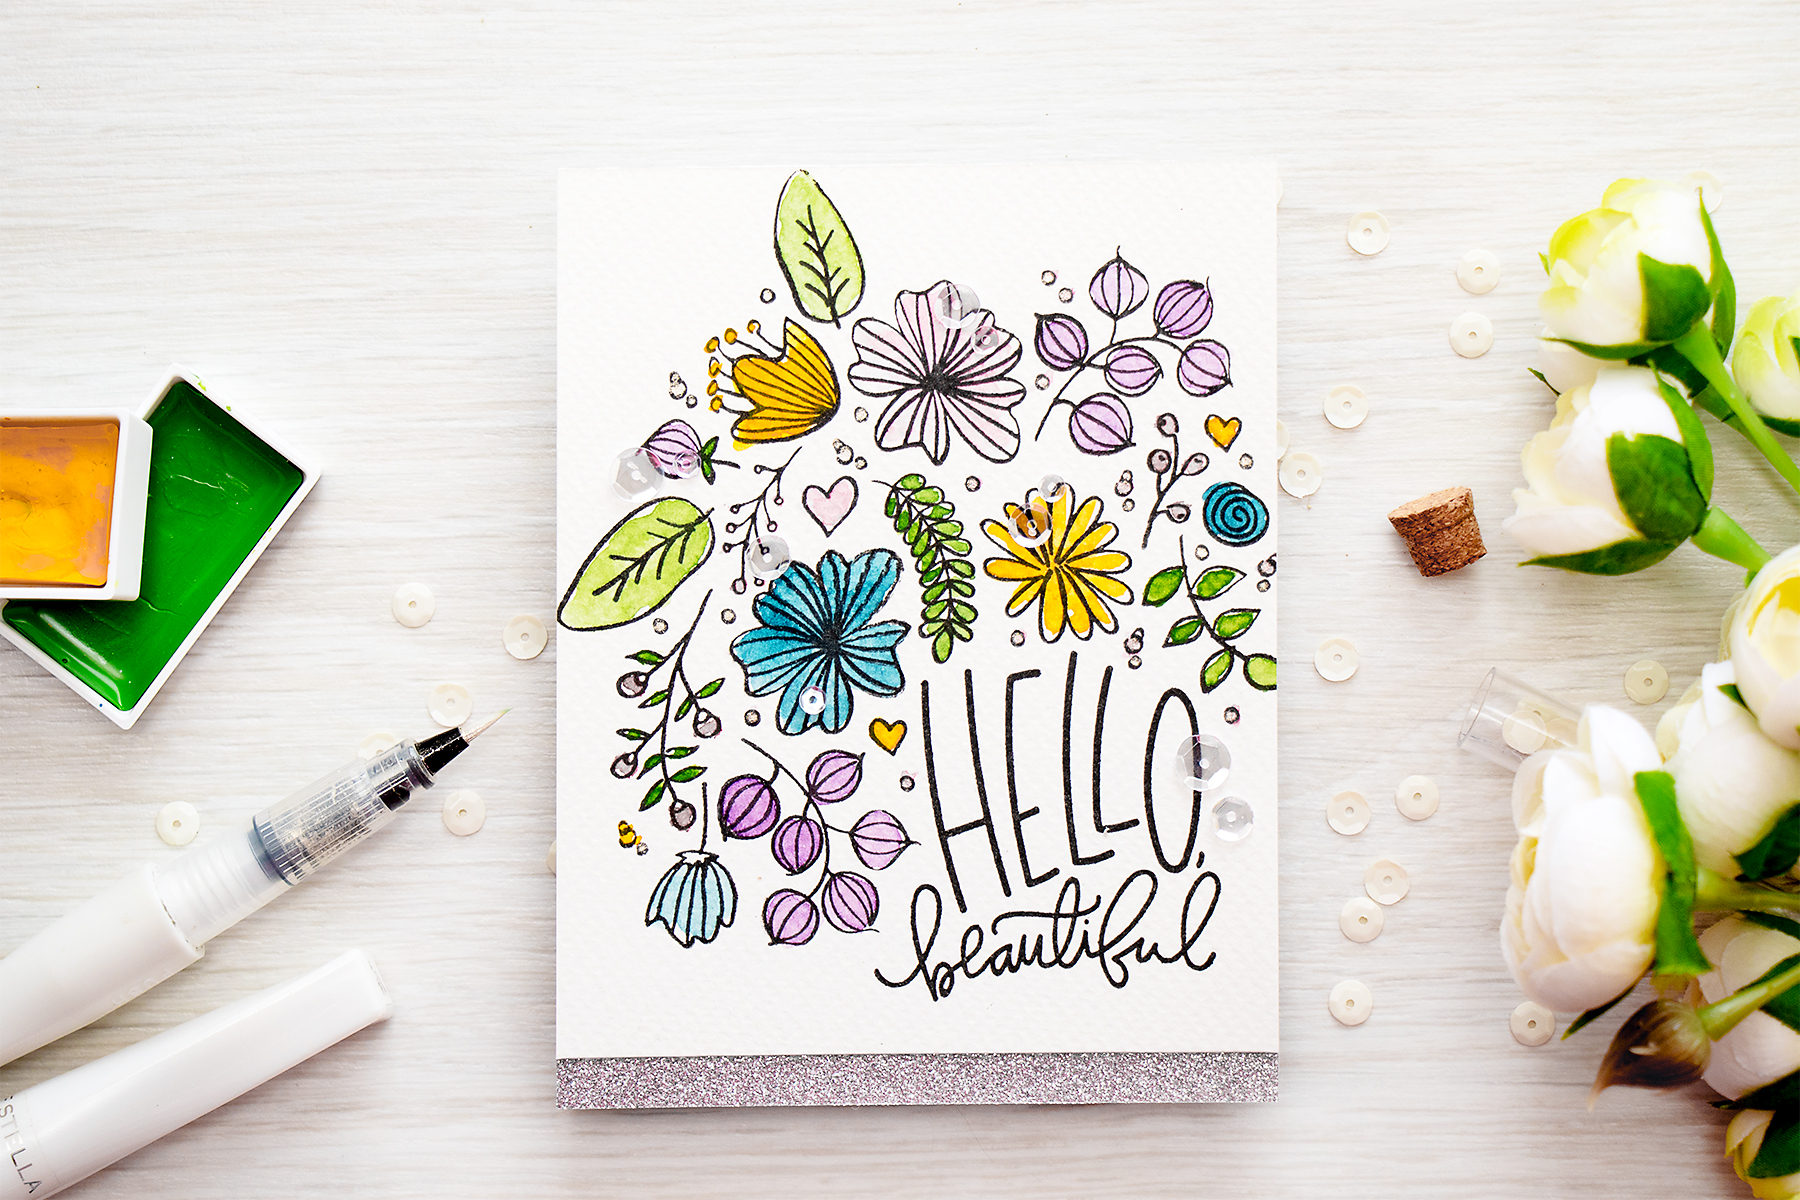
Hello, crafters! This video and projects show a different way to color floral images with alcohol markers without the stress of blending.
This coloring method reminds me of graphic-like coloring. Think about computer-generated graphics and limit that graphic to just a few colors. That image will have a clear transition between various shades of one color. So no gradual blending. Harsh lines that add color, define shadows and highlights.
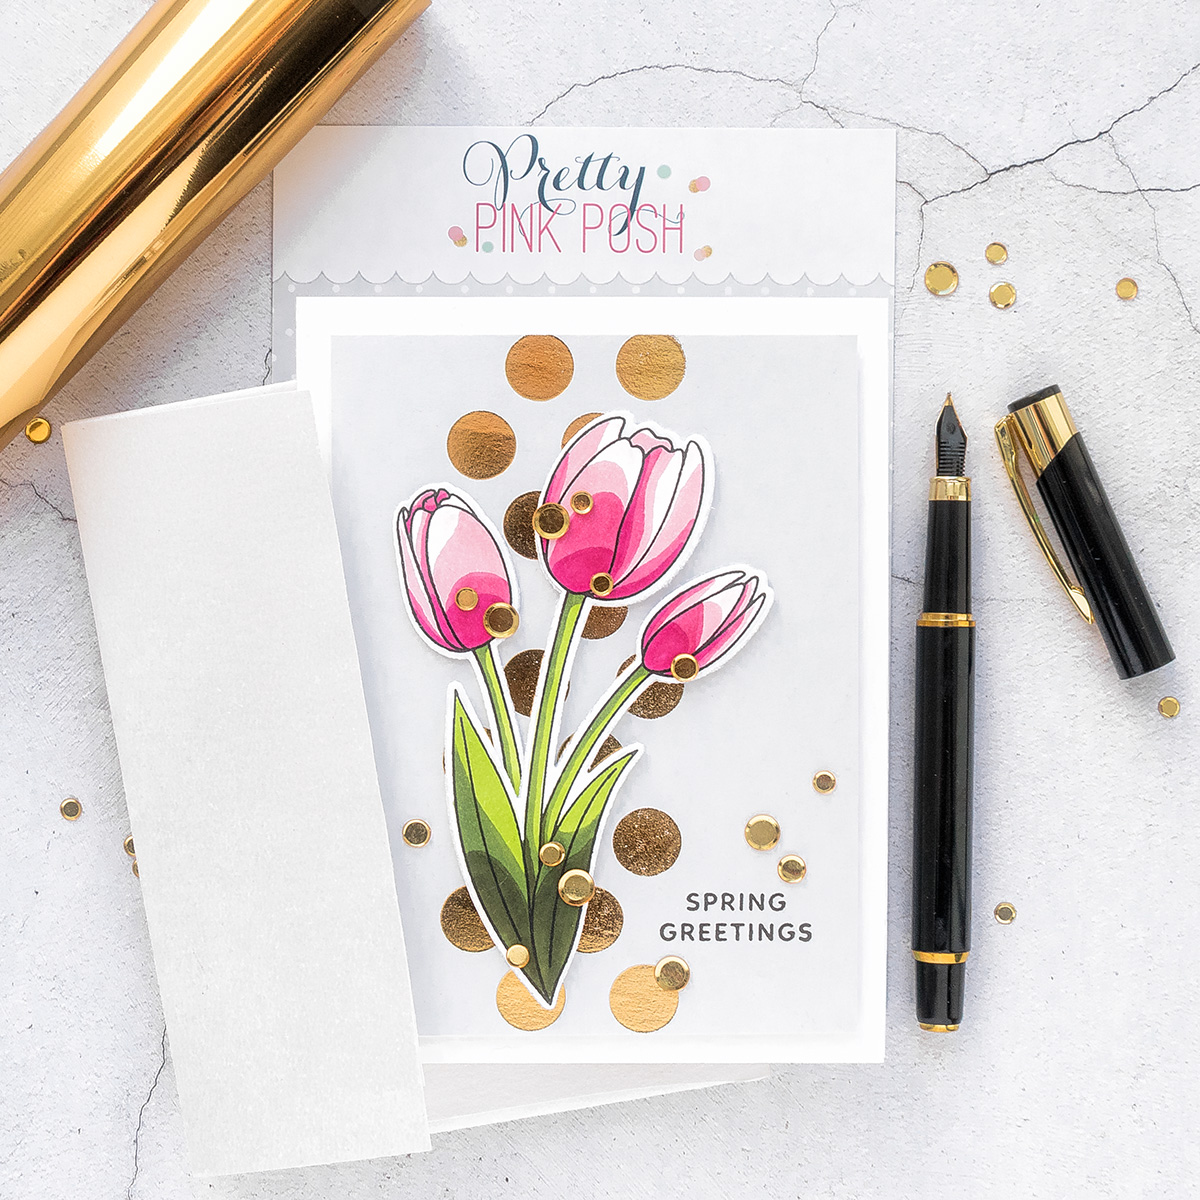
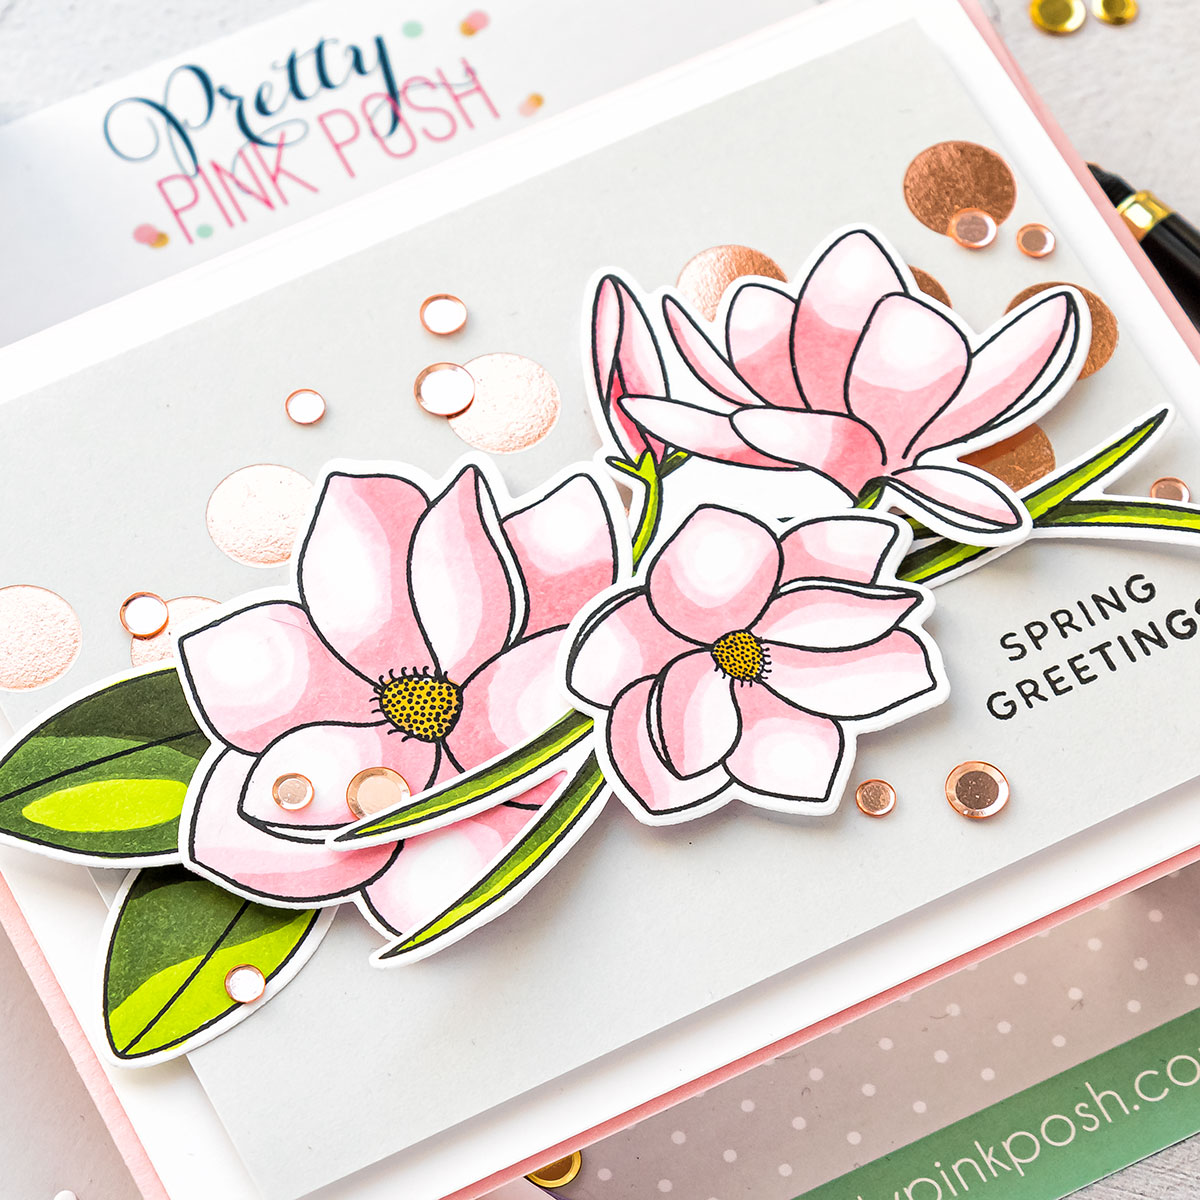
You can use this coloring method with any images, I find that I like to use florals the most for this. The florals I am using today are all from Pretty Pink Posh, but of course, this can be applied to other stamps just as easily.
Like this project? Pin it and save for later | Curious about my project photography? Click for details.
VIDEO TUTORIAL
I filmed a video tutorial showing how to create this project from start to finish. I’m hoping you’ll enjoy it. Watch it below or on my Youtube channel.
Like this video? Please give it a big thumbs up (you can do this on Youtube video page right under the video) and share it with a crafty friend! Leave me a comment too, I love hearing from you!
CARD DETAILS
Begin this type of coloring by applying the lightest color to the entire image. When you color with Copics you typically saturate the paper with the lightest color or go back to the lightest color to blend all the colors together. While the paper is wet it makes it easier to blend the colors. When you color with alcohol markers in the usual way you also don’t color the entire image, you work in sections. You color one petal at a time as this allows the ink to remain wet long enough on that area to help you do your blending.
Here, we don’t want any blending to take place. In fact, it is rather best if blending doesn’t happen. So color the entire image using your base color and even set it aside for a few seconds or minutes to dry.

With the base layer of the ink dry add a darker color. Envision which parts of the petal would remain lightest, preserved those areas, and color the rest of the petals with a darker color. Repeat applying darker colors to create shadows on your image. Remember, we are not blending anything, we are simply applying a solid layer of color.
Copic marker colors used:
I used Pretty Pink Posh Magnolia and Crocus flower stamps in the same way but colored them using different marker colors to explore this technique a bit further. I did enjoy this coloring style and while I can’t say it will work for every image in my stash or that I will use it daily, it is something I plan to come back to often.
It is up to you how many marker colors to use to color your image in this way. Depending on the image size and depending on the size of your marker stash you might want to use just 2 colors or if the image is big and you have a bit marker collection you can use 5, 6, or even more shades of one color. I would say don’t overdo it, just do simple coloring. This is what this coloring method is all about.
Since I was making these cards in early Spring I picked Happy Spring sentiment and stamped it in black. To add interest to the background I foiled the Polka Dot Border glimmer plate from Spellbinders from my Foiled Basics collection in various color foil on light gray cardstock.

I trimmed my foiled panels to 3 3/4 x 5”, foam mounted it onto A2 white side folding card base. To add dimension to the flowers I used coordinating dies that and die-cut 4 layers from scrap white cardstock. I glued those layers together and glued them behind my colored flowers. This provided a solid layer of dimension.
Using cardstock to add dimension does make your card heavier, but it also makes it a lot more sturdy, there are weight and heft to it. That isn’t ideal for mailing the card, so if you plan to mail your project, maybe stick to using fun foam and foam adhesive squares.
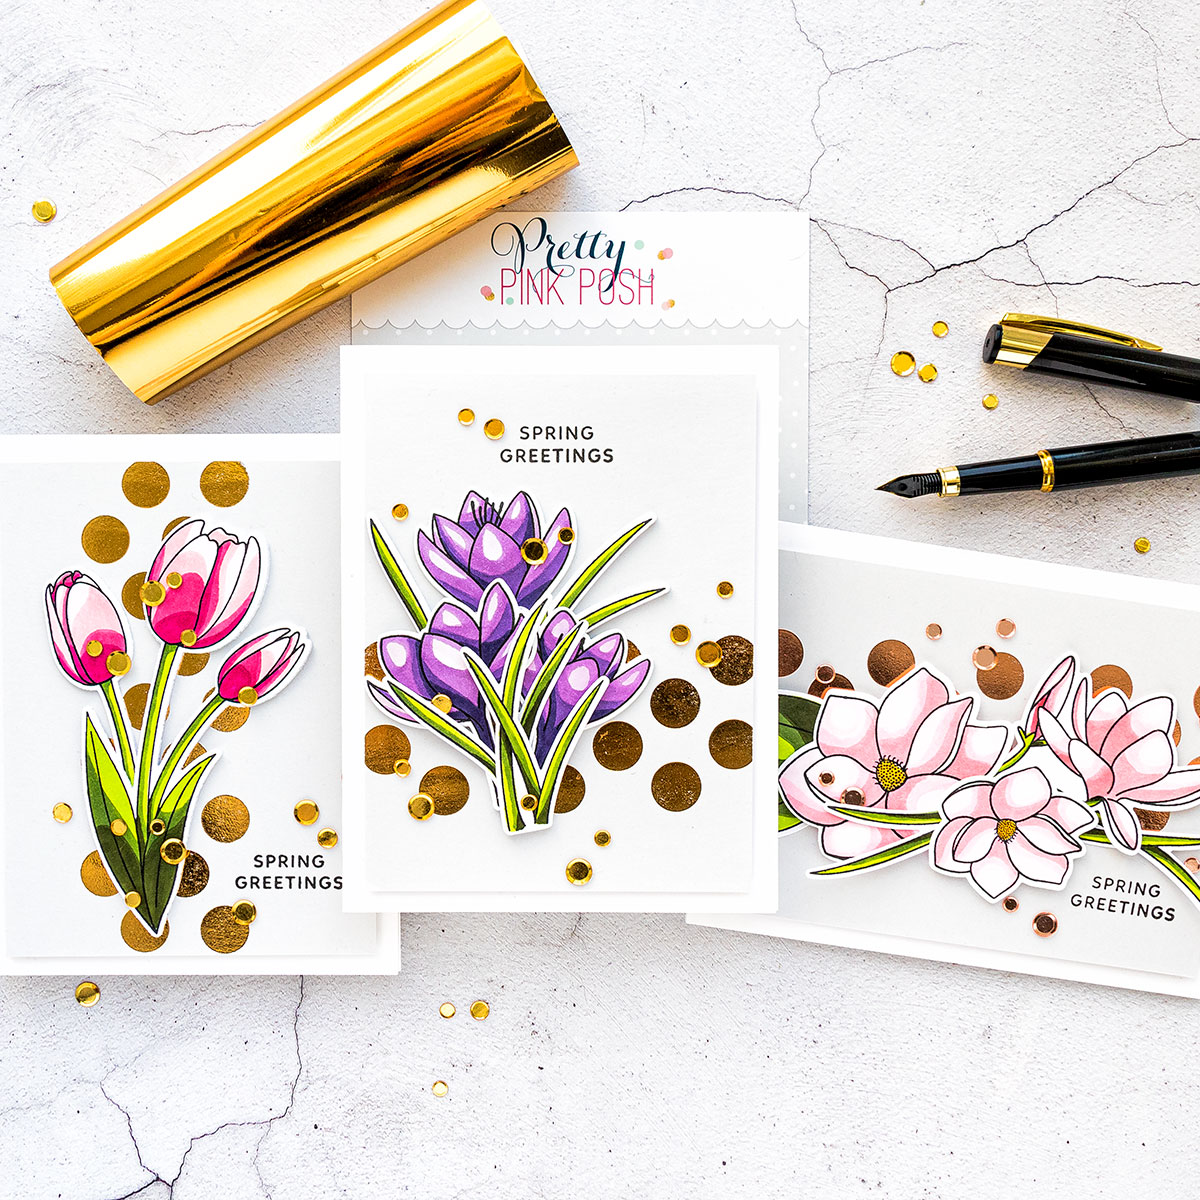
Finally, I used Pretty Pink Posh confetti in various colors (to match the foil used for the background) to embellish my card as I thought they complimented the foiled background dots perfectly.
SUPPLIES
I’m listing the products I used below. Click on the link to go directly to the product. Where available I use compensated affiliate links which means if you make a purchase I receive a small commission at no extra cost to you. Thank you so much for your support!
 Pretty Pink Posh Tulips Stamp Set Shop at: SSS | PPP |
 Pretty Pink Posh Tulips Coordinating Dies Shop at: SSS | PPP |
 Pretty Pink Posh Crocus Flower Clear Stamps Shop at: SSS | PPP |
 Pretty Pink Posh Crocus Flower Dies Shop at: SSS | PPP |
 Pretty Pink Posh Magnolia Flowers Clear Stamps Shop at: SSS | PPP |
 Pretty Pink Posh Magnolia Flowers Dies Shop at: SSS | PPP |
 Pretty Pink Posh Metallic Gold Jewels Shop at: SSS | AZ | PPP |
 Pretty Pink Posh Metallic Rose Gold Confetti Shop at: SSS | PPP |
 Pretty Pink Posh Metallic Gold Confetti Shop at: SSS | PPP |
 Spellbinders Polka Dot Strip Glimmer Hot Foil Plates Shop at: SSS | SC | SB | AZ |
 Spellbinders Hot Foil Roll – Gold Shop at: SSS | SC | SB | AZ |
 Glimmer Hot Foil – Rose Gold Shop at: SC | SB | AZ |
 Spellbinders Glimmer Hot Foil System Shop at: SSS | SC | SB | AZ |
 Spellbinders Deep Sea Die Cutting Machine Shop at: SSS | SC | SB | AZ |
 Neenah 80LB Solar White Cardstock Shop at: SSS | AZ |
 Simon Says Stamp Fog Gray Cardstock Shop at: SSS |
 Neenah 110 Lb Solar White Cardstock Shop at: SSS | AZ |
 Mini Misti Stamping Tool Shop at: SSS | SC | HA | AZ |
 Simon Says Stamp Intense Black Ink Shop at: SSS |
 Copic Sketch Marker Rv17 Deep Magenta Shop at: SSS |
 Copic Sketch Marker RV00 Water Lily Shop at: SSS | WP9 | AZ |
 Copic Sketch Marker RV10 Pale Pink Shop at: SSS | AZ |
 Copic Sketch Marker RV11 Pink Shop at: SSS | AZ |
 Copic Sketch Marker RV21 Light Pink Shop at: SSS |
 Copic Sketch Marker RV34 Dark Pink Shop at: SSS | AZ |
 Copic Sketch Marker Bv000 Iridescent Mauve Shop at: SSS |
 Copic Sketch Marker YG03 Yellow Green Shop at: SSS | WP9 | AZ |
 Copic Sketch Marker G94 Grayish Olive Shop at: SSS | WP9 | AZ |
 Copic Sketch Marker G99 Olive Green Shop at: SSS |
 Copic Sketch Marker V12 Pale Lilac Shop at: SSS | AZ |
 Copic Sketch Marker V17 Amethyst Shop at: SSS | AZ |
 Crystal Ninja Crystal Katana Pick Up Tool Shop at: SSS | AZ | PPP |
 Simon Says Stamp Craft Tacky Glue Shop at: SSS |
Yana,
I REALLY like today’s blending post. Such a more interesting look over regular blending.
I’m going to try this today!
Thank you….Beth
thank you, Beth! I’m so glad you’ve enjoyed it 🙂
interesting idea, i find i like this look
I’m so glad! Thank you, Lynne!
What beautiful and graphic look. Gorgeous cards, Yana :-0
thank you 🙂 I can’t wait to try this coloring method again
I can’t wait to try this technique! Also can you tell me if the Spellbinders foil plates can be used in a machine like the Minc?
thank you, Robin. To answer your question – no. The Glimmer machine and Minc are completely different and products aren’t compatible.
Beautiful cards Yana!
I love the look of this technique. Brilliant!
Just beautiful….more sophisticated somehow than the blending we’re used to seeing. Nice work!
Beautiful cards with this fun technique, Yana!! Thanks for the great video – I’m going to try it!!
Gorgeous cards, Yana ! Fun and great technique that can be used by anybody with a fabulous result. Thanks for the video !