


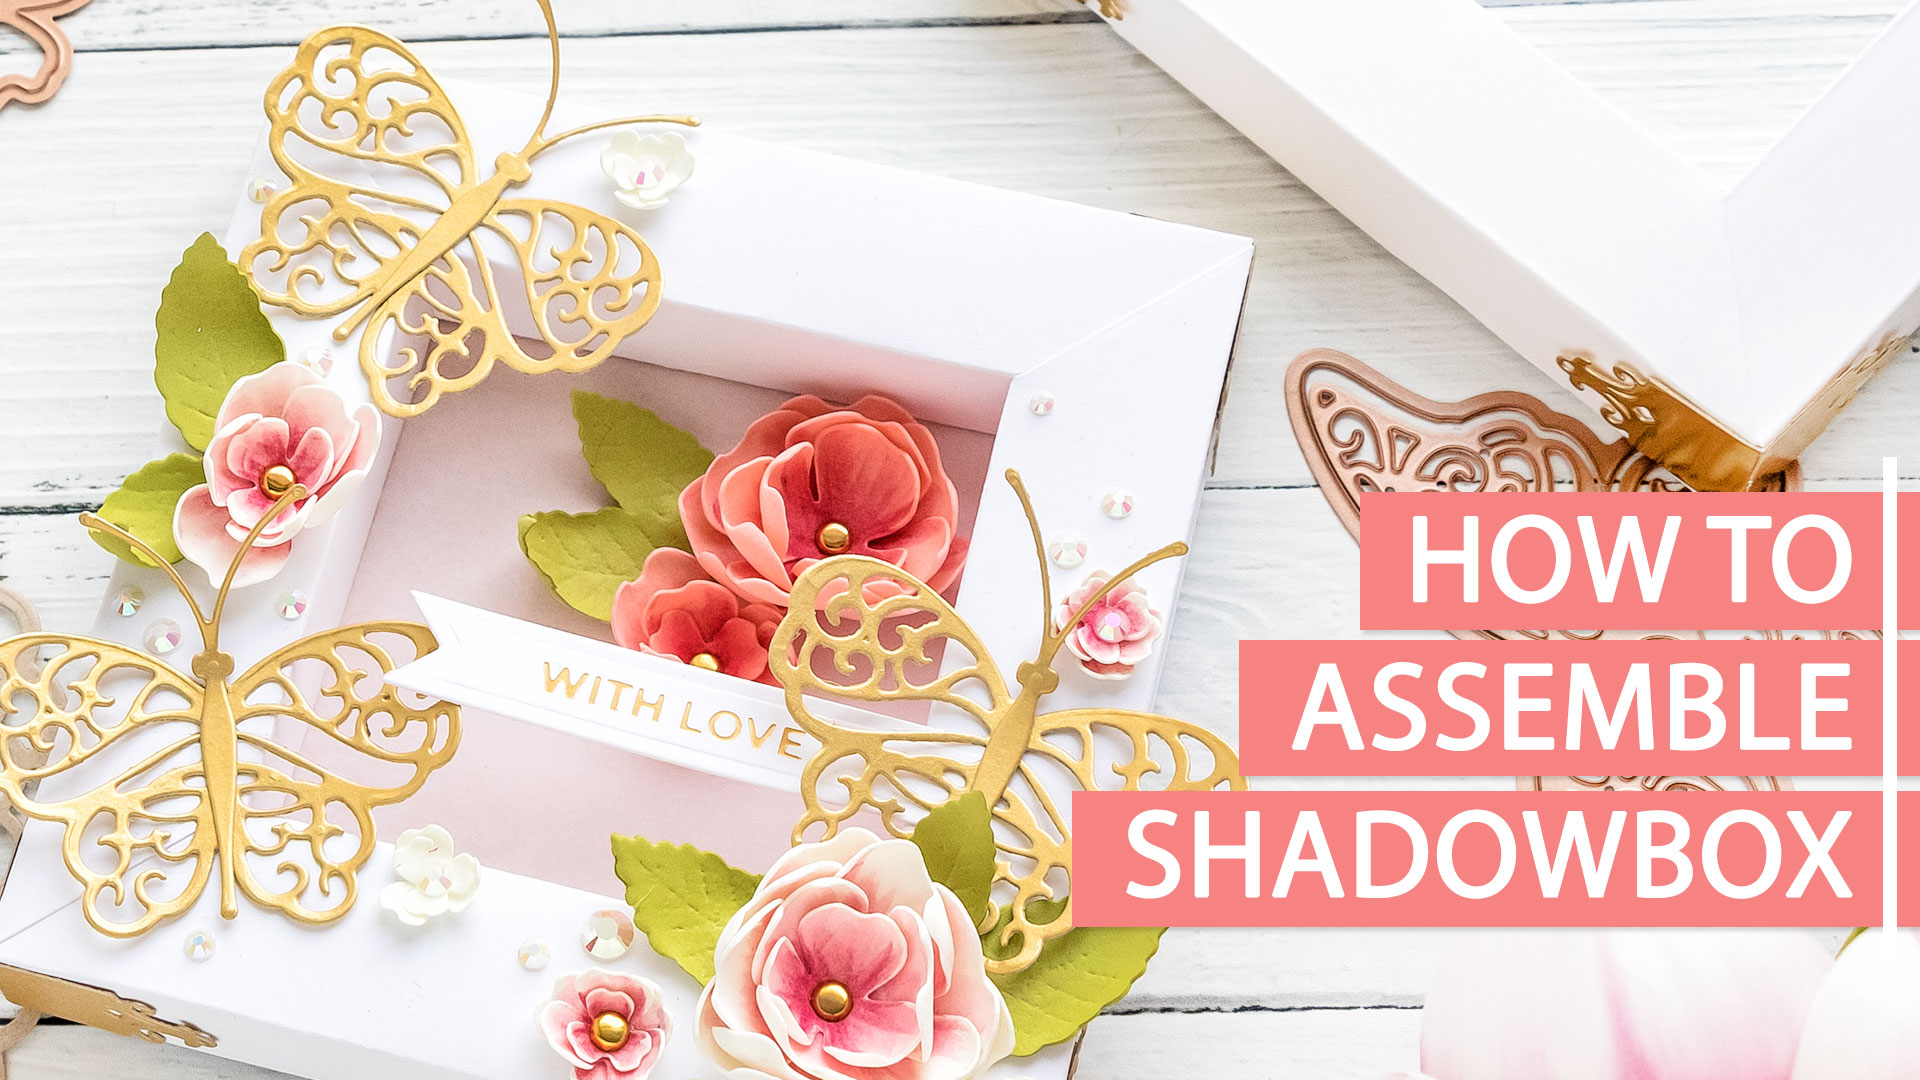
Hello, crafters! As promised, I’m sharing a tutorial showing how to make a shadow box using specialty Shadowbox dies from Spellbinders and Becca Feeken. In my world, Becca is a paper genius and she always comes up with such clever and functional designs it’s hard not to be a fan of her work.
Becca’s recent collection includes 3 sets of dies that each can be used to make shadowboxes. The different sets will give you different border width of the box and each of the sets can be used to make a shadowbox of literally any size as long as you have a sheet of paper big enough for it. And all of these will work in die cutting machines with 6” opening, so you don’t need to have the huge machines for it.
VIDEO TUTORIAL
As always, I filmed a video tutorial showing how to create this project from start to finish. I’m hoping you’ll enjoy it. Watch it below or on my Youtube channel:
Like this video? Please give it a big thumbs up (you can do this on Youtube video page right under the video) and share with a crafty friend! Leave me a comment too, I love hearing from you!
There’s some math involved in putting a shadowbox together, and there’s a bit of a learning curve, but once you make your first shadowbox the following will become easier and easier to make.
ASSEMBLY DETAILS
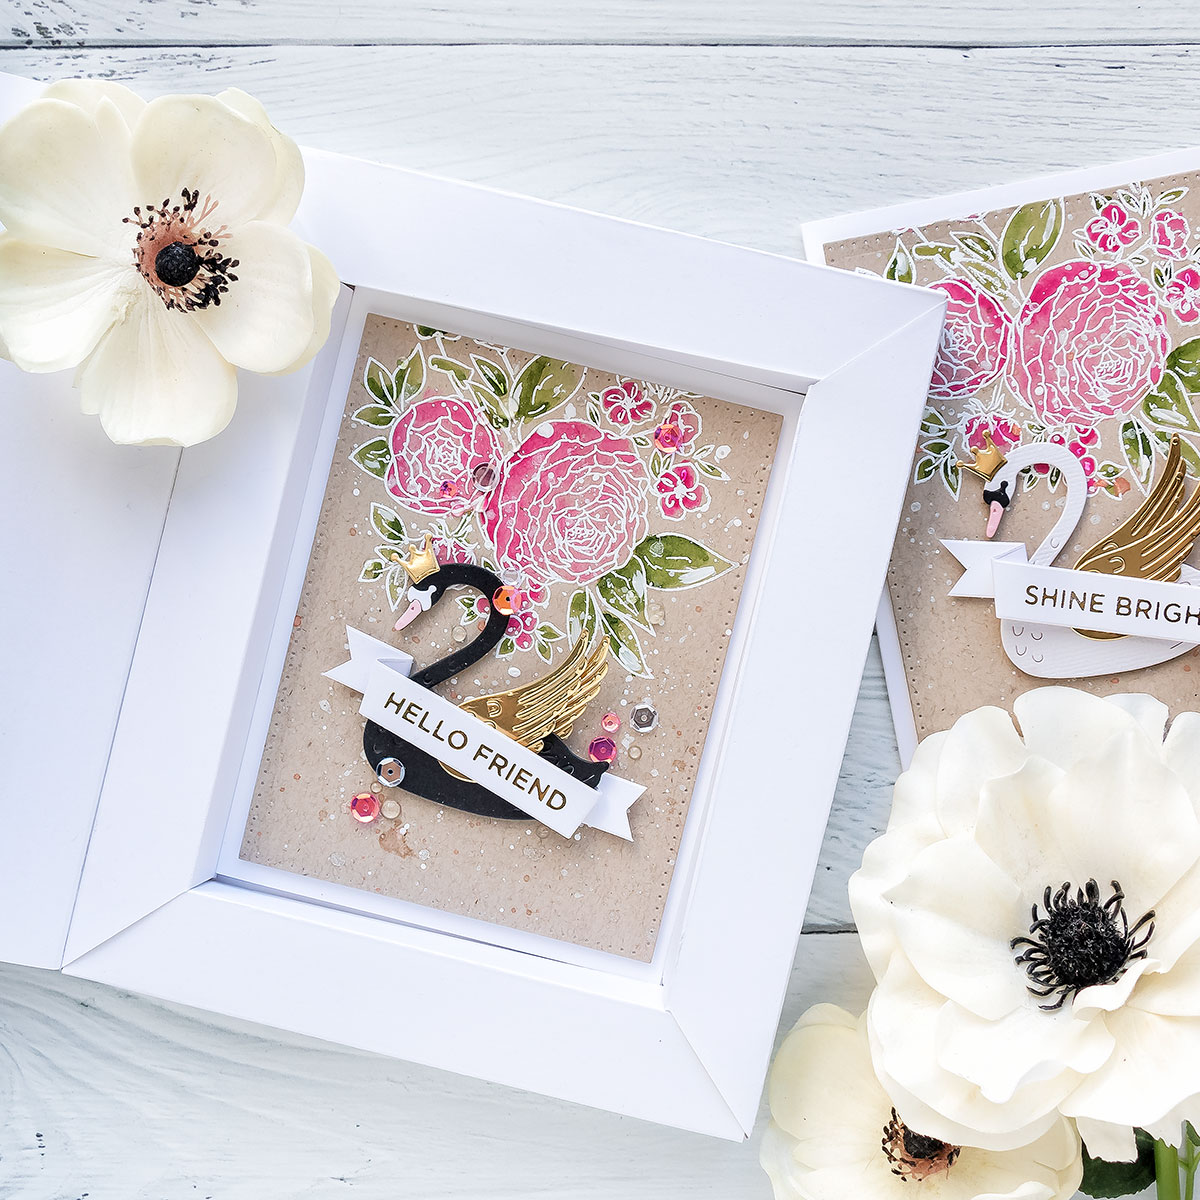
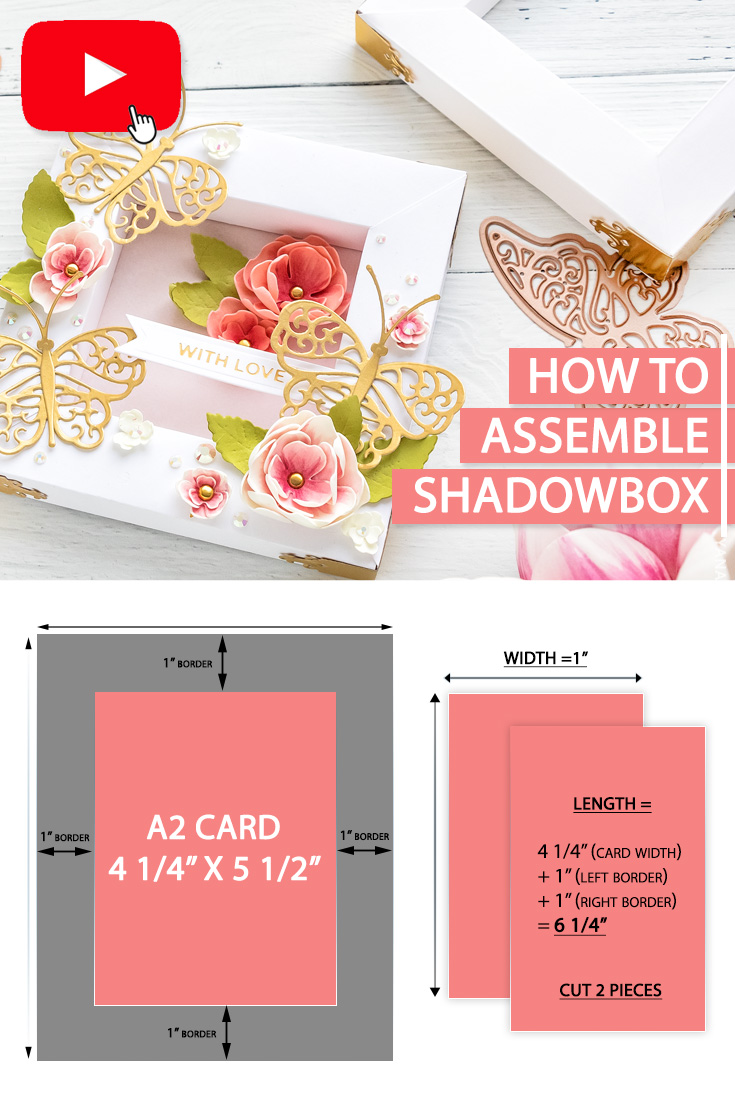
I want to create a box for an A2 card. I’m using the 1” border die to make my box, it’s the S4-981. To calculate the size of the box I need to add 1” as this is the width of the border of the box on each side of my card, so total 2” to the card width and card length.
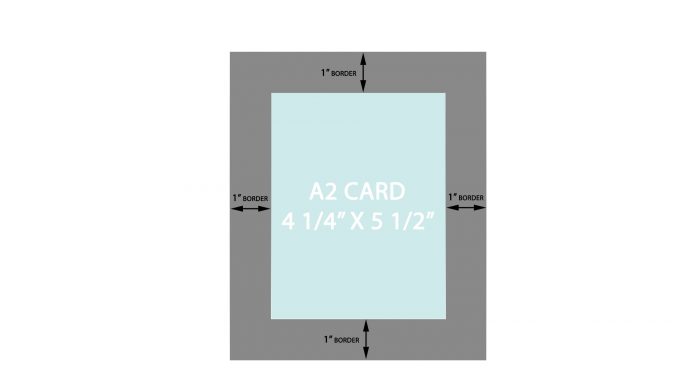
For an A2 card and 1” wide frame the width is 6 1/4”, the length is 7 1/2”.
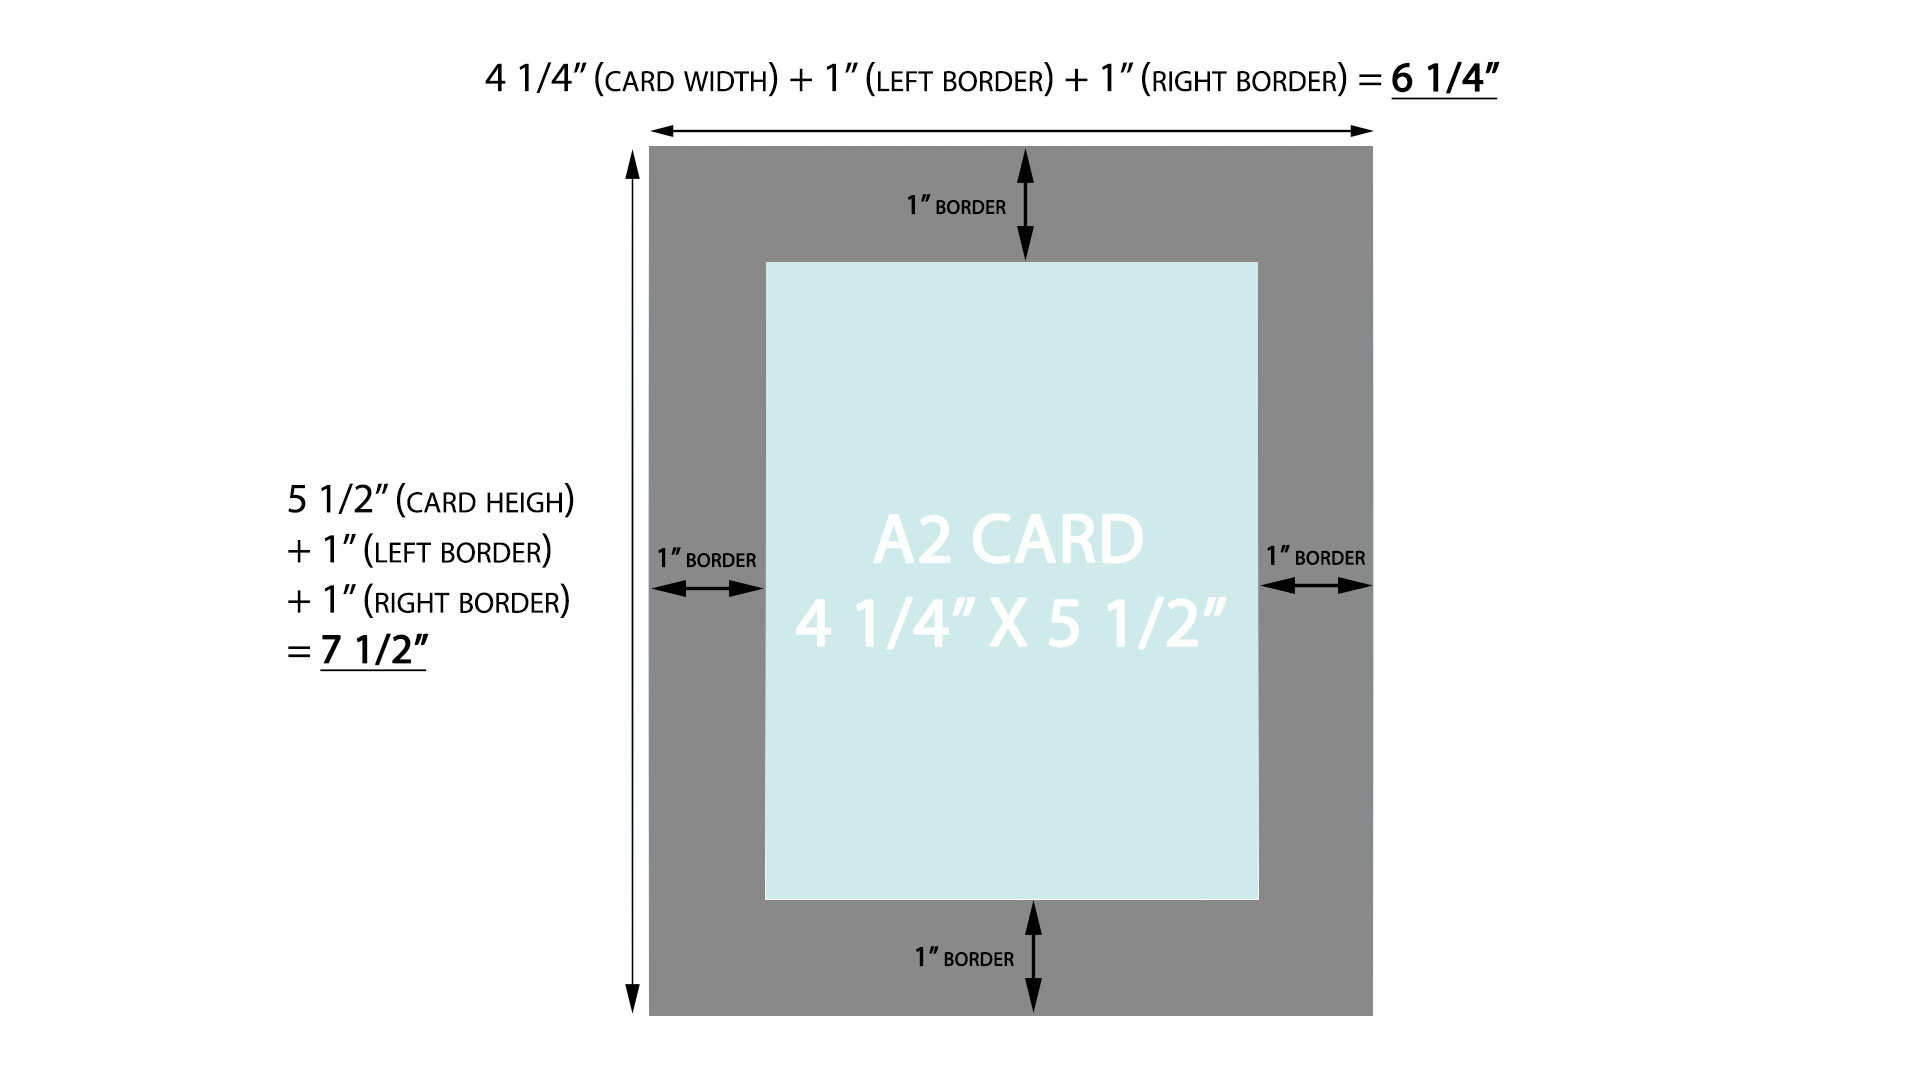
With these dimensions, once my frame is assembled, the opening in the center will fit an A2 card perfectly. Following this formula you can easily make a box for any size project. Just add the width of the box twice to the width and length of your project. For 1” wide box you add 2 inches, for 3/4” wide box you add 1 1/2” and for 1/2” wide box you add 1”.
Once you have your dimensions you can start pre cutting your paper to make the sides of the box. You’ll need 4 pieces of paper. 2 shorter pieces and 2 longer pieces if your box is rectangular. If your box is square, the size of all 4 pieces will be the same.
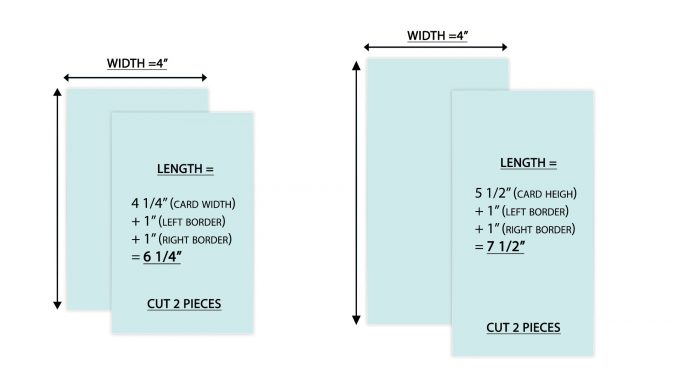
The length of both pieces is already determined – it’s the outer box dimensions. The width hoverer is determined by which die set you are using. And it’s specified for each set on the product page. It’s 4” for 1” wide box, 3” for the 3/4” wide and 2.15” for the 1/2” wide box.
I’m using the 1” wide box so paper dimensions for my box are 4” wide x 6 1/4” long and 4” wide by 7 1/2” long. I hope this explains the logic of how you need to calculate the desired dimensions of the box and the paper.
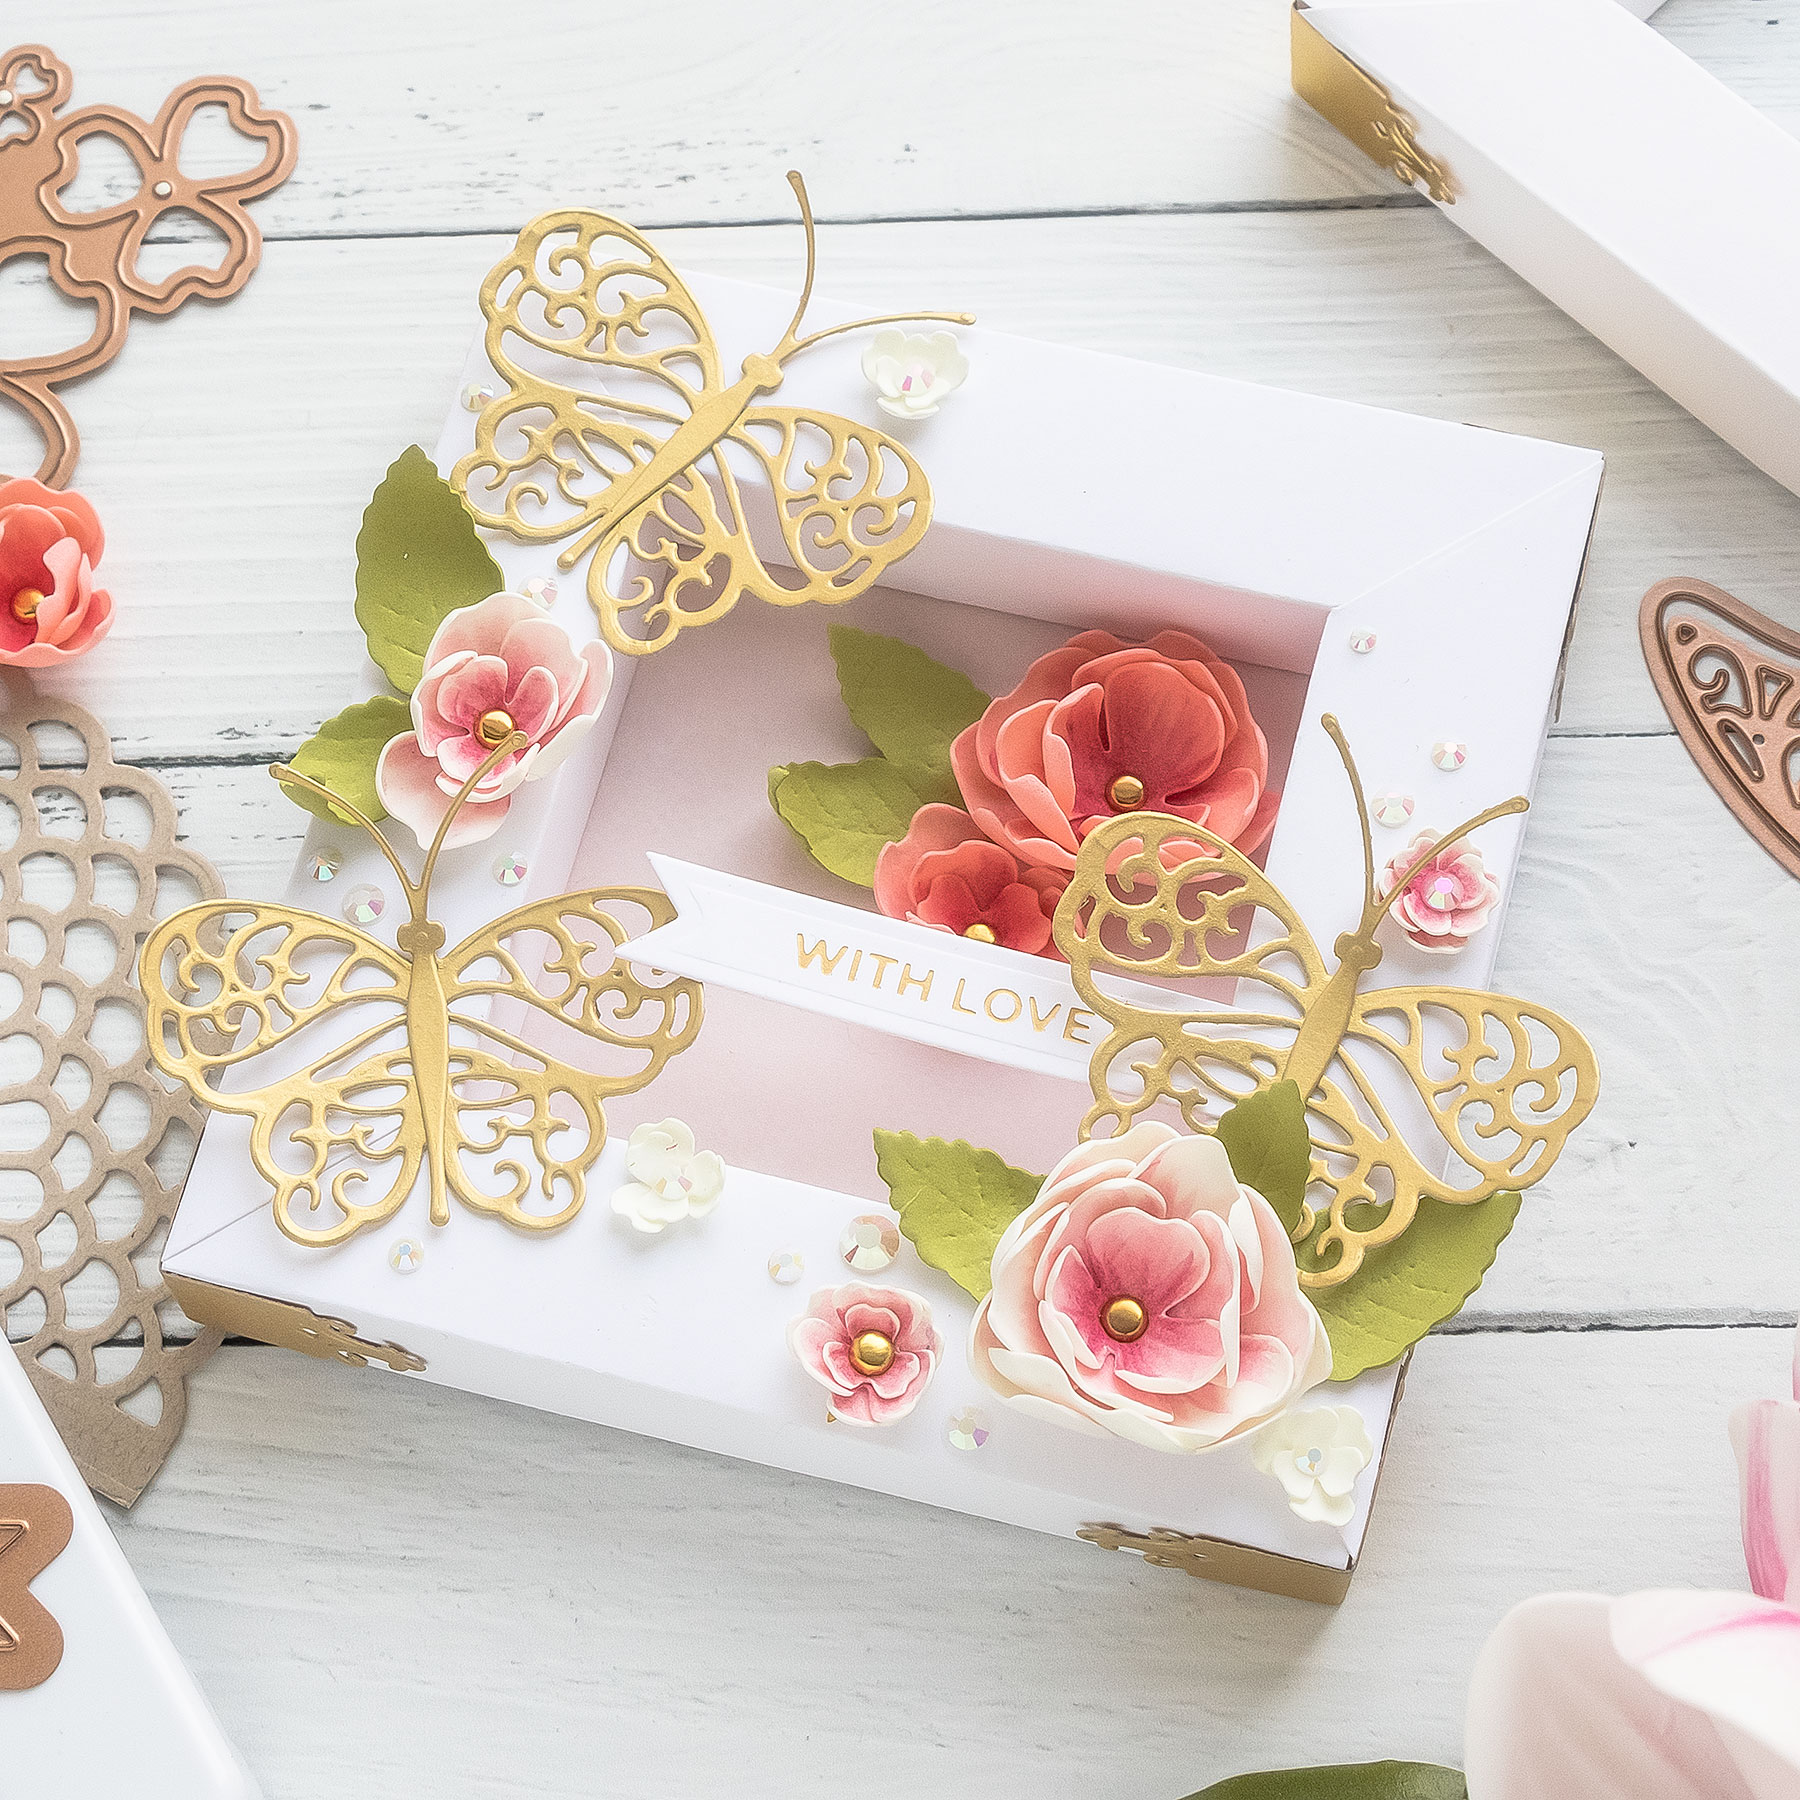
See this shadowbox in detail HERE
I hope this video & blog post has been helpful. If you have questions about the process, please comment below, specify the time in the video to help me answer it better.
SUPPLIES
I’m listing the products I used below. Click on the link to go directly to the product. Where available I use compensated affiliate links which means if you make a purchase I receive a small commission at no extra cost to you. Thank you so much for your support!
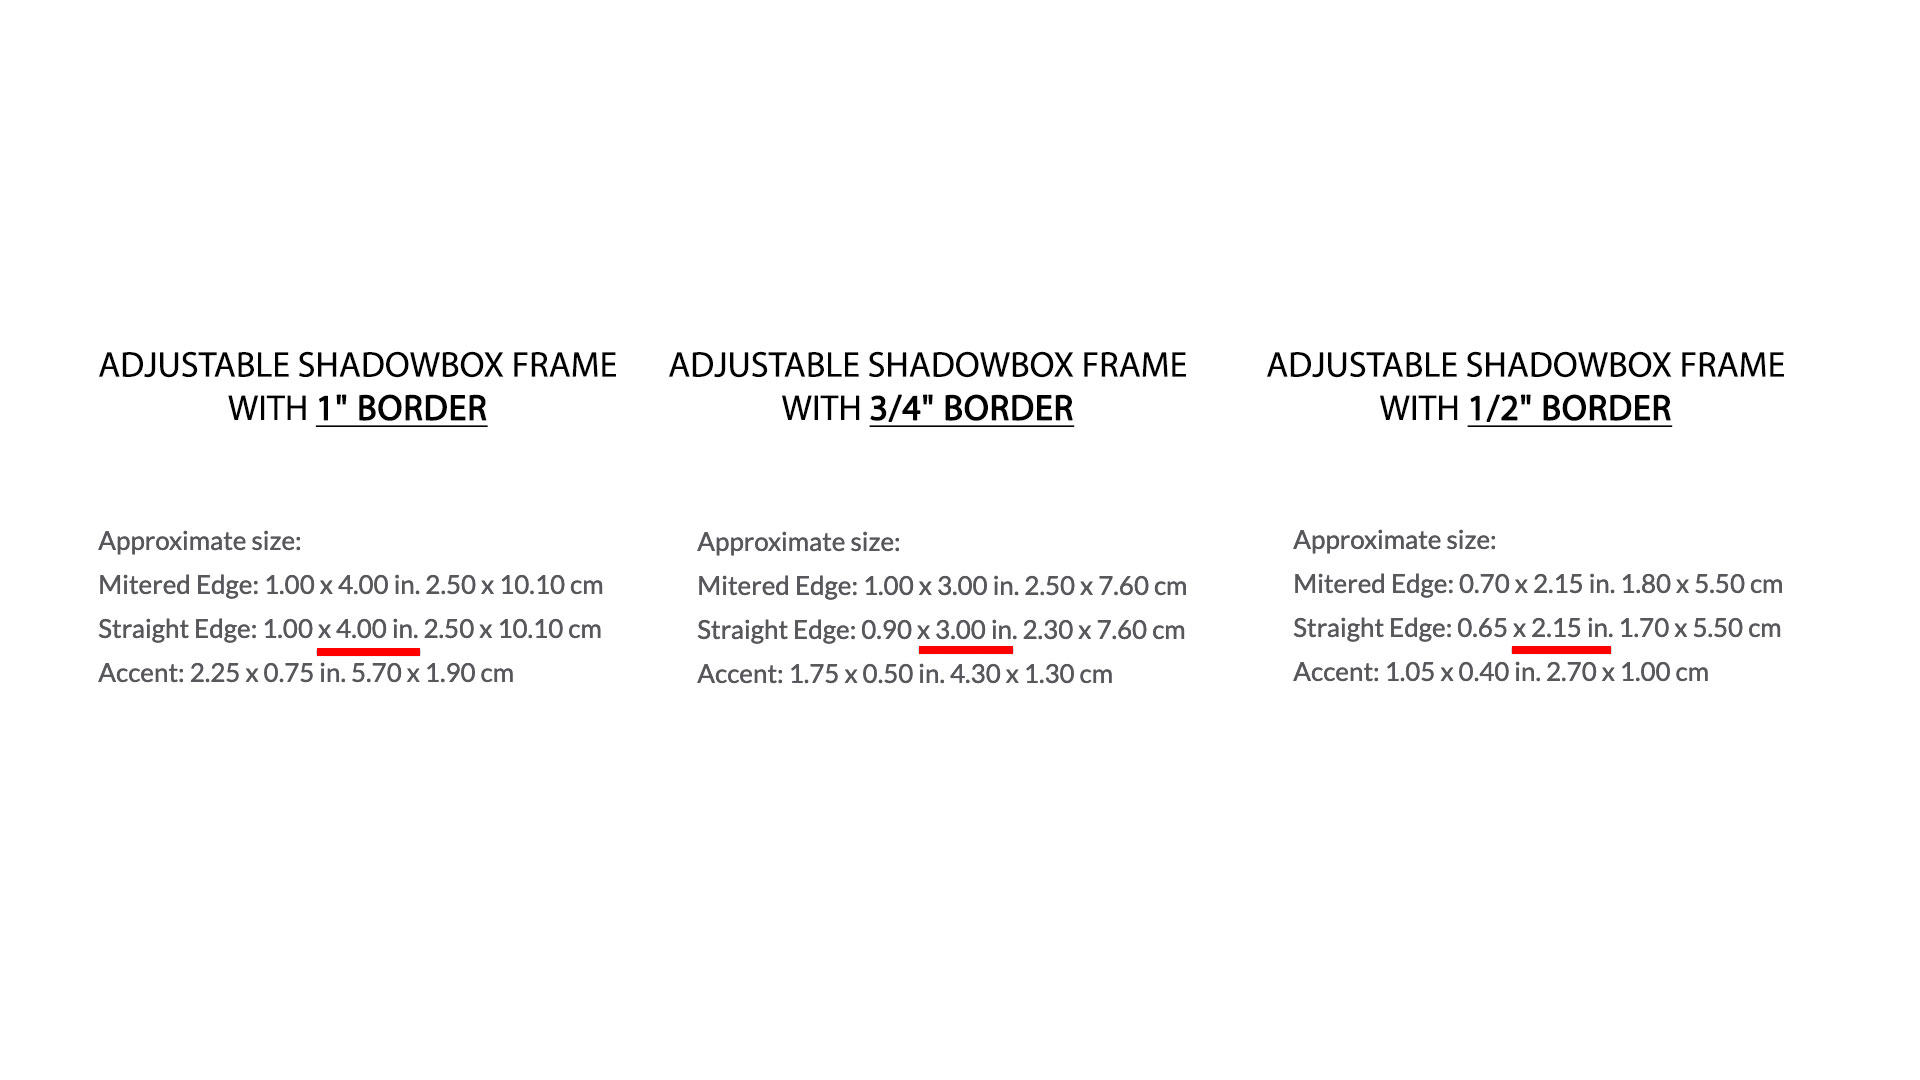
 Spellbinders Adjustable Shadowbox Frame With 3/4″ Border Shop at: SC | SB | AZ |
 Spellbinders Adjustable Shadowbox Frame with 1/2″ Border Shop at: SC | SB | AZ |
 Spellbinders Adjustable Shadowbox Frame with 1″ Border Shop at: SC | SB | AZ |
 Spellbinders Platinum 6 Die Cutting Machine Shop at: SSS | SC | SB | AZ |
PIN/SAVE ME!
Save this image to one of your Pinterest boards to easily come back to this post in the future.

Fantastic ! Both versions were very pretty to see & understandable, although I hate Math( math = Mental A buse To Humans) these dies will be a fantastic investment for crafting. Thank you to you & Becca x
At first I wasn’t sure how this would work to make any size shadow box but after watching your video I see! Great idea!
GORGEOUS!!!! I Book Marked this page of your blog too, Yana! (Along with the YouTube Video)This is WONDERFUL that you’ve given us the How To’s to make these little boxes any size we like! One question: That fancy little corner piece, is that one of the dies with this box die? I don’t see it. Just wondering if it were in another set to get? THANKS YANA for your LOVELY INSPIRATION for us! LOVE your work!!;)
THANK YOU, Yana!! I purchased one of these dies and had a hard time putting my first frame together. Your video explains everything perfectly. I’m SO not a math person, but even I can do the math on this now that I understand the formula!!!! I have many ideas on how I would like to use the die and after watching your video I’m ready to dive back into making more frames/boxes. Thank you so much for the complete, easily to follow and understand video. I seriously can’t thank you enough. Hope you’re hanging in there in China and that you’re able to get back to your craft room (and cats!) before too much longer. Appreciate how you’ve been staying in touch.
Beautiful project! Love these shadow box frames. Now to decide which one I’ll start with! Thanks for the wonderful tutorial.
Perfect!! I was looking to make shadow box frames just a few days back and here I have all the details! Thank you so much for sharing them 🙂 I love your work!! 🙂