


Hello and welcome back for another Yippee For Yana video! Gosh, I’ve missed these videos! I was reading your comments on my previous post on Simon’s blog and you just blew me away! I’m also so happy to know you guys enjoyed my watercolor! Guess what? I have more watercolor cardmaking coming today.
Like this project? Pin it and save for later | Curious about my project photography? Click for details.
VIDEO TUTORIAL
As always, I filmed a video tutorial showing how to create this project from start to finish. I’m hoping you’ll enjoy it. Watch it below or on my Youtube channel:
Like this video? Please give it a big thumbs up (you can do this on Youtube video page right under the video) and share with a crafty friend! Leave me a comment too, I love hearing from you!
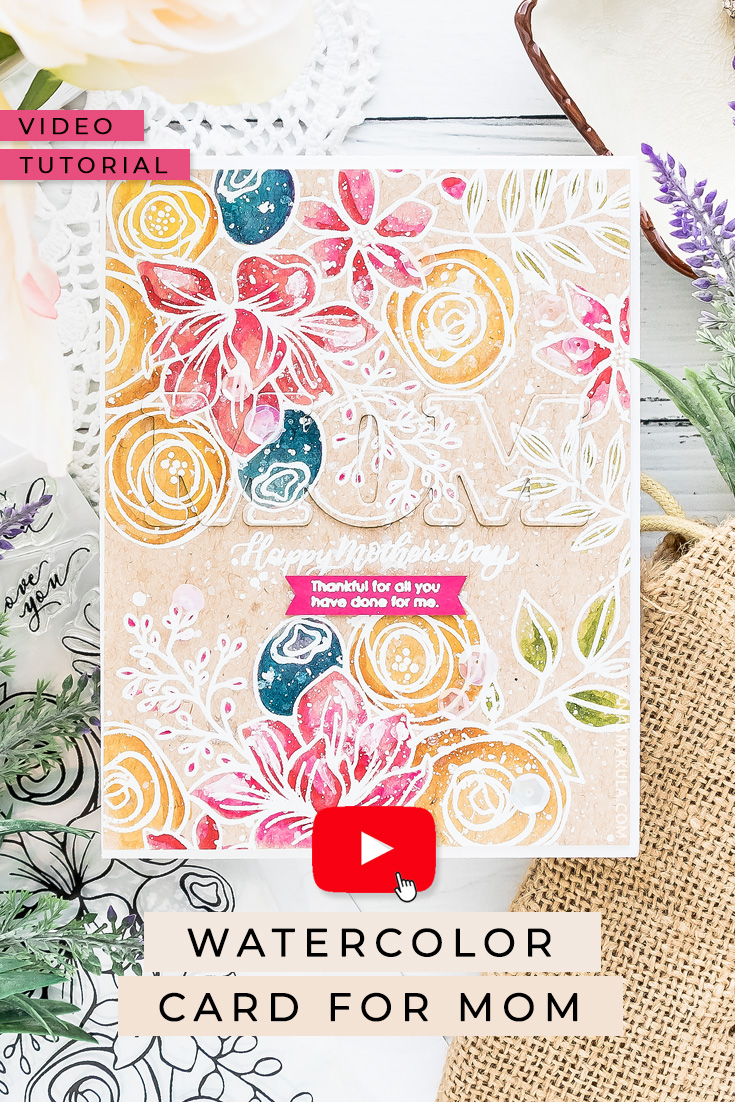
WATERCOLOR MOTHER’S DAY CARD DETAILS
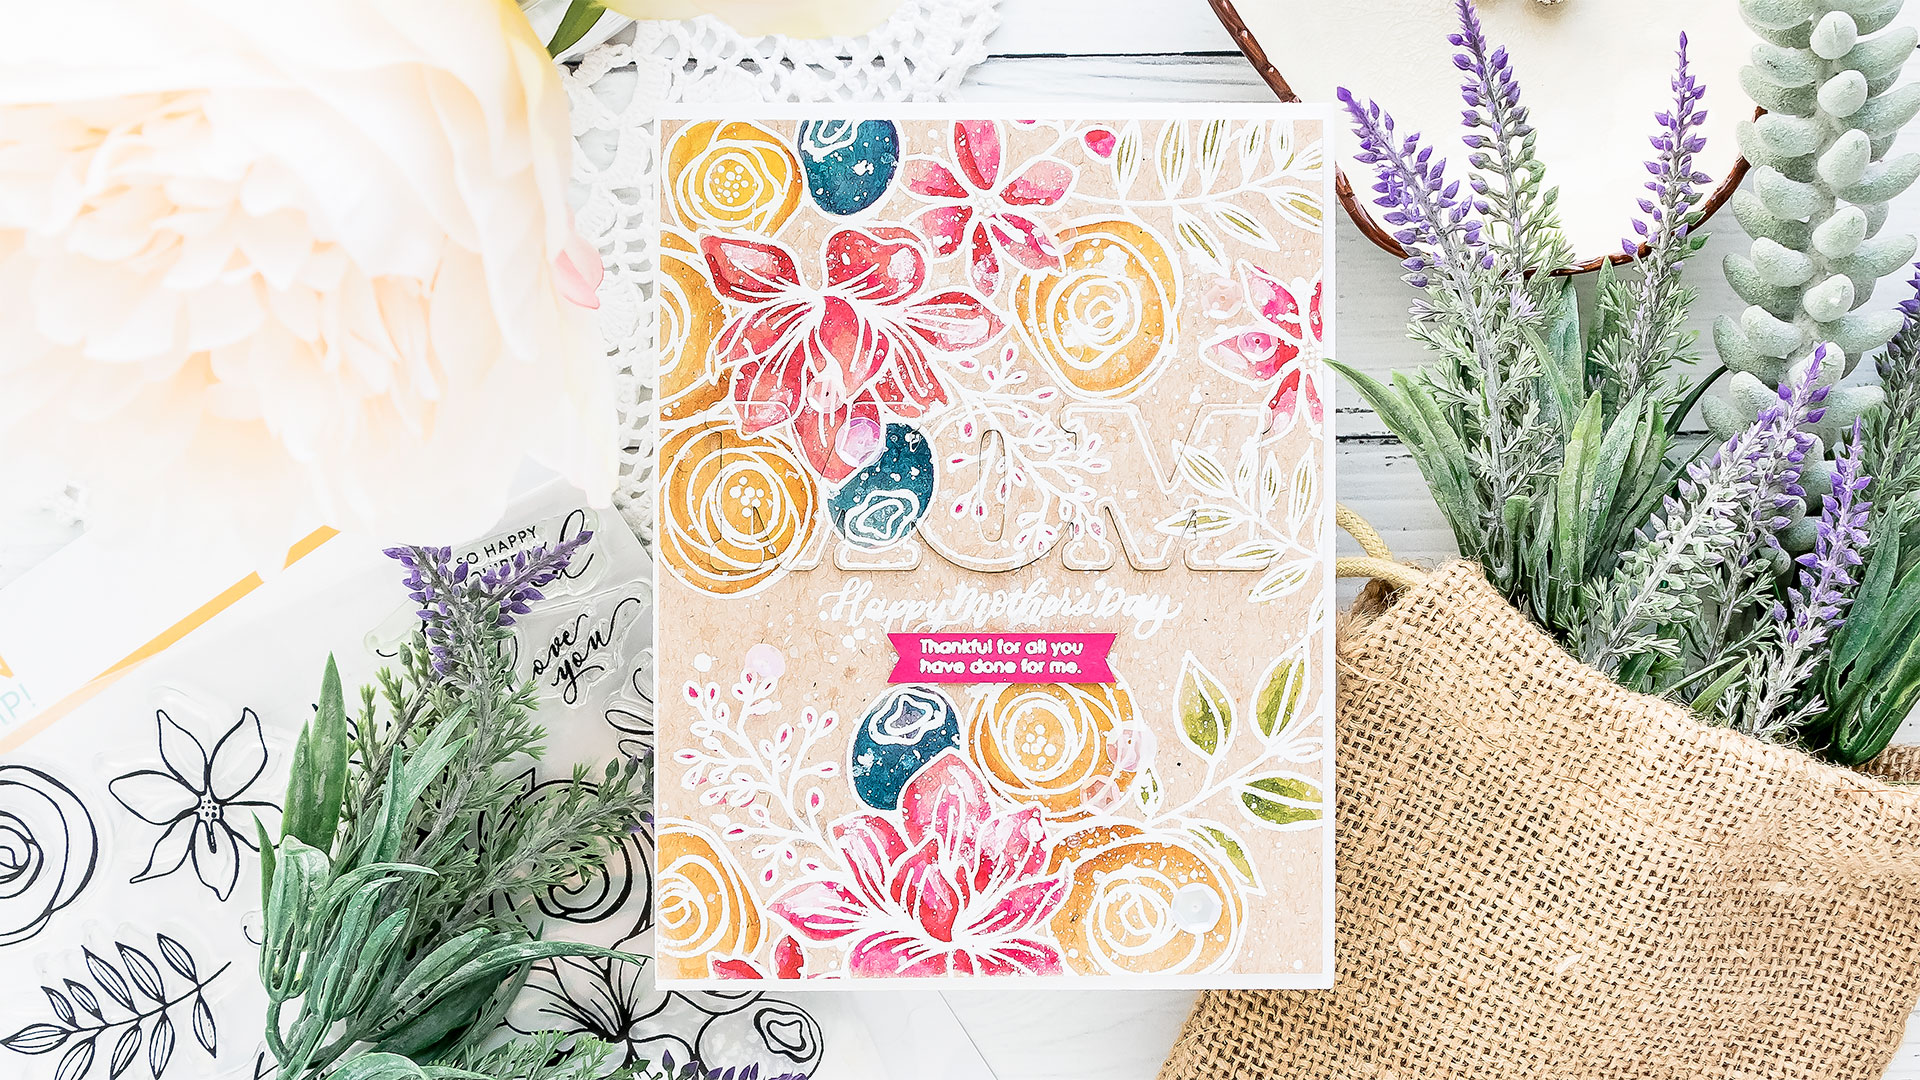
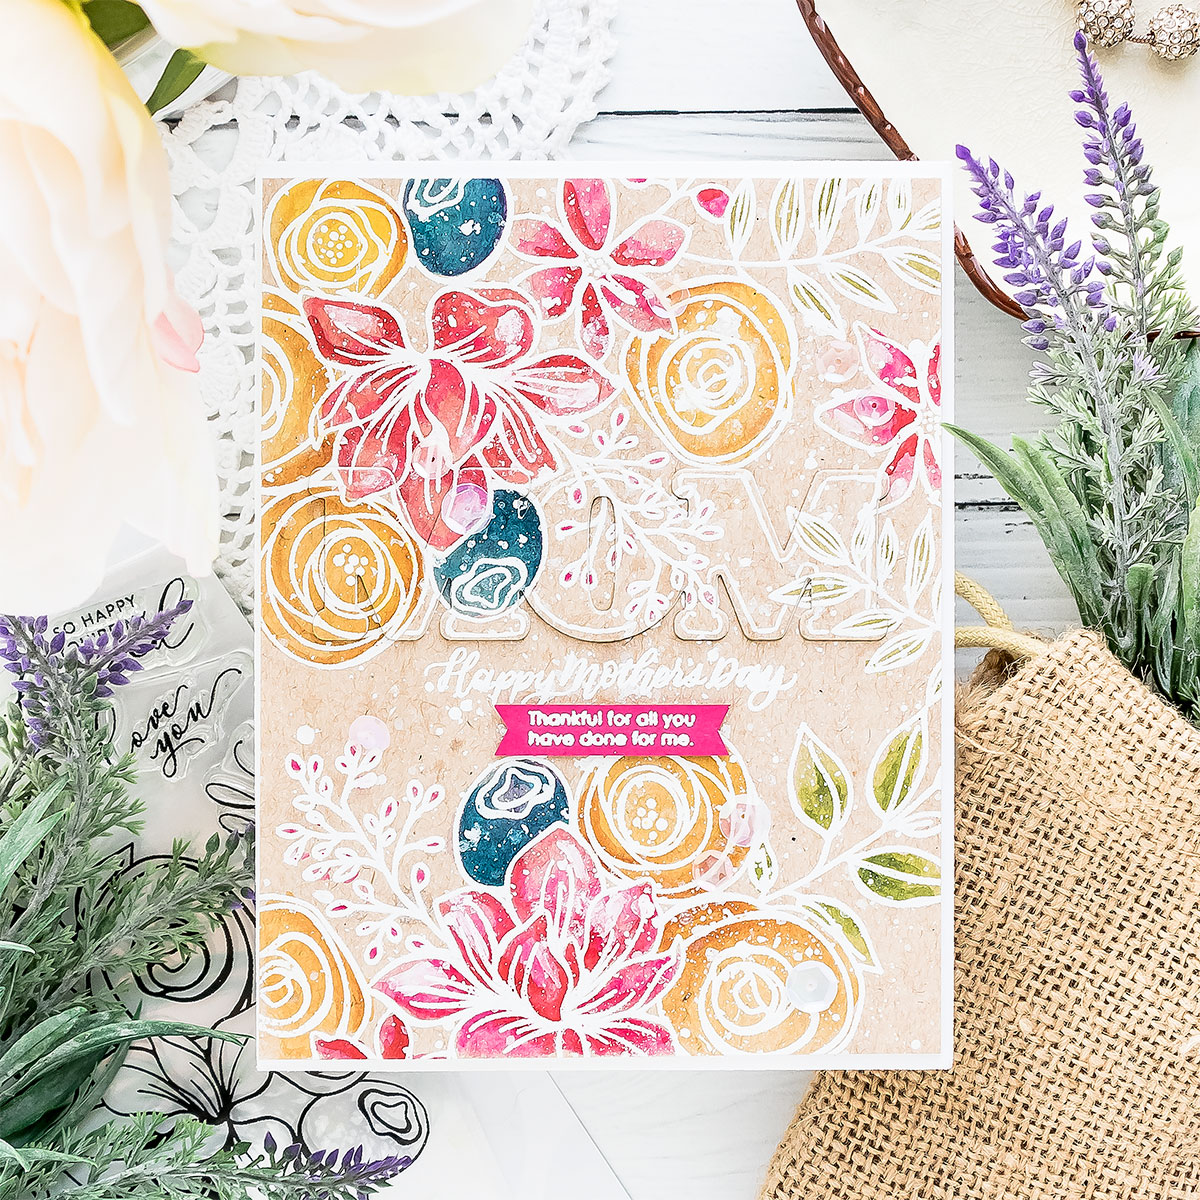
In this episode, I’m sharing an easy and messy watercolor floral card Mother’s Day card using some older goodies from Simon Says Stamp. I know how much you enjoy watching tutorials using not only new but also older products so I’m hoping you’ll find this video useful.
The main stamp set I’m using today is the Sketched Flowers 6×8 clear stamp set by Simon. I also have a “Happy Mother’s Day” sentiment stamp from another stamp set, called Mom Flowers. I also used a sub sentiment from here, another sentiment for the inside of the card and also a coordinating die.
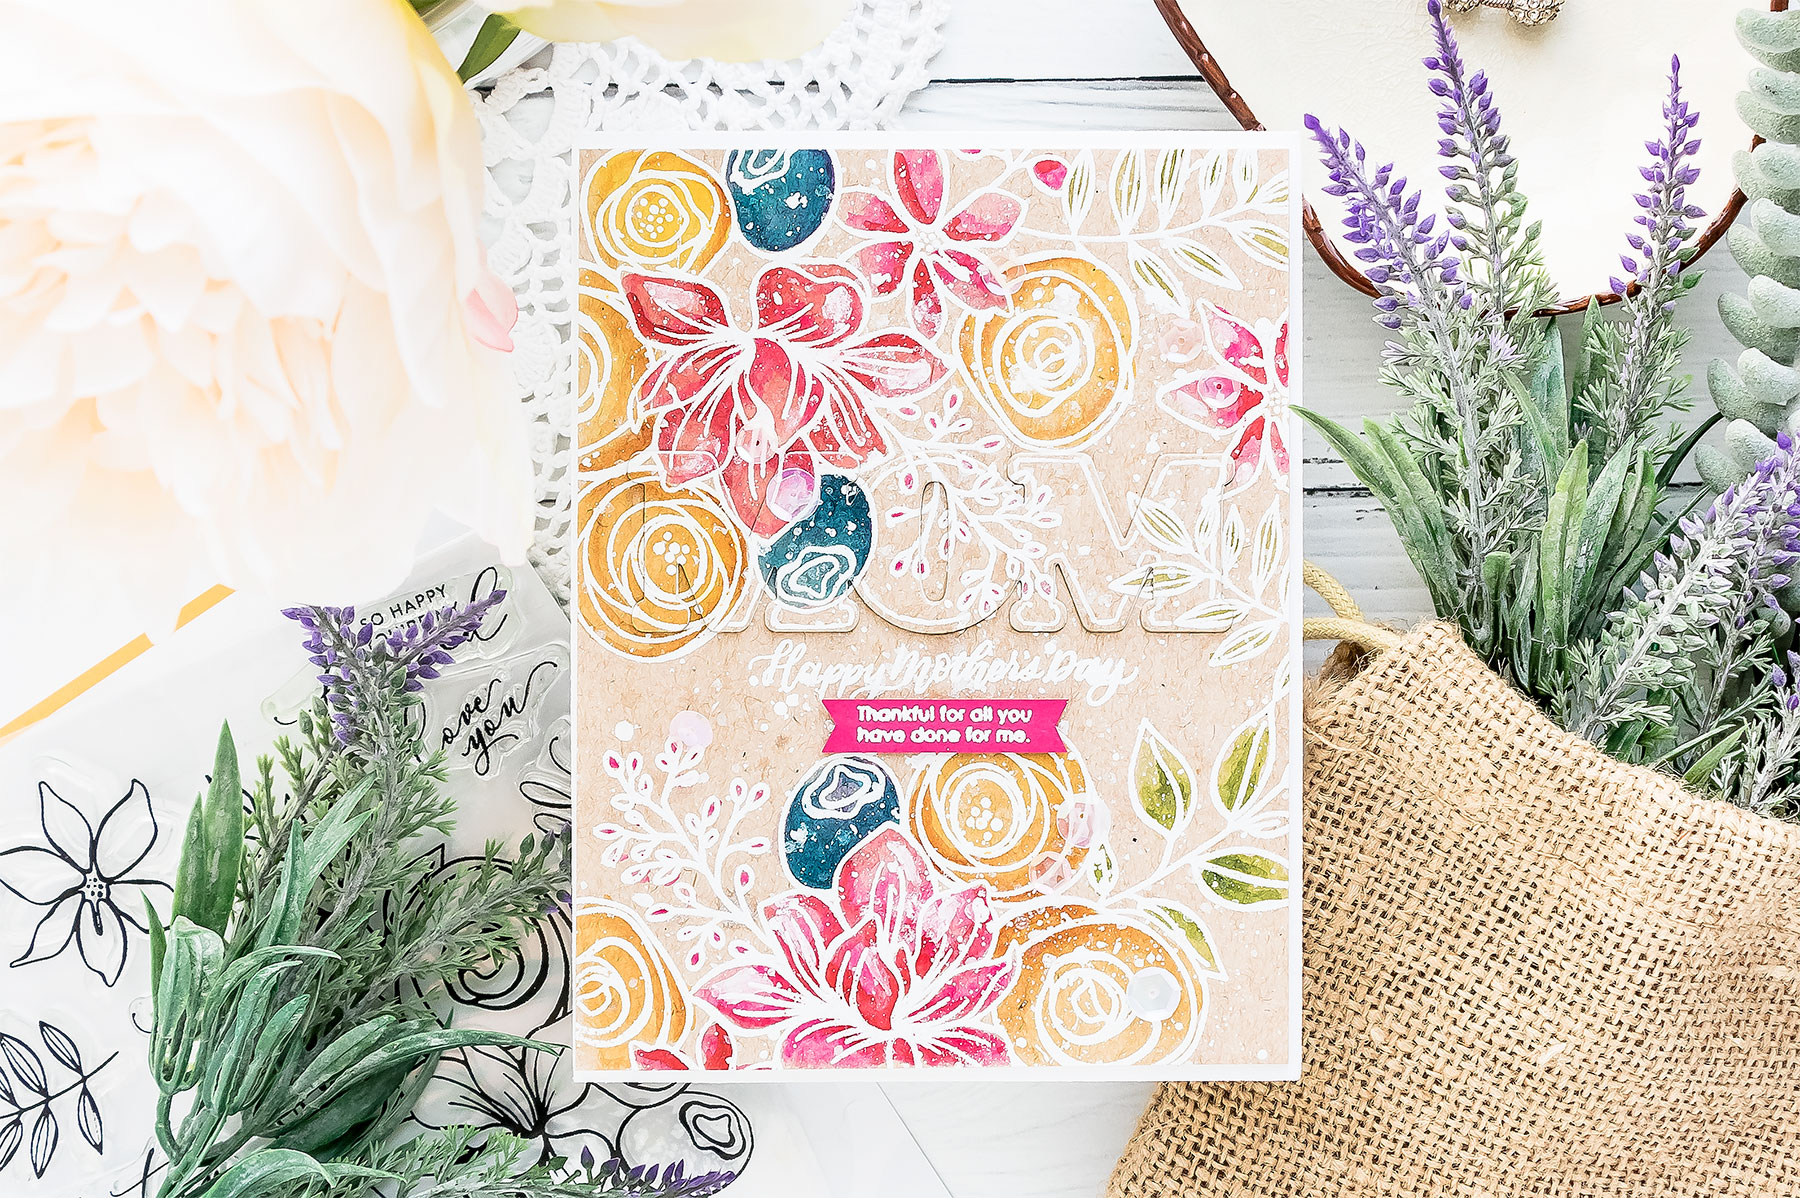
I wanted to do simple and messy watercoloring. I started working on this card by prepping cardstock for heat embossing. I wanted to heat emboss image outlines to simplify the watercoloring. When I have raised outlines to my images I find that I can watercolor faster, as I am not afraid to go outside the lines, the embossed outlines help me stay inside the image boundaries.
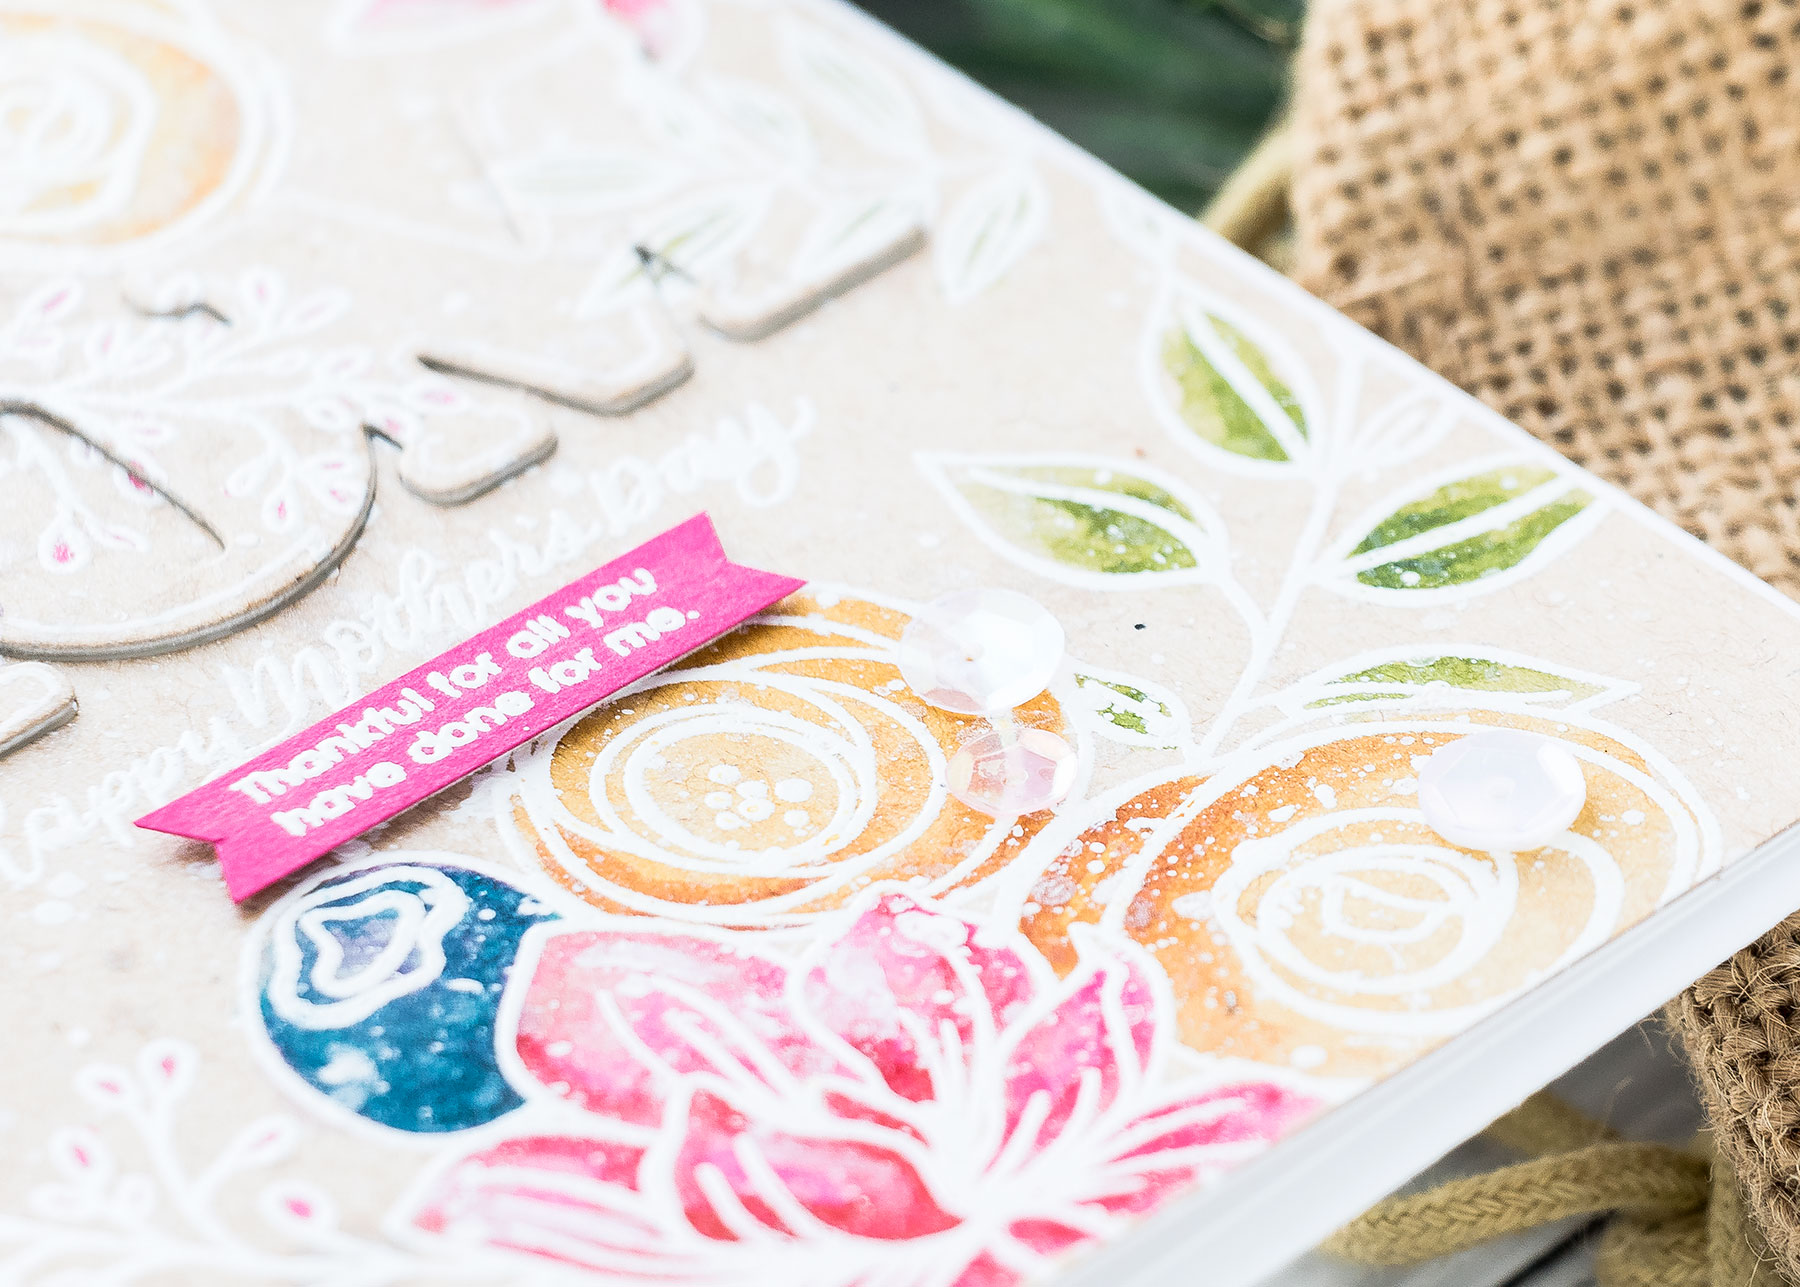
The paper I am using today is actually not a watercolor paper, it is regular cardstock. This is Neenah Desert Storm 80lb cardstock. I picked this paper for my card today because I wanted my watercoloring to have a nonwhite background to it, but I didn’t really want to spend the time coloring the background itself.
I’ve done it in the past – I would color the images themselves and would later come in and also color the background to whatever color I wanted. Results are usually phenomenal, but this is also a very time-consuming process. A way around it is to use colored paper right away.
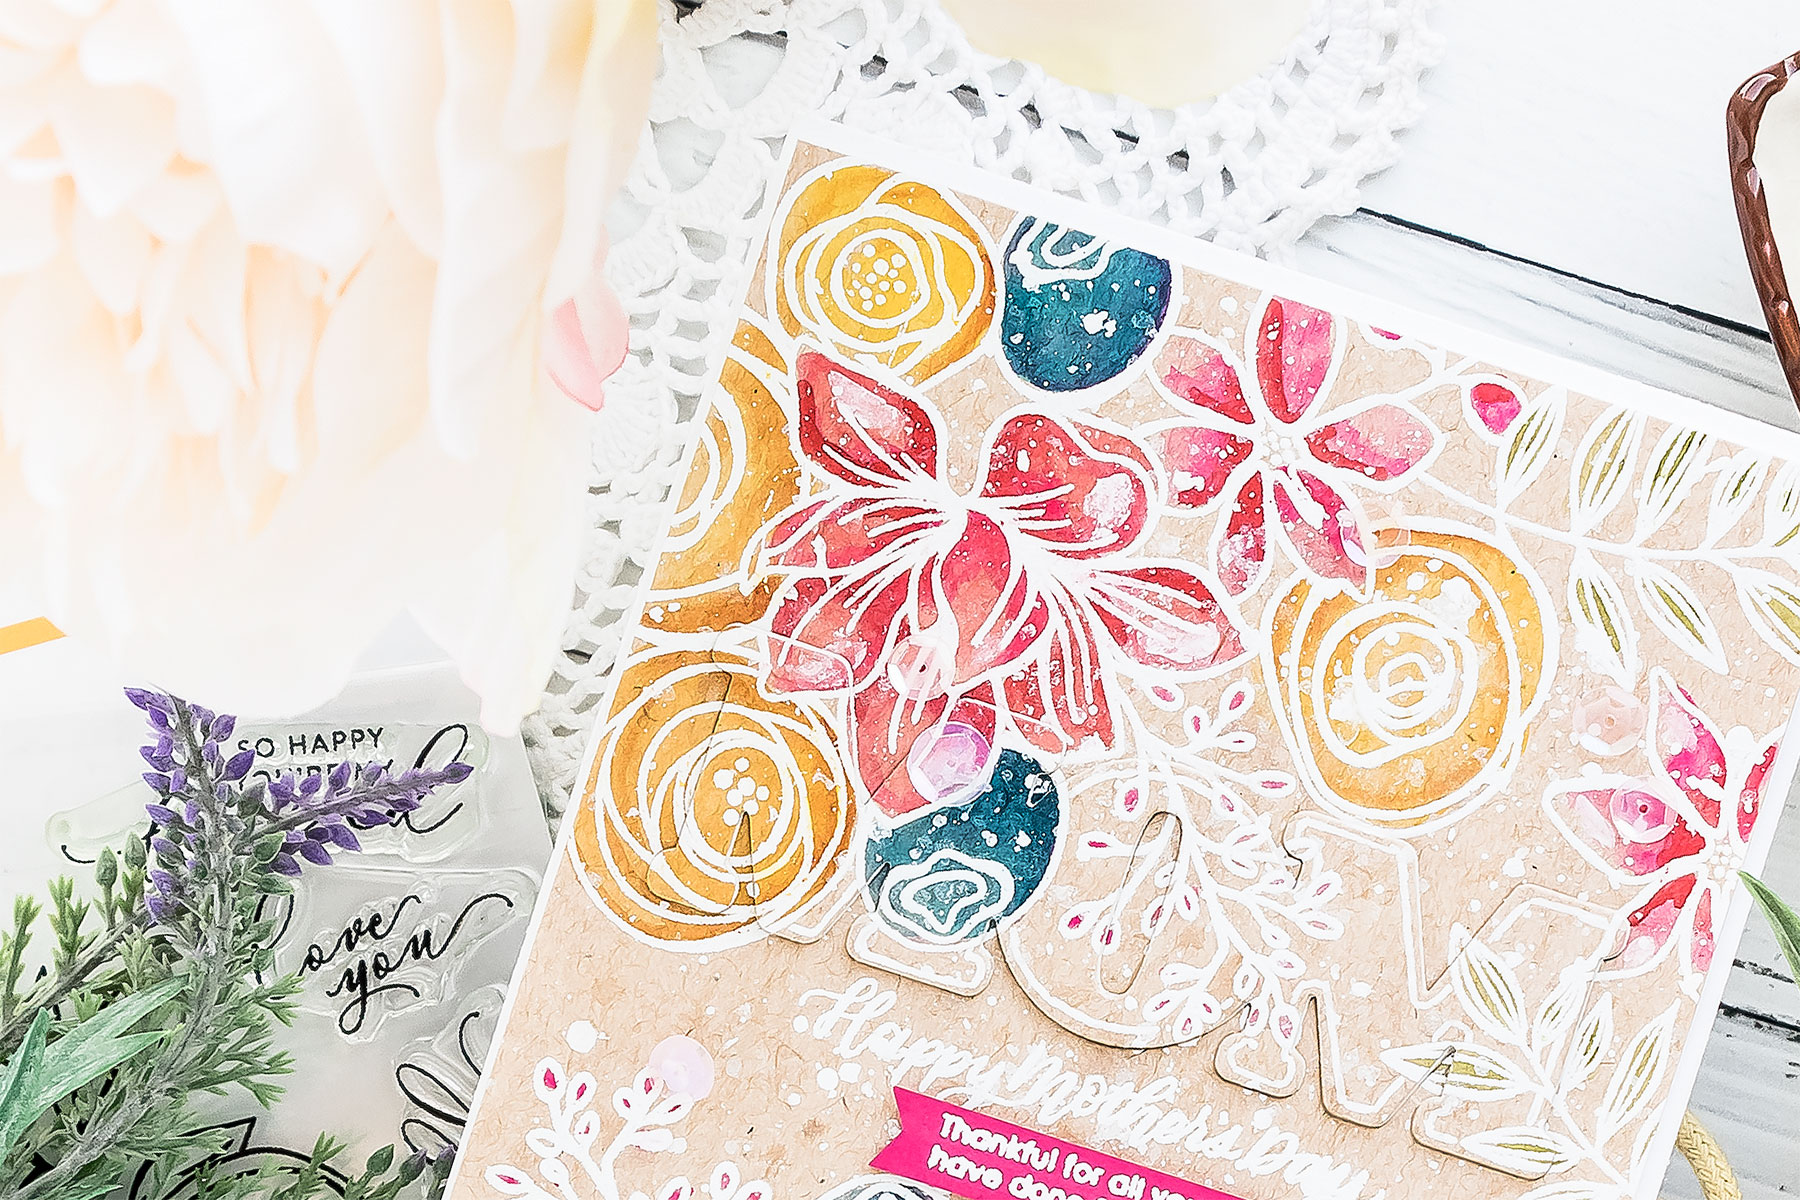
I stamped images and sentiment on the front panel, covered them with Hero Arts White Detail embossing powder and heat set. Now comes the fun part! Coloring! Similar to my previous Simon Says Stamp video I used my Daniel Smith Watercolors and a water brush.
You would think that watercolor would not show or would not work on kraft paper, but if in fact does work beautifully. Yes, the colors are not as vibrant and saturated as they would have been on white, the kraft color of the paper does dull some of the colors, but water coloring on kraft still works.
I started by coloring leaves using Serpentine Genuine and also Sap Green colors for some shading. Next, I used Quinacridone Rose, Opera Pink, Imperial Purple (although this is one of the colors that turned muddy, I later colored over it with Phtalho Turquoise), Cadmium Yellow Medium, Quinacridone Gold, and Quinacridone Deep Gold.
The trick to coloring on non-watercolor paper is using very little water. This kind of paper is not designed to take and hold water so you need to go easy on the amount of water you add with your watercolors. Using a water brush here helps me as I know exactly how much water is coming out and I can control the amount of water to make sure I’m not letting too much out and not over saturating my paper.
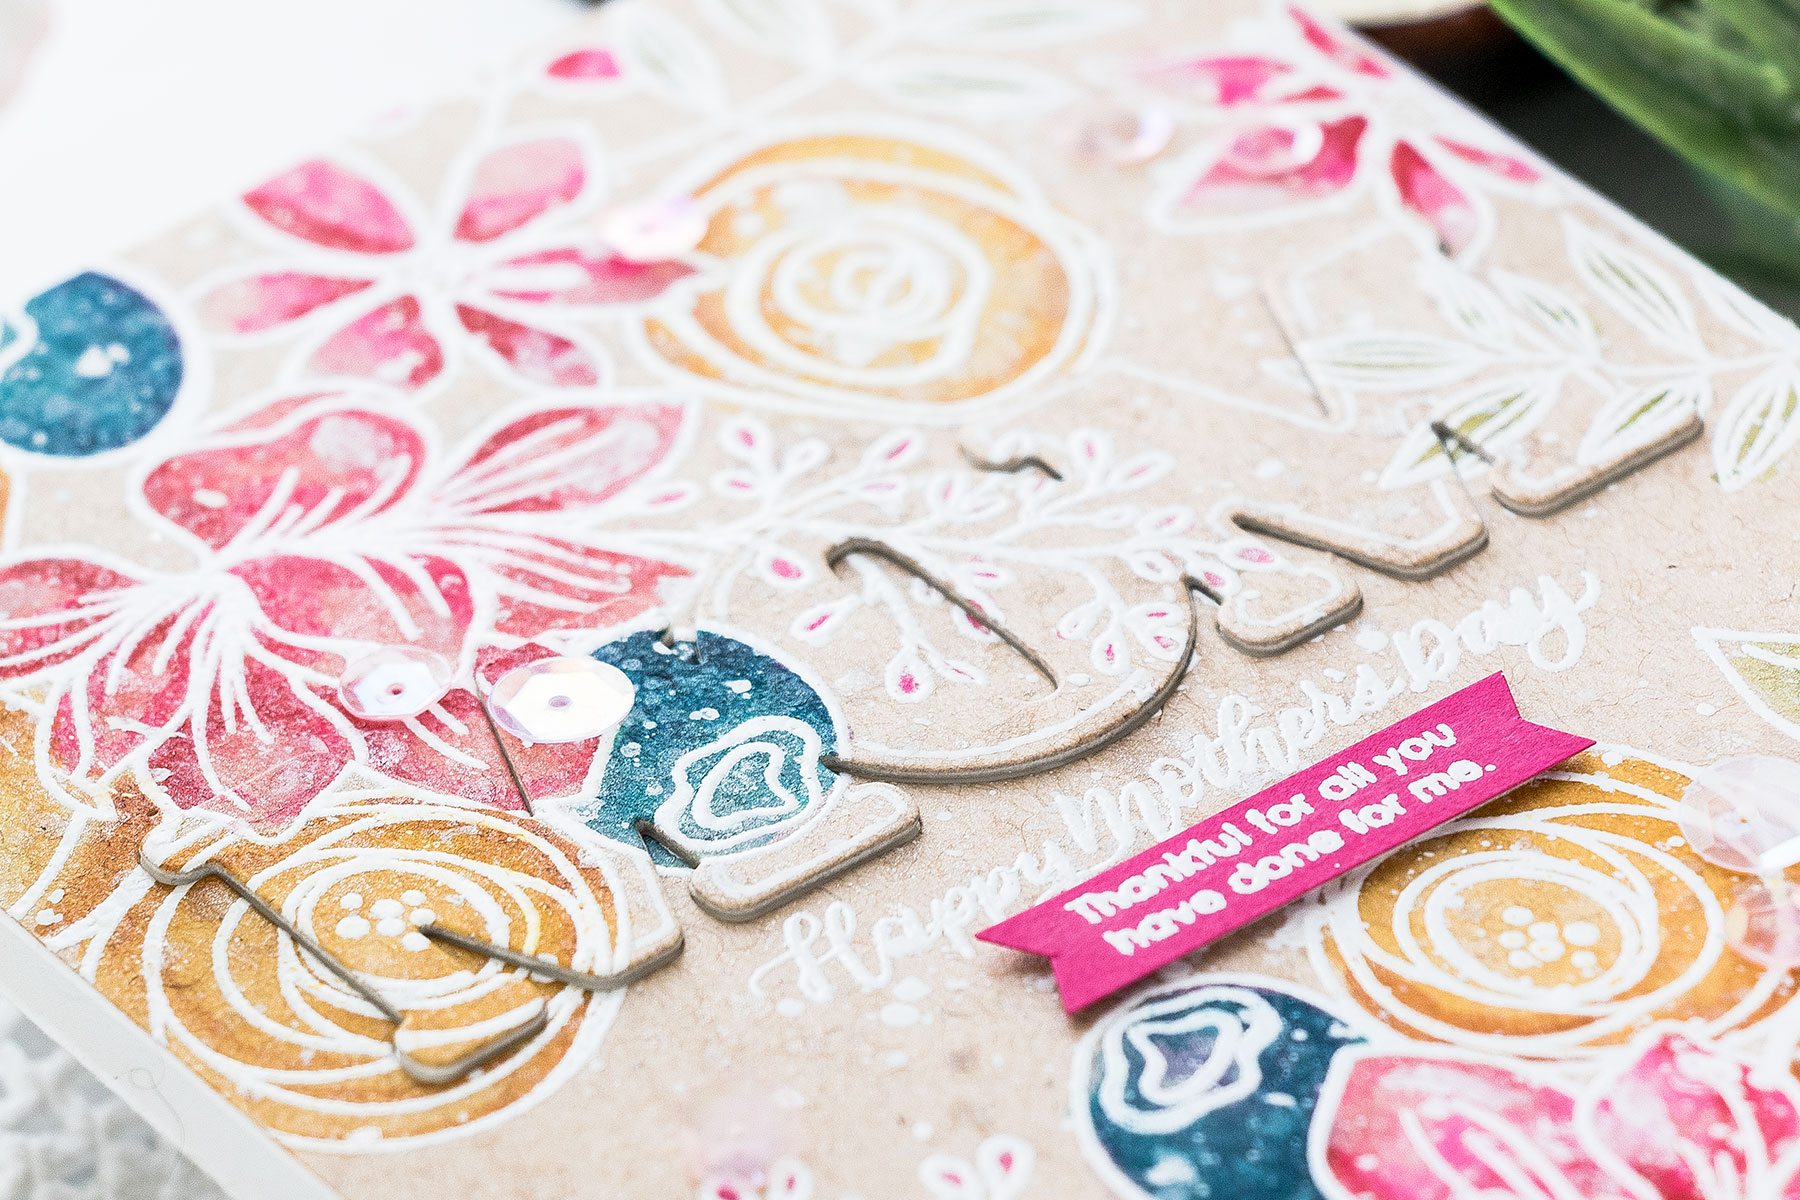
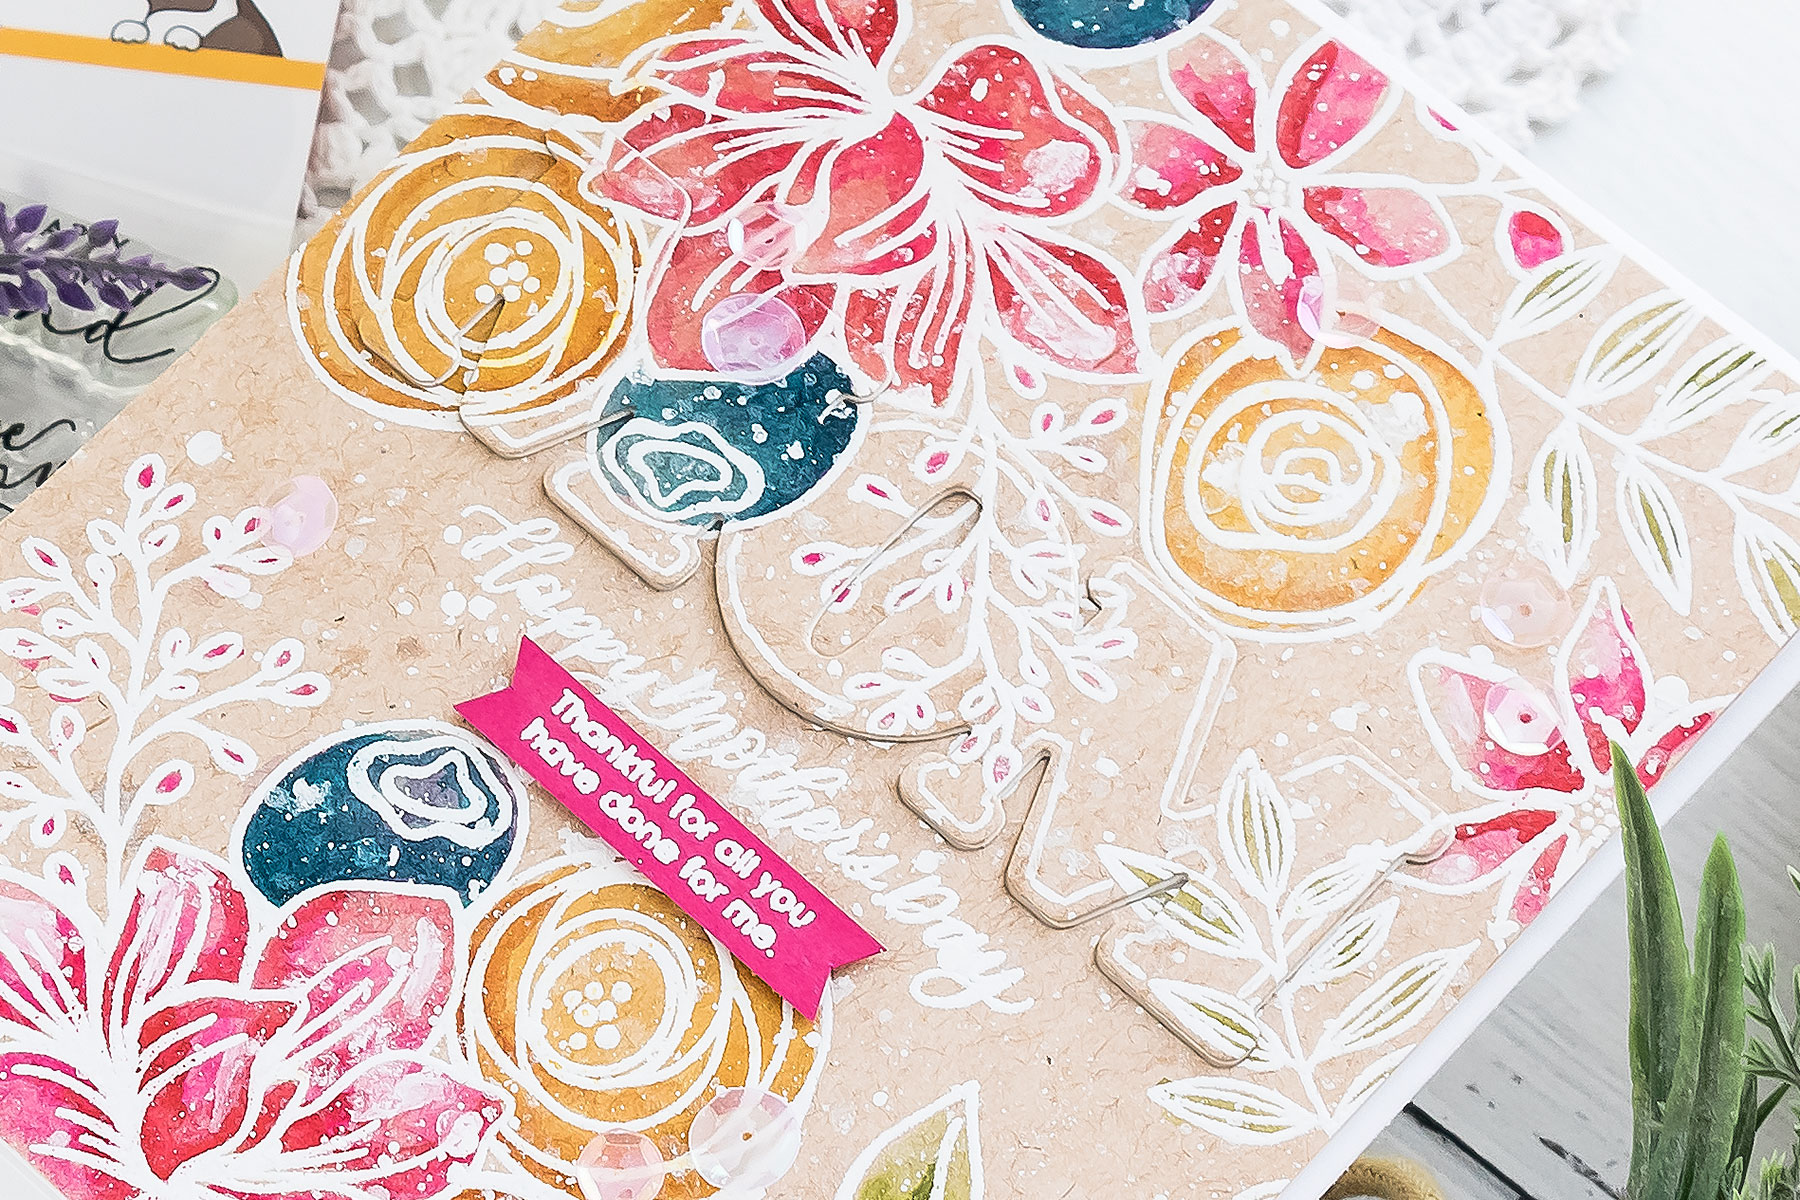
After the coloring was done I added a generous spritz of Hero Arts Iridescent Shimmer. This is step number one to make the watercolor piece messy. Next, I used some white acrylic paint, diluted it with water and splattered onto the card rather heavily.
At this point, I felt like the sentiment was lost on this card, so I decided to use a coordinating die from the Mom’s Flowers stamp set and die cut word MOM into this panel. My plan was to inlay it back in but with the help of thin foam adhesive to pop it up just a tad on the card.
I inlayed it back into the background and added the negative piece from the letter O back into the background to make it look solid.
Finally, I outlined the die cut letters to help them stand out a little bit on the card. The coordinating stamp is a solid one and while I could have used it, I didn’t want to have solid stamping on these letters, I only wanted an outline, so I drew one myself using a white pen. This ended up looking like the MOM outline was positioned under all of the florals on the background as if it was masked.
The messiness of this card disguised any of the imperfect hand-drawn lines on the word MOM and helped them blend and become a part of the design. I also used a few sequins from my stash to add some sparkle to the card front and finally stamped another message on the inside of the card.
I hope you will give this idea a try!
SUPPLIES
I’m listing the products I used below. Click on the link to go directly to the product. Where available I use compensated affiliate links which means if you make a purchase I receive a small commission at no extra cost to you. Thank you so much for your support!
 Simon Says Clear Stamps Sketched Flowers Shop at: SSS |
 Simon Says Clear Stamps Mom Flowers Shop at: SSS |
 Simon Says Stamp Bold Mom Dies Shop at: SSS |
 Simon Says Stamp Doll Pink Cardstock Shop at: SSS |
 Simon Says Stamp Embossing Ink Pad Shop at: SSS |
 Simon Says Stamp Large Grid Pad Shop at: SSS |
 Spellbinders Deep Sea Die Cutting Machine Shop at: SSS |
 Neenah Classic Crest 80 Lb Desert Storm Shop at: SSS |
 Neenah 110 Lb Solar White Cardstock Shop at: SSS |
 Hero Arts White Detail Embossing Powder Shop at: SSS |
 Hero Arts Heat Embossing Gun Shop at: SSS |
 Hero Arts White Iridescent Shimmer Spray Shop at: SSS |
 Tsukineko VersaFine Vintage Sepia Ink Shop at: SSS |
 Daniel Smith Quinacridone Gold 5ml Shop at: SSS |
 Daniel Smith Quinacridone Rose 5ml Shop at: SSS |
 Daniel Smith Opera Pink Shop at: SSS |
 Daniel Smith Sap Green 5ml Shop at: SSS |
 Daniel Smith Serpentine Genuine Shop at: SSS |
 Daniel Smith Quinacridone Coral 5ml Shop at: SSS |
 Daniel Smith Imperial Purple 5ml Shop at: SSS |
 Medium Water Brush Shop at: SSS |
 EK Success Powder Tool Applicator Shop at: SSS |
 Misti Stamping Tool Shop at: SSS |
 White Fun Foam 12 Pack 9 x 12 Shop at: SSS |
 Sakura Classic White Gelly Roll Pens Set of 3 Shop at: SSS |
SAVE ME/PIN ME TO PINTEREST
Like this card idea? Be sure to save it to one of your Pinterest boards for future reference!
That’s a beautiful card! 🙂
So very beautiful!!
VERY PRETTY, Yana!!! 😉 Your card has that “artsy” feeling to it! ;)<3
Really Beautiful card!!!
Wow! I really like the blue flowers in there! Really helps the card to pop. I could see the color fade back as the video went on. Cool! And I really … really appreciate you sharing your (and the card’s!) process … how you “fixed” “mistakes” along the way, went with how the card was coming along and what you felt it needed. So many times I start out with an idea in mind and by the time I’m done with a card it’s completely different than what I planned at the start. The creative journey certainly involves going with the flow!!!! (A life lesson too!) I made a card a while back where, similar to your’s, I used a word die and cut into the image. I’m still not sure if I like it as the word I cut doesn’t stand out (just like your’s). I wasn’t sure what, if anything, I could — or wanted to — do to make the word more obvious but not take away from the image. I’ll keep your suggestion in mind and see if that’s something that might help the card I made (still can’t decide if it needs any help or to just leave it alone!!!!). Love to watch your watercolor … and pencil color … and ….!!!! Thanks so much, Yana!!!
Its amazing to watch you “work” Yana. I have to admit, I feel a ‘little intimidated’ at the thought of me using w/c’s on regular cs but after seeing your last 2 cards (and videos) I feel more inclined to try it. Like you mentioned the key is not to use too much water and I feel that the less you play with it on each image the better, so as not to over work the paper. TFS!
Hey Yana….I’ve watched this tutorial a couple of times as I’d love to recreate it. You mention in the YT tutorial that you used ‘THIN foam adhesive sheets’ from, I believe, Scrapbook Adhesives, but I cannot find this product in ‘sheets’. I LOVE using their THIN 3D adhesives squares and in fact, I even emailed Scrapbook Adhesives about a year ago asking them if they would consider making the same low profile foam adhesive in ‘sheet format’. I would so appreciate hearing from you with respect to what foam adhesive sheet you used in this tutorial. Thanks, so much, Yana!